October 13, 2020
Planning the Quilt Back
The quilt backing needs to be larger than the quilt top to allow extra for fabric that is taken up during quilting and for stabilization when using a quilting frame. Always add 8" to both the length and width measurements so you have an extra 4" of fabric all around.
Trim off the selvage of all backing fabrics. The selvage edge is tighter than the rest of the yardage and can cause puckering or inward curving in your finished quilt if it is used as a part of the backing.
Backing fabrics should have the same care requirements as the quilt top. It should be preshrunk if the quilt top fabrics were. Although muslin is an inexpensive option for a quilt back, keep in mind that it shows every quilting detail and does little to enhance the beauty of your finished quilt. Remember--you will see the back of the quilt when you're using it. A coordinated backing offers more eye appeal.
WARNING: Bed sheets for quilt backings aren't recommended! Although it's tempting to use a bed sheet because of its size, sheets don't make good quilt backs. The thread count is much higher in sheeting than in common quilting fabric. The tighter weave causes the needle to break the sheet's threads when it pierces through, rather than pushing between the threads as it does with quilting fabric. It leaves holes and diminishes the stability of the sheet.
To piece your quilt backing, use 1/2" seam allowances for added stability. Sew the pieces together along a pair of long edges. Press the seam allowances open.
Determining Backing Yardage
First, figure out your backing yardage based on the size of your quilt top. You can piece together backing fabric using horizontal and vertical seams and using different configurations, so following the guide below will help you figure out which way uses the least amount of fabric for your preferred piecing method.
For Quilts Less Than 34" in Width and Length
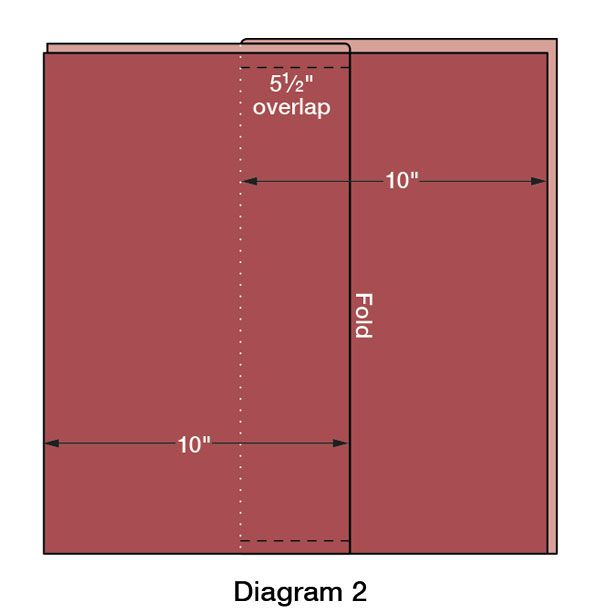
For a very small quilt that has either a width or length of less than 34", you can use a single piece of 42"-wide fabric for the backing. This width will cover the 34" dimension plus the additional 8".
- Quilt top dimension + 8". Divide by 36" to determine the yardage necessary.
- Example for a 28" square quilt top. 28" + 8 = 36". 36" divided by 36" = 1 yard.
For Quilts 40" to 60" in Width
If your quilt top is wider or longer than the width or length of your backing fabric, you will need to piece the backing. If seams are necessary, you need to decide whether you want them to be horizontal or vertical on the back of the quilt. If your quilt is 40 to 60" wide, horizontal seams save on yardage.
- Quilt top width x 2 + 12. Divide by 36" to determine yardage.
- Example for a 47"x74" quilt top: 47" x 2 = 94". 94" + 12 =106". 106" divided by 36" = 3 yards.
TIP: Manufacturers offer fabrics in widths of 60", 90", and 108", but they are available in a limited color and design assortment.
For Quilts 61" to 80" in Width
If your quilt is wider than 60", you may use one or two vertical seams to piece the backing.
- Quilt top length x 2 + 12. Divide by 36" to determine yardage.
- Example for a 70"x84" quilt top: 84" x 2 = 168". 168" + 12 =180". 180" divided by 36" = 5 yards.
For Quilts 81" to 120" in Width
A quilt 81 to 120" requires a backing that is pieced with vertical seams.
- Quilt top length x 3 + 18. Divide by 36" to determine yardage.
- Example for a 95"x110" quilt top: 110" x 3 = 330". 330" + 18 =348". 348" divided by 36" = 9-2/3 yards.
Tips for Choosing and Preparing a Quilt Backing
- Cut and piece the quilt backing larger than the quilt top, adding at least 8" to both the length and width measurements.
- If you're concerned about the quality of your hand or machine quilting, choose a busy print that will camouflage your stitches.
- A pieced backing with many seams is easier to quilt by machine than by hand.
- Choose fabrics with the same care requirements as the quilt top. If fabrics in the quilt top were preshrunk, fabrics for the quilt backing should be too.
.....................................................................................................................................................................................................................
October 12, 2020
Three Ways to Baste Your Quilt
Layering the quilt top, batting, and backing before quilting is an important step in preparing your project for quilting. Here are three ways to baste your quilt:
Assemble a Quilt Sandwich
Quilters call the process of assembling the three layers (quilt top, batting, and backing) as making a quilt "sandwich." It is best to assemble the layers on a large, flat surface where the entire quilt can be spread out. If you are sending your quilt to a professional machine quilter, follow their instructions on how to prepare your quilt. Most machine quilters want you to have the backing pieced and all three layers separate.
1. If the quilt backing is pieced, press all the seam allowances open. This will prevent bulk when quilting.
2. Place the quilt backing wrong side up on a large, flat surface. Tape, clip, or otherwise secure the quilt backing to the work surface.
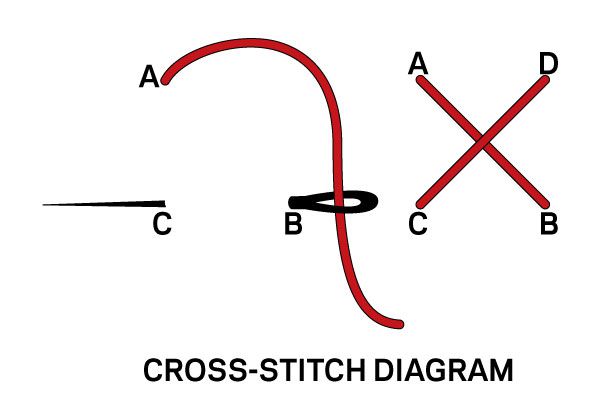
3. Center and smooth the batting in place atop the quilt backing. If desired, baste the batting and backing together with a single, large cross-stitch in the center to prevent the layers from shifting.
4. Center the quilt top right side up on top of the batting. To be sure that it is centered, fold it in half with right sides together. Align the center fold of the quilt with the center of the batting, then unfold the quilt top and smooth out any wrinkles.
5. To check that you have not stretched or pulled the quilt top out of alignment during the layering process, place a large square ruler in one corner. The edges of the ruler should be flush with the quilt top's edges. Take care not to stretch the quilt top out of shape.
Three Methods for Basting
Baste all the layers together, beginning in the center. Be careful not to shift the layers, and work toward the edges, smoothing fabric as you go.
Pin-Basting
Machine quilters generally pin-baste because it is easier to remove pins than basting threads.
Pin the three layers together with rustproof safety pins, making horizontal and vertical lines through the center of the quilt sandwich to form quadrants on the quilt top. Add pins over the entire surface of the quilt top at 3" to 4" intervals. (Tip: I use the quilt block pattern or palm of my hand to determine the spacing of pins).
Spray-Basting
Basting sprays are best for small quilt projects such as table runners or wall hangings. Follow the manufacturer's directions to adhere the layers to one another. Take care not to overspray, which can lead to a gummy buildup over your work surface and quilting needle.
Thread-Basting
This method is the most common for hand quilters because it works better in a hoop than pins do.
With stitches about 2" long, baste the three layers together by stitching horizontal, then vertical lines through the center of the quilt sandwich to form quadrants on the quilt top. Next, baste diagonally in both directions. Add basting stitches 3" to 4" apart over the entire surface of the quilt top.
..............................................................................................................................................................................................................................................................
October 11, 2020
Choose the Best Batting for Your Project!
Your beautiful quilt top deserves a batting that will enhance it and be suited to its use. Quiltmakers historically used whatever natural fibers were on hand. Today's quilters, however, can choose from a variety of natural, synthetic and blended products that have a variety of characteristics.
Batting is the soft layer between the quilt top and backing that offers warmth and gives a quilt dimension and definition. Because batting comes in various thicknesses and fibers, it can also affect its drapability. The batting you choose should complement the nature and use of your finished quilt. Check package labels, talk to other quilters, and test samples to find a batting with the qualities that are important for your project.
Manufacturing Process
All battings start out as individual fibers that are carded and processed into a sheet or web. Without further treatment, these unbonded fibers would come apart or clump together inside a quilt, making them difficult to use. Untreated batting also would be susceptible to bearding or fiber migration, which is when batting fibers come through the quilt top.
To make a sheet or web of batting more stable, and hence more usable, it's either bonded or needle punched-treatment processes that result in battings with different characteristics.
Bonding
Manufacturers chemically bond batting fibers by adding a resin or using heat. Resin bonding helps wool and polyester battings resist bearding. Bonded battings usually have a higher loft and airier appearance than needle-punched battings. A bonded batting holds up well with use and does not require extensive quilting. If a batting is not bonded, it can be difficult to work with and have an uneven appearance.
Needle Punching
This treatment process involves running a barbed needle through the batting fibers to tangle them, which provides some stability to the web. For additional stability, a scrim-an extremely thin nonwoven substrate layer-can be added to a batting sheet or web before it's needle punched. The loft of needle-punched batting varies according to the number of layers used in the manufacturing process. The fewer the layers, the lower the loft; the lower the loft, the better fine-quilting details can be seen.
Bleaching
Natural batting fibers are ecru in color. They can be bleached to create bright white battings for use with white or light color fabrics
Batting Qualities
Carefully read the manufacturer's label to learn the specific qualities of a particular batting. Knowing what qualities you desire can make a significant difference in your satisfaction with the finished quilt. You can learn about various battings by looking at other quilters' finished projects and asking the makers what battings they used. Because same-type battings from different manufacturers can vary in qualities and results, keeping records of the battings you use and your personal preferences will help you make future selections.
Bearding
Some battings beard, or have fibers migrate through the quilt top, more than others. Bearding is particularly a problem when light battings are used with dark fabrics, or the reverse, so choose your batting color according to your quilt color. Also, test battings using similar quilt fabrics, thread, quilting technique, and, if desired, washing process. Though bearding can be attributed to a batting, it also can be caused by loosely woven fabric. And finally, make sure you're not using an untreated batting.
Drapability
The density or sparseness of the quilting and the loft of the batting will affect the drape, or relative stiffness or softness, of a finished quilt. In general, a thinner batting and denser quilting will result in a quilt with a softer drape. A thicker batting in a quilt that has been tied, rather than heavily quilted, will have less drape.
Grain Line
Batting can have a grain line just as fabric does. The lengthwise grain is stable and doesn't have much give; the crosswise grain will be stretchy. In order to prevent unwanted distortion, match the lengthwise grain of the batting and backing. Quilt the lengthwise grain first to limit distortion.
Loft
The thickness of a batting is referred to as its loft. Differing loft levels result in differing appearances in a finished quilt. Keep in mind that the higher the loft, the less drapability in the finished quilt.
Resiliency
A batting's ability to regain its original shape is its resiliency. A resilient batting, such as one made from polyester, will spring back when unfolded and resist creasing. This may be a desirable feature if you want a finished quilt with a puffy appearance. Cotton battings are less resilient and more prone to creasing, but some of their other qualities may compensate and make their use desirable. A cotton/polyester blend batting is somewhere in between in terms of resilience.
Warmth
Cotton battings have the ability to absorb moisture, thus offering cooling comfort in the summer and a natural warmth in the winter. Wool battings provide warmth with little weight. Synthetic fibers, such as polyester, lack the breathability of natural fibers.
Washability and Shrinkage
Polyester and wool battings resist shrinkage; cotton battings can shrink 3–5 percent. Check the package label, then decide whether to preshrink a batting. Some quilters prefer the puckered, antique look that comes from a batting that shrinks after it's been quilted.
Quilting Method
Do you plan to quilt your project by hand or machine, or are you tying it? Do you want to use perle cotton and a utility stitch to create a folk art look?
The batting type dictates the spacing between rows of quilting, so before you select your batting you should determine whether you want dense or sparse stitching. The manufacturer's label will specify the maximum stitching distance. If you exceed this distance when quilting, your batting will shift and bunch up later, causing your finished project to look uneven. If you want to tie a project, select a batting that specifies a wide distance between stitches.
Intended Use
Consider how your finished quilt will be treated. Is it a baby quilt that will be washed and dried extensively? Will it be placed on a child's bed and get pulled and tugged? Are you making a wall hanging that needs to maintain sharp, crisp corners?
Or are you making a quilt that you want to drape loosely over a bed and tuck beneath the pillows? Is it an heirloom project that will be used sparingly and only laundered once every few years? Or is it a decorative item that will never be washed? Is it a table runner that needs to lie extremely flat? Answer these questions to determine which batting is best for your project.
Desired Appearance
Think about loft. Do you want your quilt to be big and puffy or lie flat? When do you plan to wash and dry your quilt fabrics and batting? If you want an antique appearance, don't wash and dry them separately but rather wait until the project is finished.
Fibers
Consider whether you want natural, synthetic, or a blend of fibers. Each has different qualities.
Size
Quilt batting needs to be larger than the quilt top to allow for take-up during quilting and for stabilization when using a quilting frame. Add 8 inches to both the length and width measurements to allow an extra 4 inches of batting around the entire quilt.
..............................................................................................................................................................................................................................................................
September 20, 2020
Conquer Your Unfinished Projects for Good!
If you're like me, you may have some UFOs that have been hanging around for awhile. For those of you who are unfamiliar with the term, a work in progress (or UFO which stands for unfinished object) is very common among quilters. Even quilters who have only been quilting a few years may have a few laying around. A UFO or work in progress refers to any project you’ve started, but have stopped making progress on. It’s possible you ran out of fabric and had to put the project aside while you tracked down more. You may have lost interest in the project after a few months and pushed it aside for something new and more exciting. You may have even got stuck on a step of the project and decided you didn’t have the time, energy or skill set to continue with it.
Personally, I have the attention span of a squirrel and when I get started on a project, I find several others that need to be finished and before I know it, after overthinking which project to pick up first, it's time to go to bed.
There can be a multitude of reasons you may have an unfinished project. And there’s no shame! But for many of us, when UFOs start piling up, it can cause some problems. First of all, UFOs take up space in our sewing rooms. You may have them in boxes and bags and sitting on shelves or in closets. That space can start to eat into your fabric storage space and can cause visible clutter. Those unfinished projects can also cause stress or guilt. Have you ever wanted to start a new project but then remembered the pile of unfinished ones waiting for your attention? Did you ever buy fabric for a project but haven’t even cut into it yet because you stopped working on the quilt? Having a long list of unfinished projects can add extra weight to your quilting to-do list and make you conflicted about where your precious quilting time should be spent. UFOs can also block your creativity. If you’re weighed down by all the projects waiting for your attention, you may not feel completely free to start new passion projects or try a new technique.
Of course, we know it’s impossible to keep your UFOs from piling up. So many quilters are excited to start new projects or just don’t have enough time in the day to finish everything they start. We totally understand! Being in a quarantine situation this year has provided many of us with the extra time we needed to get back to those UFOs. And BRAVO to those of you working on them and ultimately completing them!! If you need some extra incentive to get to those UFOs, we propose that you challenge yourself.
There is still time! Make a goal to finish a realistic number of projects before the end of this year. We have 3.5 months left in 2020 and enough time to get to a few if not several of your UFO's.
1. Make a list of all the projects that you want to finish this year. You can choose from any of your UFOs. You can also add projects that have been on your long-time to-do list to the list. Embroidery, knitting, crochet, scrapbooking, and painting – basically anything creative -- can count toward your list too! And don't feel confined to only making one list! Feel free to make multiple lists. One project list could be those just waiting to be quilted. One list may be for in-progress projects, and other lists may be for charity quilts, blocks-of-the-month, or kits.
At the end of each month, go through your list(s) and check off the completed projects or move them from, for example, the in-progress list to the waiting to be quilted list. That way, you can see your progress and by the end of the year, you'll have made a significant dent in your stack of UFOs.
These are rough rules – we really want to make this work for you, so use these ideas however is the most helpful to you!
Before you get started making your list, we wanted to provide a few more tips for finishing your UFOs. Being accountable is key! Here are a few ideas:
Get Organized: The first step in tackling your UFOs is to get organized. You won't make progress on your projects if you're constantly searching for fabrics and supplies needed for your UFOs. And you'll lose momentum fast if you can't get out your projects and sew in your free time. Make sure all your UFOs are stored in easy-to-find places and that all fabrics, pieces, tools, and instructions for each project are on hand.
Set Goals: Next, set progress goals for each project (we suggest writing them down and hanging them in your sewing room). It can be a larger goal such as finish a quilt by Christmas, or smaller steps such as finishing two blocks a week. Make sure your goals are clear and attainable. If you set goals that aren't realistic to your time and life, you'll only be frustrated when you miss the deadlines.
Reward Yourself: Sometimes a finished quilt isn't all the push you need to complete a project. Try rewarding a finished quilt with a little prize: a trip to the local quilt store, a meal at a favorite restaurant, or fresh flowers for your sewing room! Looking forward to a treat may help you make progress on a project even when you don't feel like working on it. You may even tell yourself that you can't start a new quilt until you finish the UFO.
.............................................................................................................................................................................................................................................................
August 25, 2020
Ten Tips for Choosing Fabrics
When we ask quilters what they struggle with most, choosing fabric is always toward the top of the list. Here are ten great tips to help you find the color palettes and combinations that work best for you.
First, let’s talk about inspiration. Inspiration is everywhere, but we have some specific suggestions for places to look to help get you started.
1. Start with a photo that you love, whether it’s one you’ve taken or one you’ve seen online. These photos can be from your vacations, from magazines or advertisements or artwork. If you find yourself drawn to a particular image because of the color palette, why not try pulling together fabrics that are similar?
2. Use a multicolor fabric print to pull together colors. Whether you plan to use the particular print in your quilt or simply use it for color inspiration, it’s a great way to get started. When the fabric was created, the designer already did the work of creating a color palette for you! Use the colors from the fabric to pull a palette of your own.
3. Look at the selvage of the fabric for a color palette. If you aren’t familiar with fabric selvages, take a look along the bottom edge of fabric. You’ll usually see the name of the fabric line, the fabric designer's name, and some color dots. The color dots are each individual ink color used in the fabric printing process. If the fabric has more than one color, you’ll see the color dots, which you can use to help pull together a palette.
4. Dive into color theory. You might remember learning about color theory when you were in school, and that theory hasn’t changed no matter how long ago you learned it! There are a lot of great resources for learning color theory, including using a color wheel or reading books on the topic. Color theory is a very specific way of learning about color, but if you need a little help getting started, it can be an excellent resource.
Now let's look at tips for mixing and matching fabrics to make a beautiful quilt.
5. Once you’ve figured out a color palette you want to use, think about the scale of the prints in your project. In order to create a nice visual push and pull, it’s great to have a range of large, medium, and small prints. This will add nice texture and movement to your quilt. If you're averse to large prints, try adding a small stripe or floral. Sometimes even a small print can make an impact against tone-on-tones. (There are a few exceptions to this rule. If you're making a quilt that is all solids, obviously this rule doesn't apply. If you're making a quilt with small pieces, choosing a large-scale print can overwhelm the small blocks.)
6. Up the contrast! Contrast means having a mix of light, medium, and dark fabrics. The best way to easily see if you have enough contrast is to take a picture of your fabric selection on your phone and change it to black and white. This will allow you to see the contrast variations without being distracted by the colors themselves. If all your fabrics are the same in contrast, you’ll have a quilt design that looks undefined and mushy.
7. Once you’ve selected your fabrics taking scale and contrast into consideration, think about where each of those fabrics will be placed in the pattern. Color and fabric placement can make such a huge difference in your quilt. Many times, a pattern has a secondary design you can highlight with your color placement, so it’s really fun to think about where your colors are going and what part of the design that will bring forward. You can do something similar by using computer programs such as Electric Quilt. Some patterns also come with coloring pages where you can color in different options for color placement.
8. If you’re feeling unsure about color placement, consider making a test block. Make sure you have enough extra fabric before you do this, that way you don’t run out when you make your actual quilt! If you don’t end up using the test block in your quilt, you can set it aside and practice quilting on that block later. Move forward with confidence in your fabric choices! And follow these tips for some extra fun when picking a palette.
9. Have a go-to color palette. We're all naturally drawn to specific color combinations (look at your wardrobe or home decor). If you're feeling stuck and unsure of what fabrics to pull, start with this signature color palette, then add in new colors or swap some out for a new combination.
10. Our last tip is to play around and have fun! On the next rainy day, go to your stash and start putting fabrics together. It's ok if you don't have a project in mind. If you make a combination you love, take a photo so you can remember it.
BONUS: Just remember that there are no rules. These tips can help you find the palettes and combinations that work best for you. If you like the fabric that you’ve selected, that’s all that matters.
Happy Quilting!!
..............................................................................................................................................................................................................................................................................................................................
August 24, 2020
Christmas Stars
Showcase stars composed of favorite holiday fabrics in a stunning wall quilt. Fabrics are from the Northern Light collection by Annie Brady for Moda Fabrics.
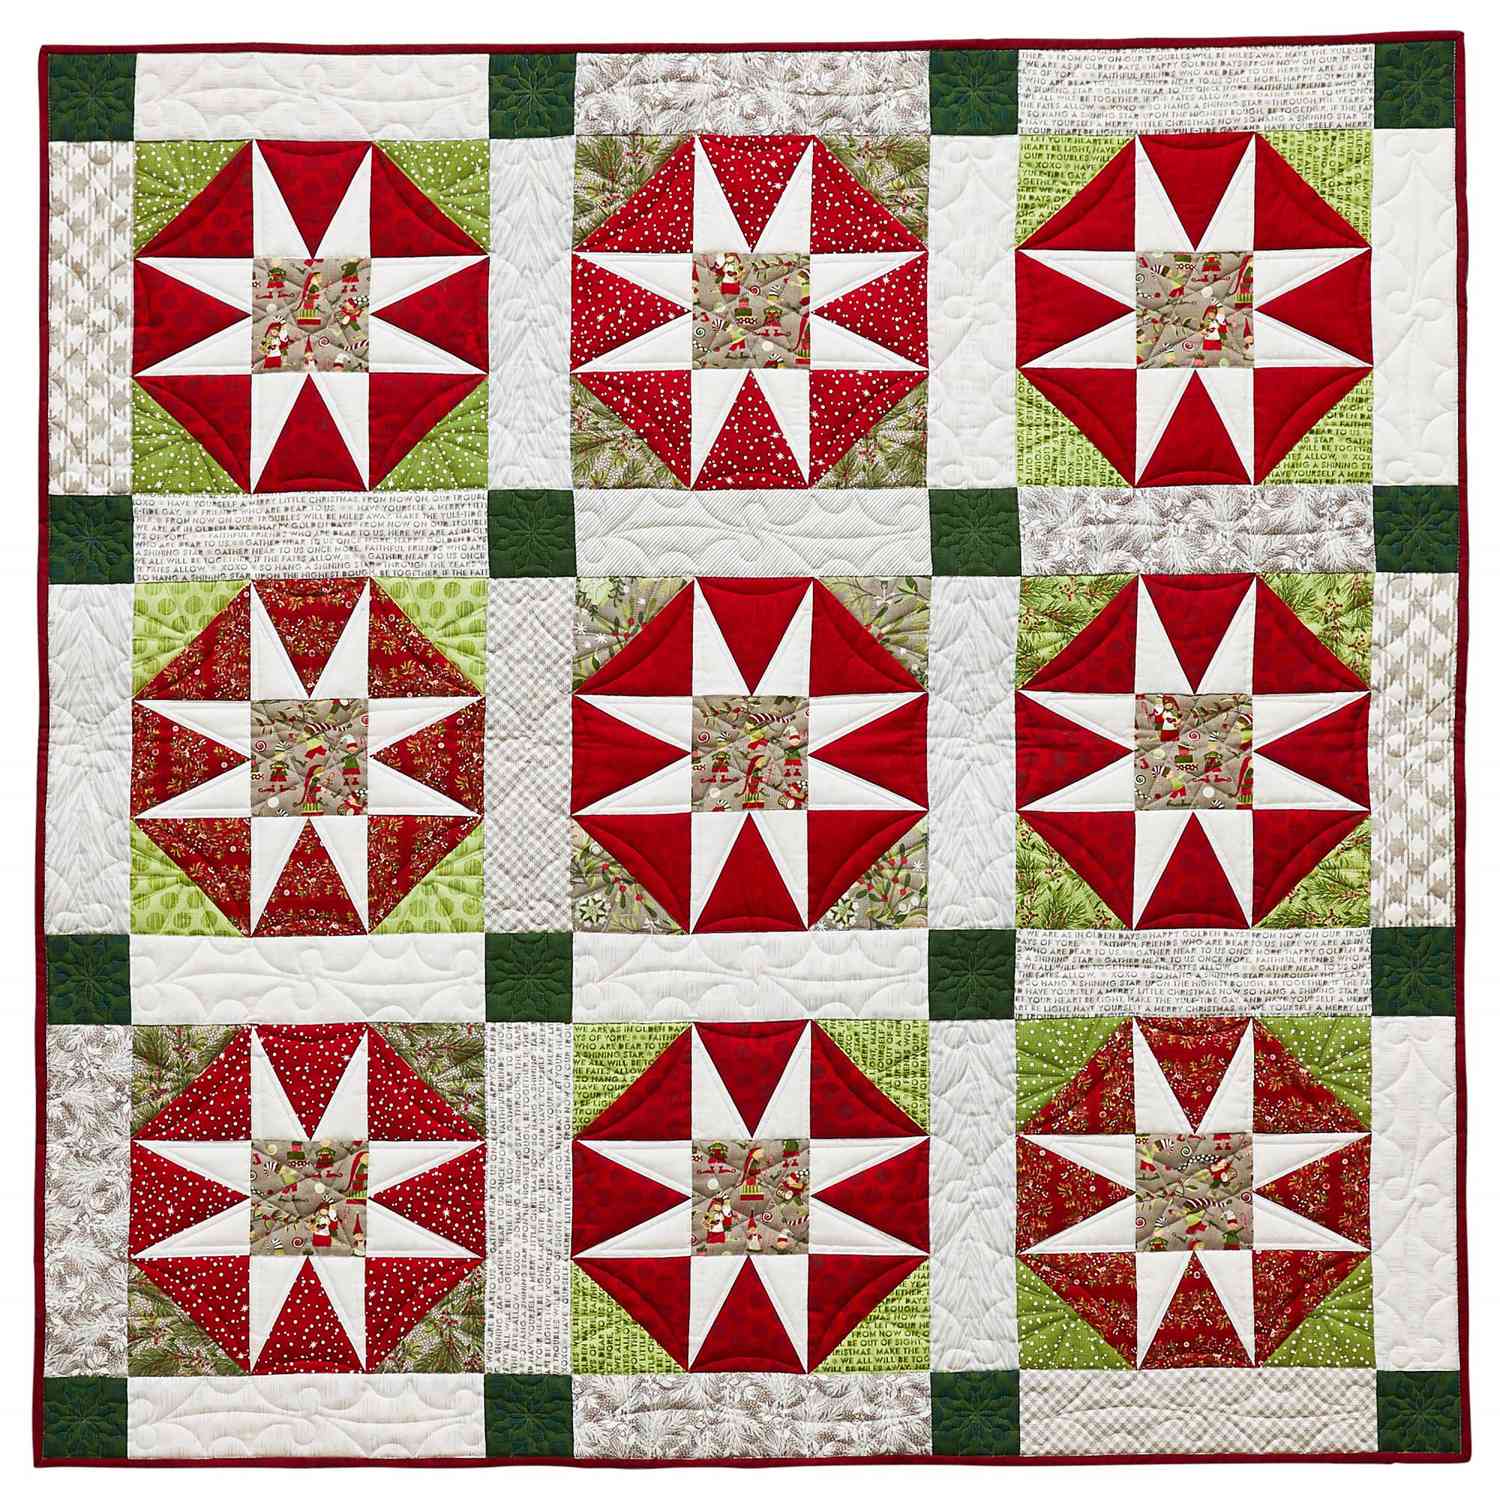
INSPIRED BY: Friendship Gathering from quilt collector Jody Sanders
QUILT TESTER: Diane Tomlinson
Materials
Yardages and cutting instructions are based on 42" of usable fabric width.
- 9—10" squares assorted green prints (blocks)
- 9—18×21" pieces (fat quarters) assorted red prints (blocks)
- 1/2 yard solid white (blocks)
- 1/4 yard tan print (blocks)
- 1/3 yard mottled green (sashing)
- 1 yard total assorted white prints (sashing)
- 1/2 yard mottled red (binding)
- 3-1/4 yards backing fabric
- 57"-square batting
FINISHED QUILT: 48-1/2" square
FINISHED BLOCK: 12" square
Cut Fabrics
Cut pieces in the following order.
From each assorted green print, cut:
- 2—4-7/8" squares
From each assorted red print, cut:
- 2—4-7/8" squares
- 4 of Pattern B
From solid white, cut:
- 36 each of patterns A and A reversed
From tan print, cut:
- 9—4-1/2" squares
From assorted white prints, cut:
- 24—3-1/2×12-1/2" sashing rectangles
From mottled green, cut:
- 16—3-1/2" sashing squares
From mottled red, cut:
- 5—2-1/2×42" binding strips
Assemble Blocks
These measurements include 1/4" seam allowances. Sew with right sides together unless otherwise stated.
Press seams in directions indicated by arrows on diagrams. If no direction is specified, press seam toward darker fabric.
1. Use a pencil to mark a diagonal line on wrong side of each assorted green print 4-7/8" square.
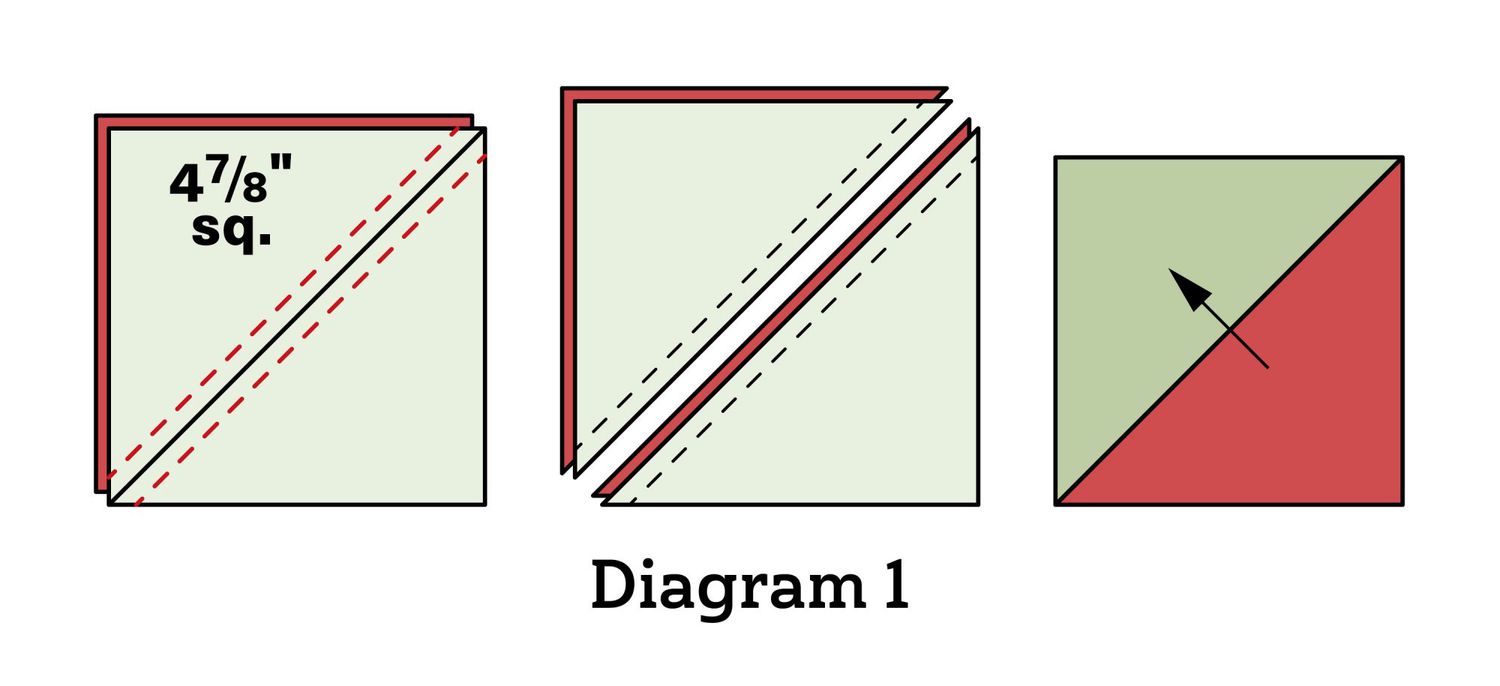
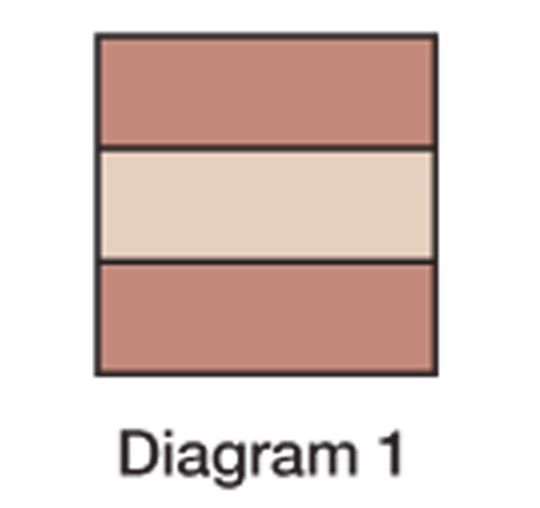
2. Layer a marked green print square atop an assorted red print 4-7/8" square. Sew together with two seams, stitching 1/4" on each side of marked line (Diagram 1). Cut apart on marked line. Press open to make two matching triangle-squares. Each triangle-square should be 4-1/2" square including seam allowances. Repeat to make 36 triangle-squares total (nine sets of four matching triangle-squares).
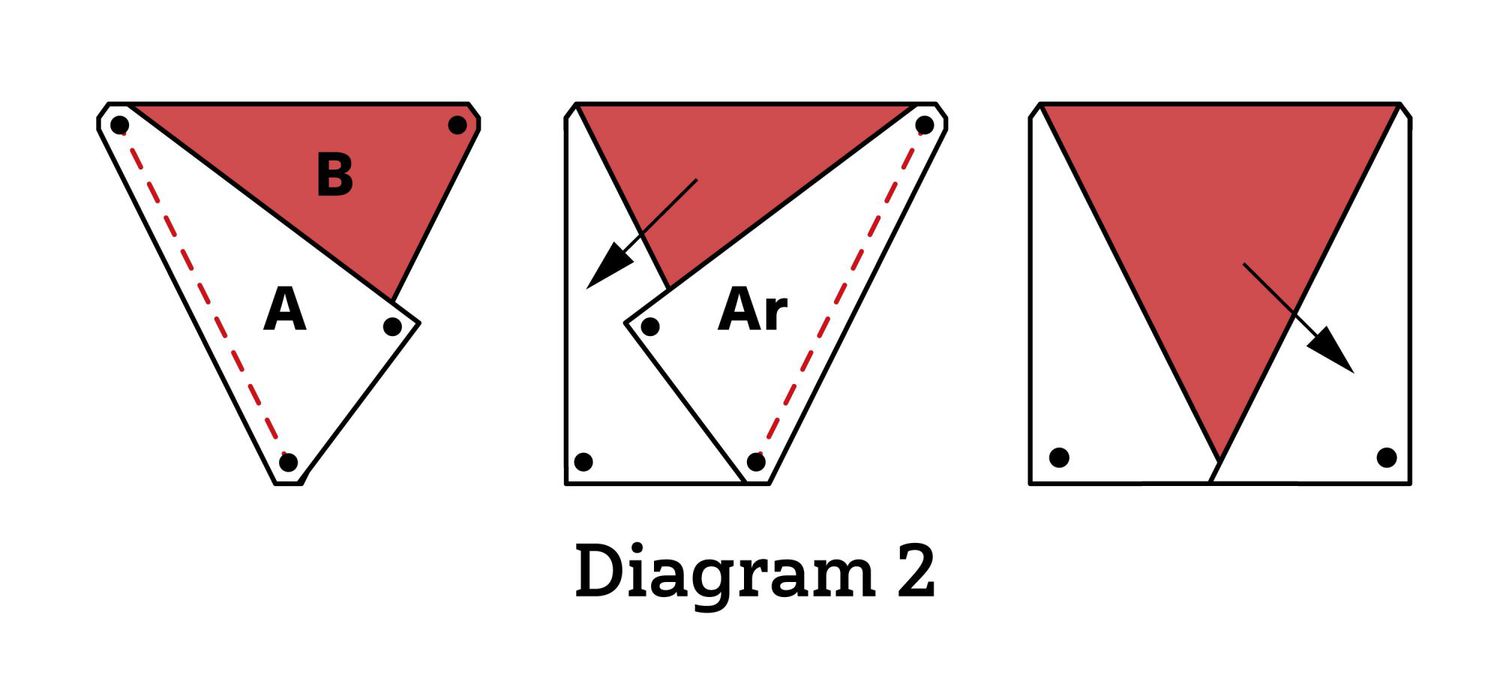
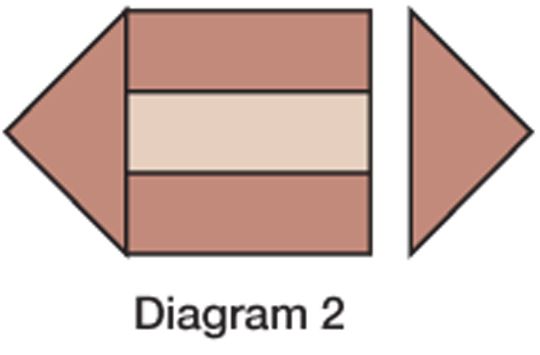
3. Referring to Diagram 2, sew a solid white A triangle to left-hand edge of an assorted red print B triangle. Add a solid white A reversed triangle to right-hand edge to make a side unit. The unit should be 4-1/2" square including seam allowances. Repeat to make 36 side units total (nine sets of four matching side units).
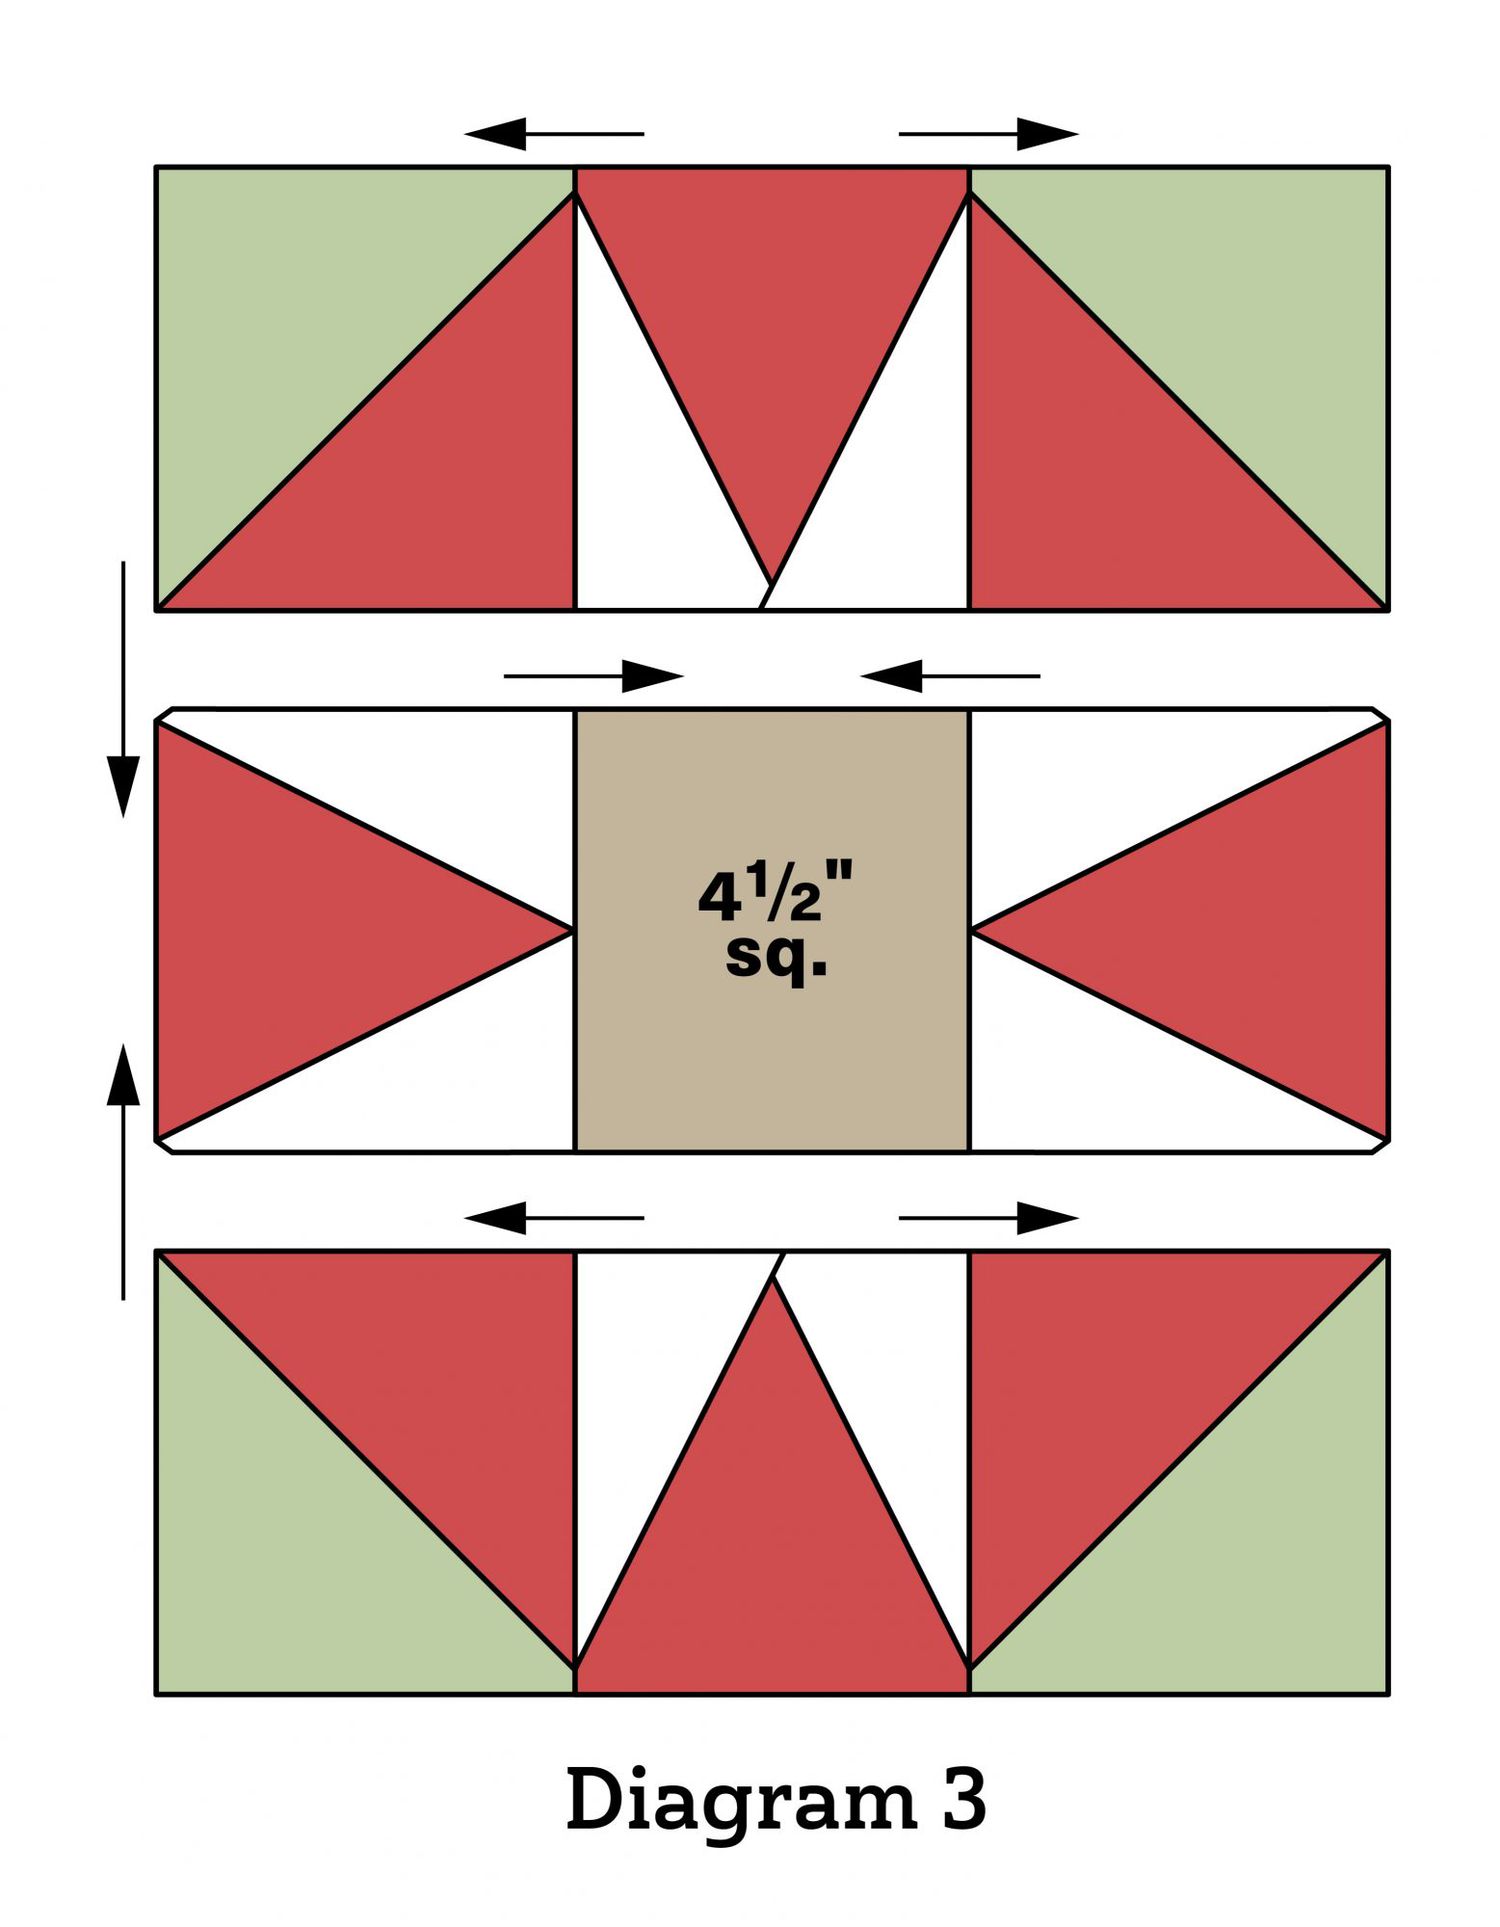
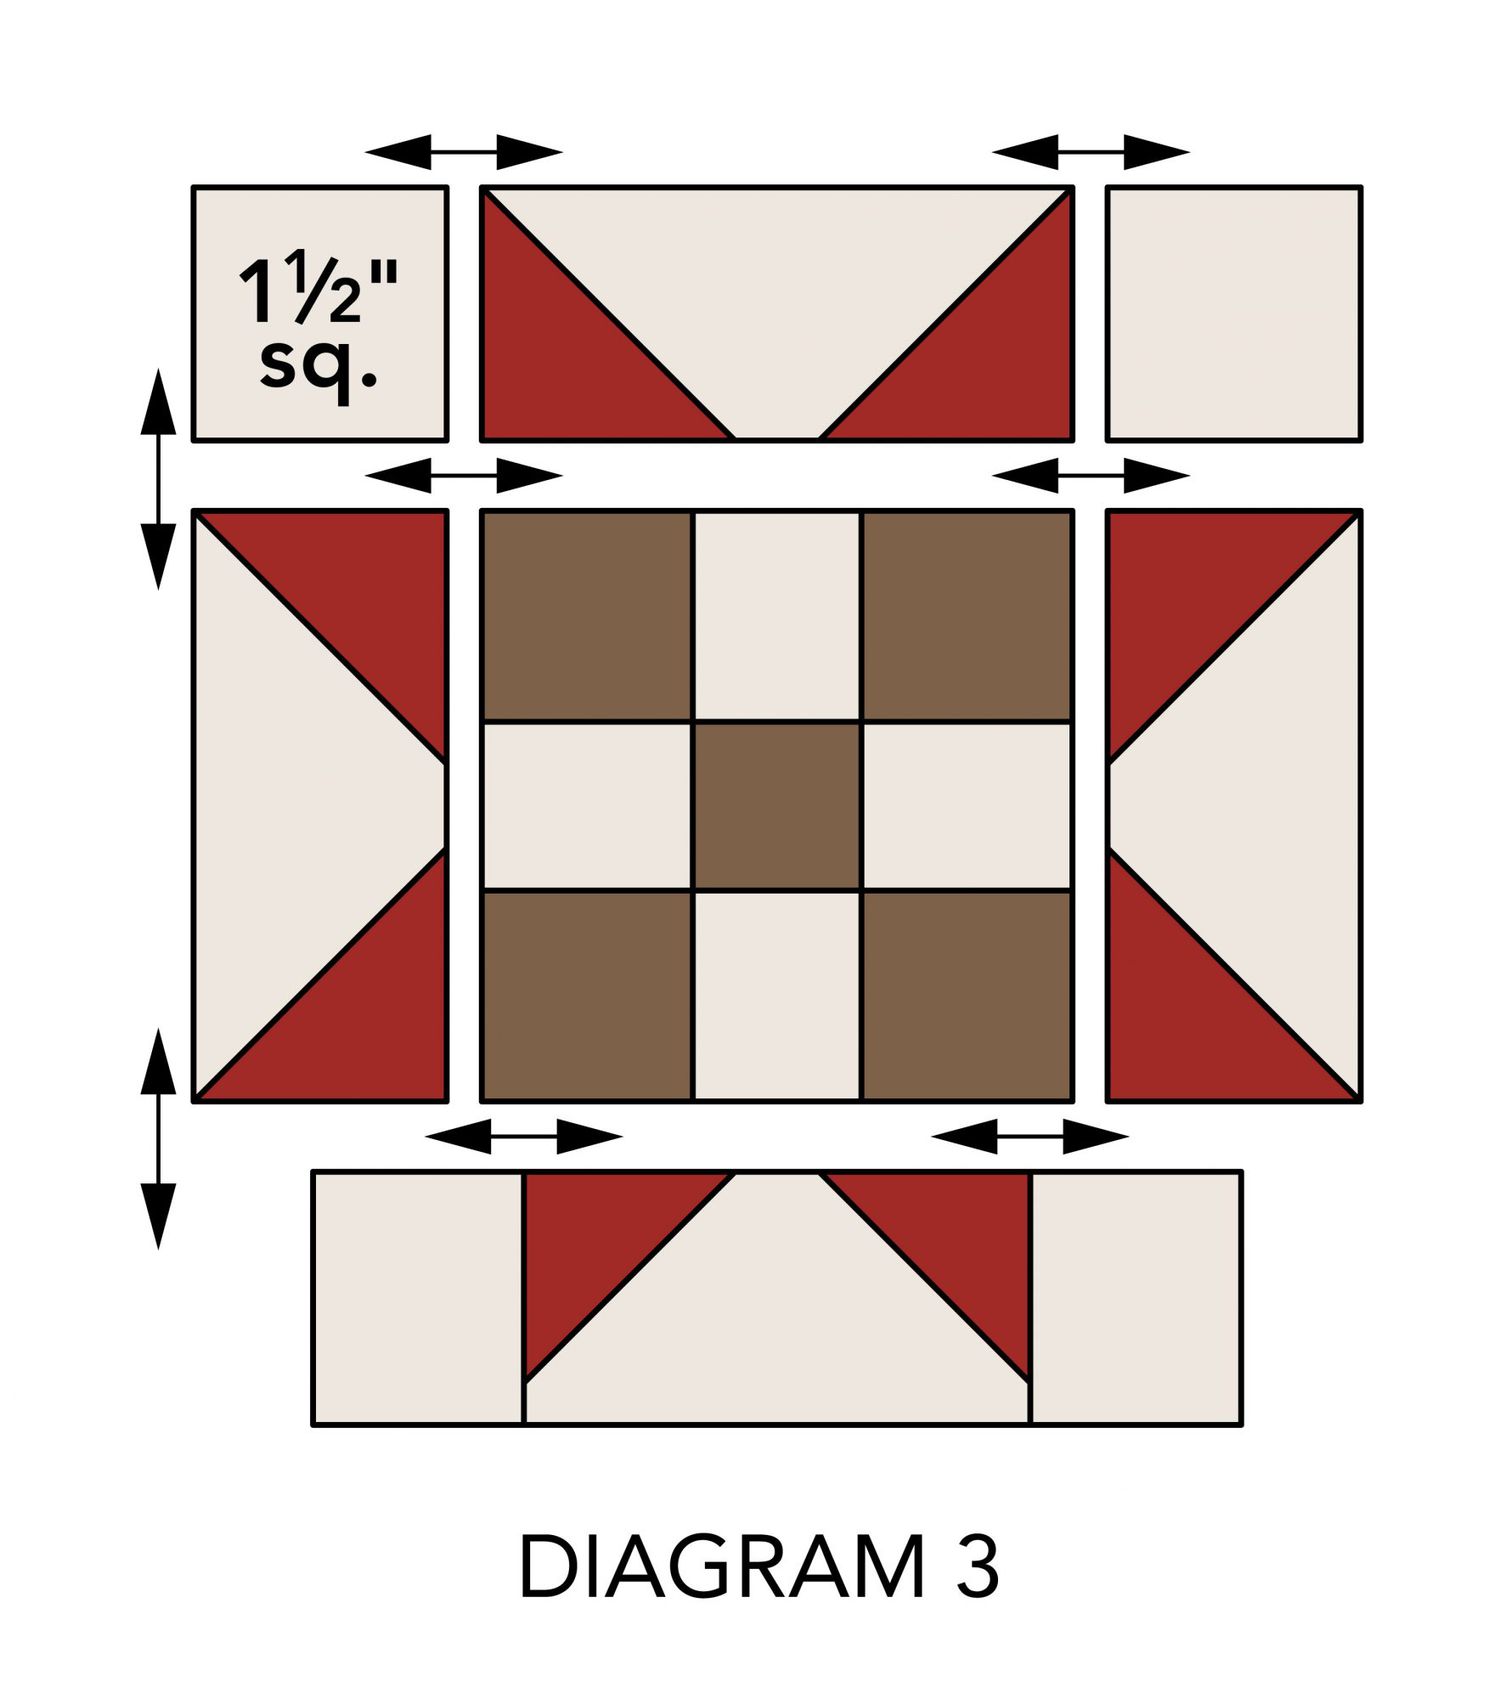
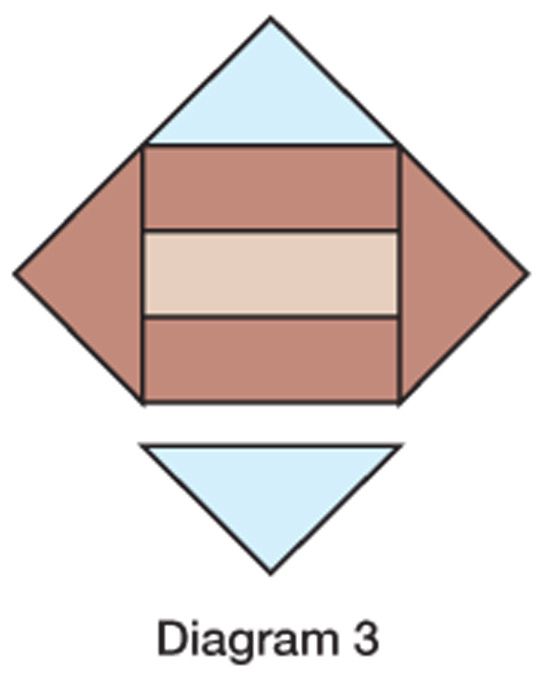
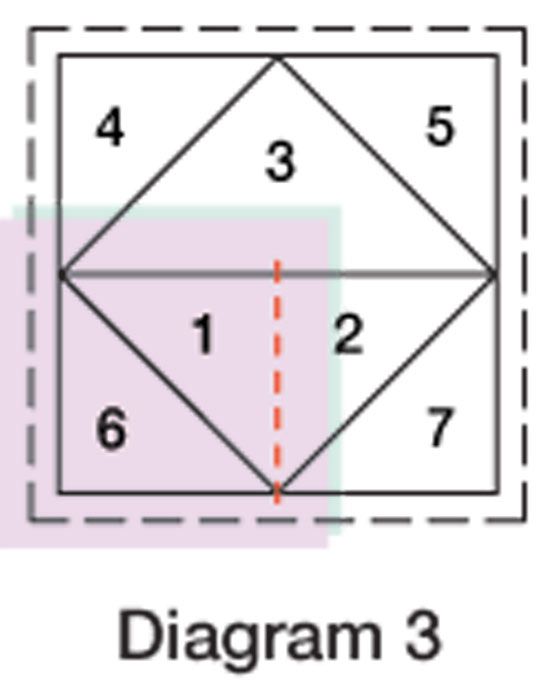
4. Lay out one tan print 4-1/2" square and four triangle-squares and four side units that use the same red print in three rows (Diagram 3). Sew together pieces in rows. Join rows to make a block. The block should be 12-1/2" square including seam allowances. Repeat to make nine blocks total.
Assemble Quilt Top
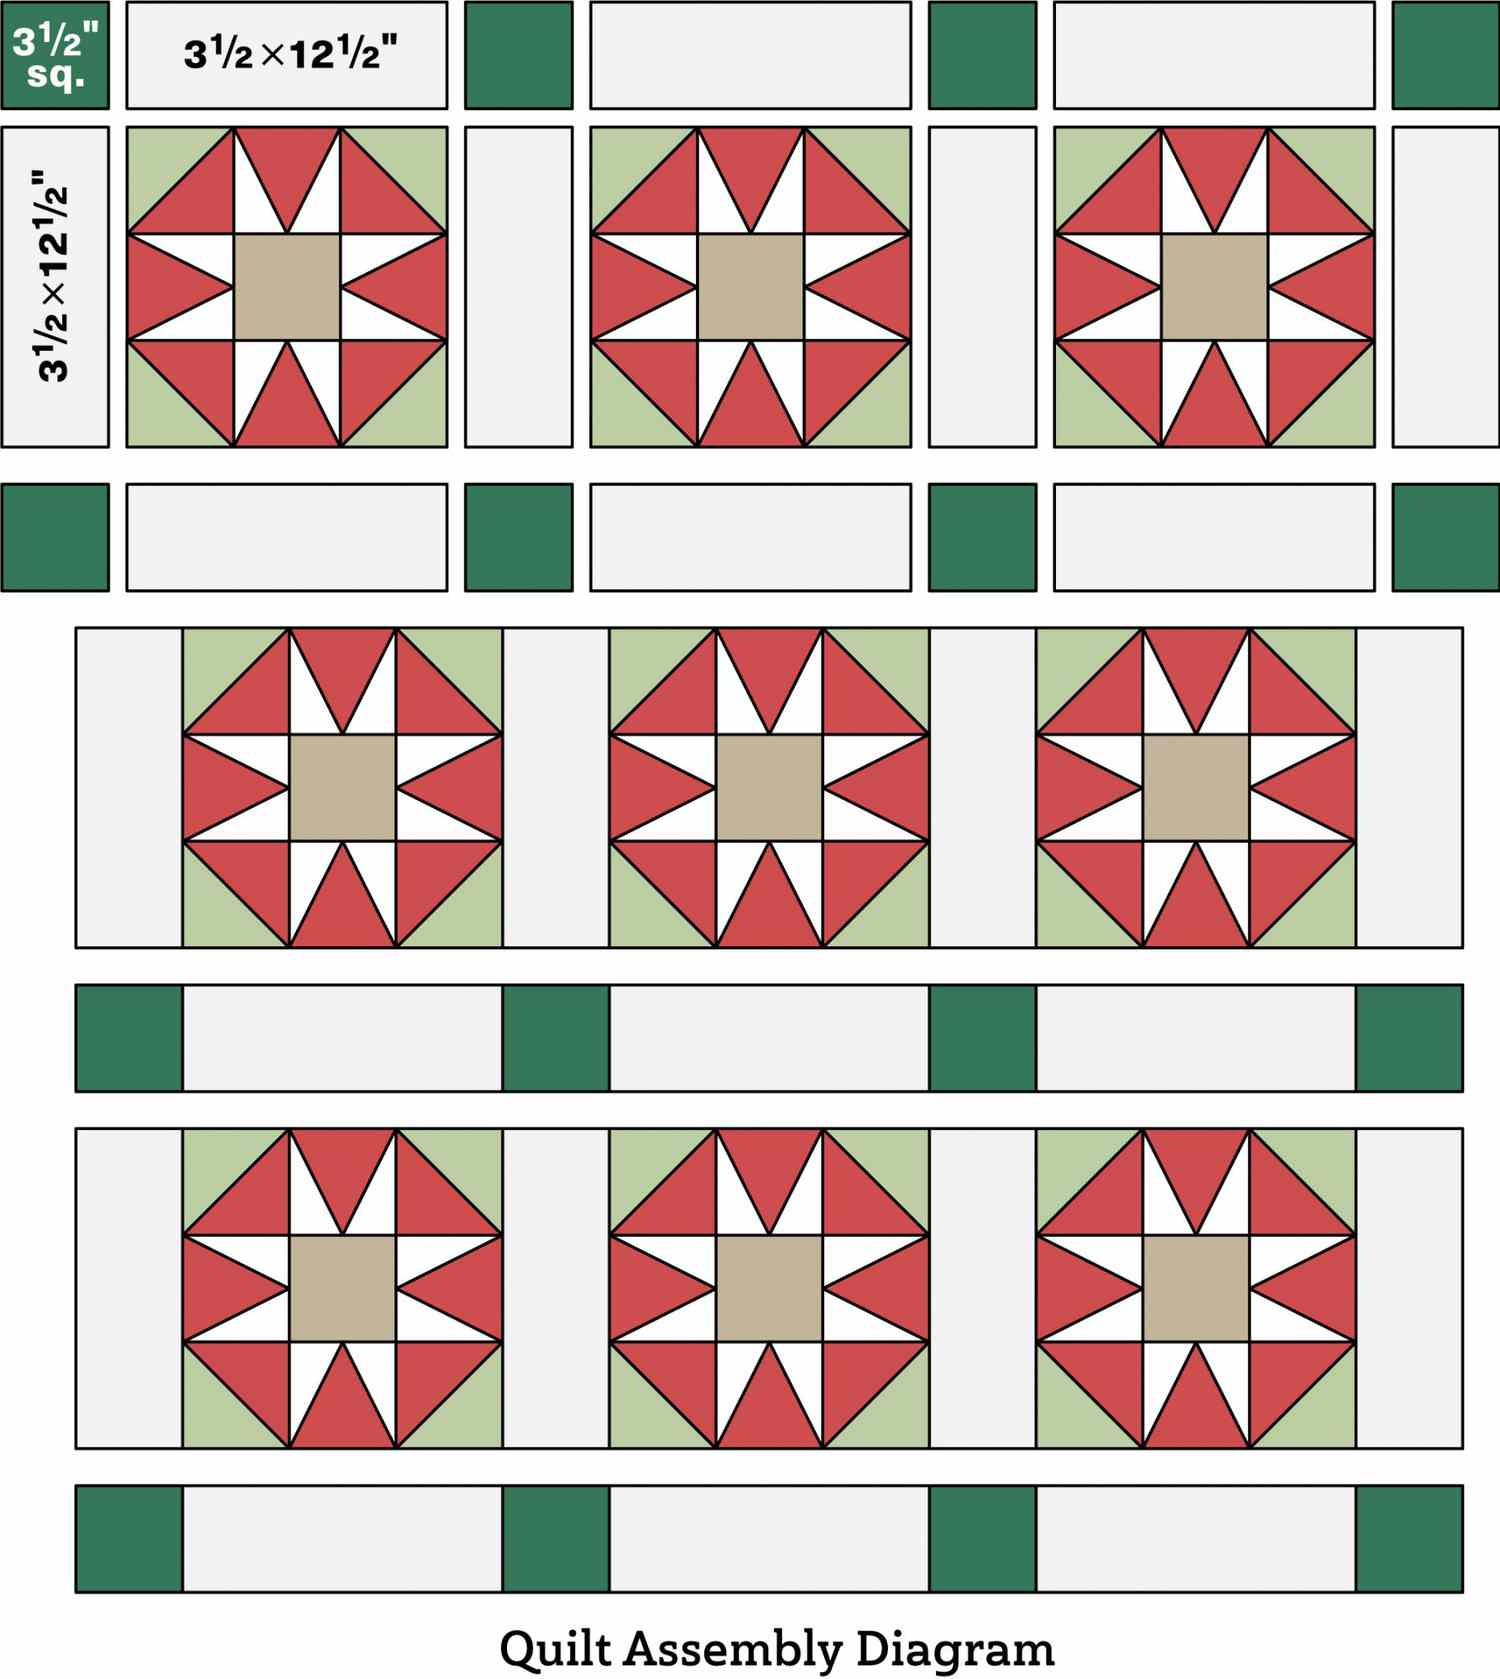
1. Referring to Quilt Assembly Diagram, lay out blocks, assorted white print 3-1/2×12-1/2" sashing rectangles, and mottled green 3-1/2" sashing squares in seven rows. Sew together pieces in rows. Press seams toward sashing rectangles.
2. Join rows to make quilt top. Press seams away from block rows. The quilt top should be 48-1/2" square including seam allowances.
Finish Quilt
1. Layer quilt top, batting, and backing; baste.
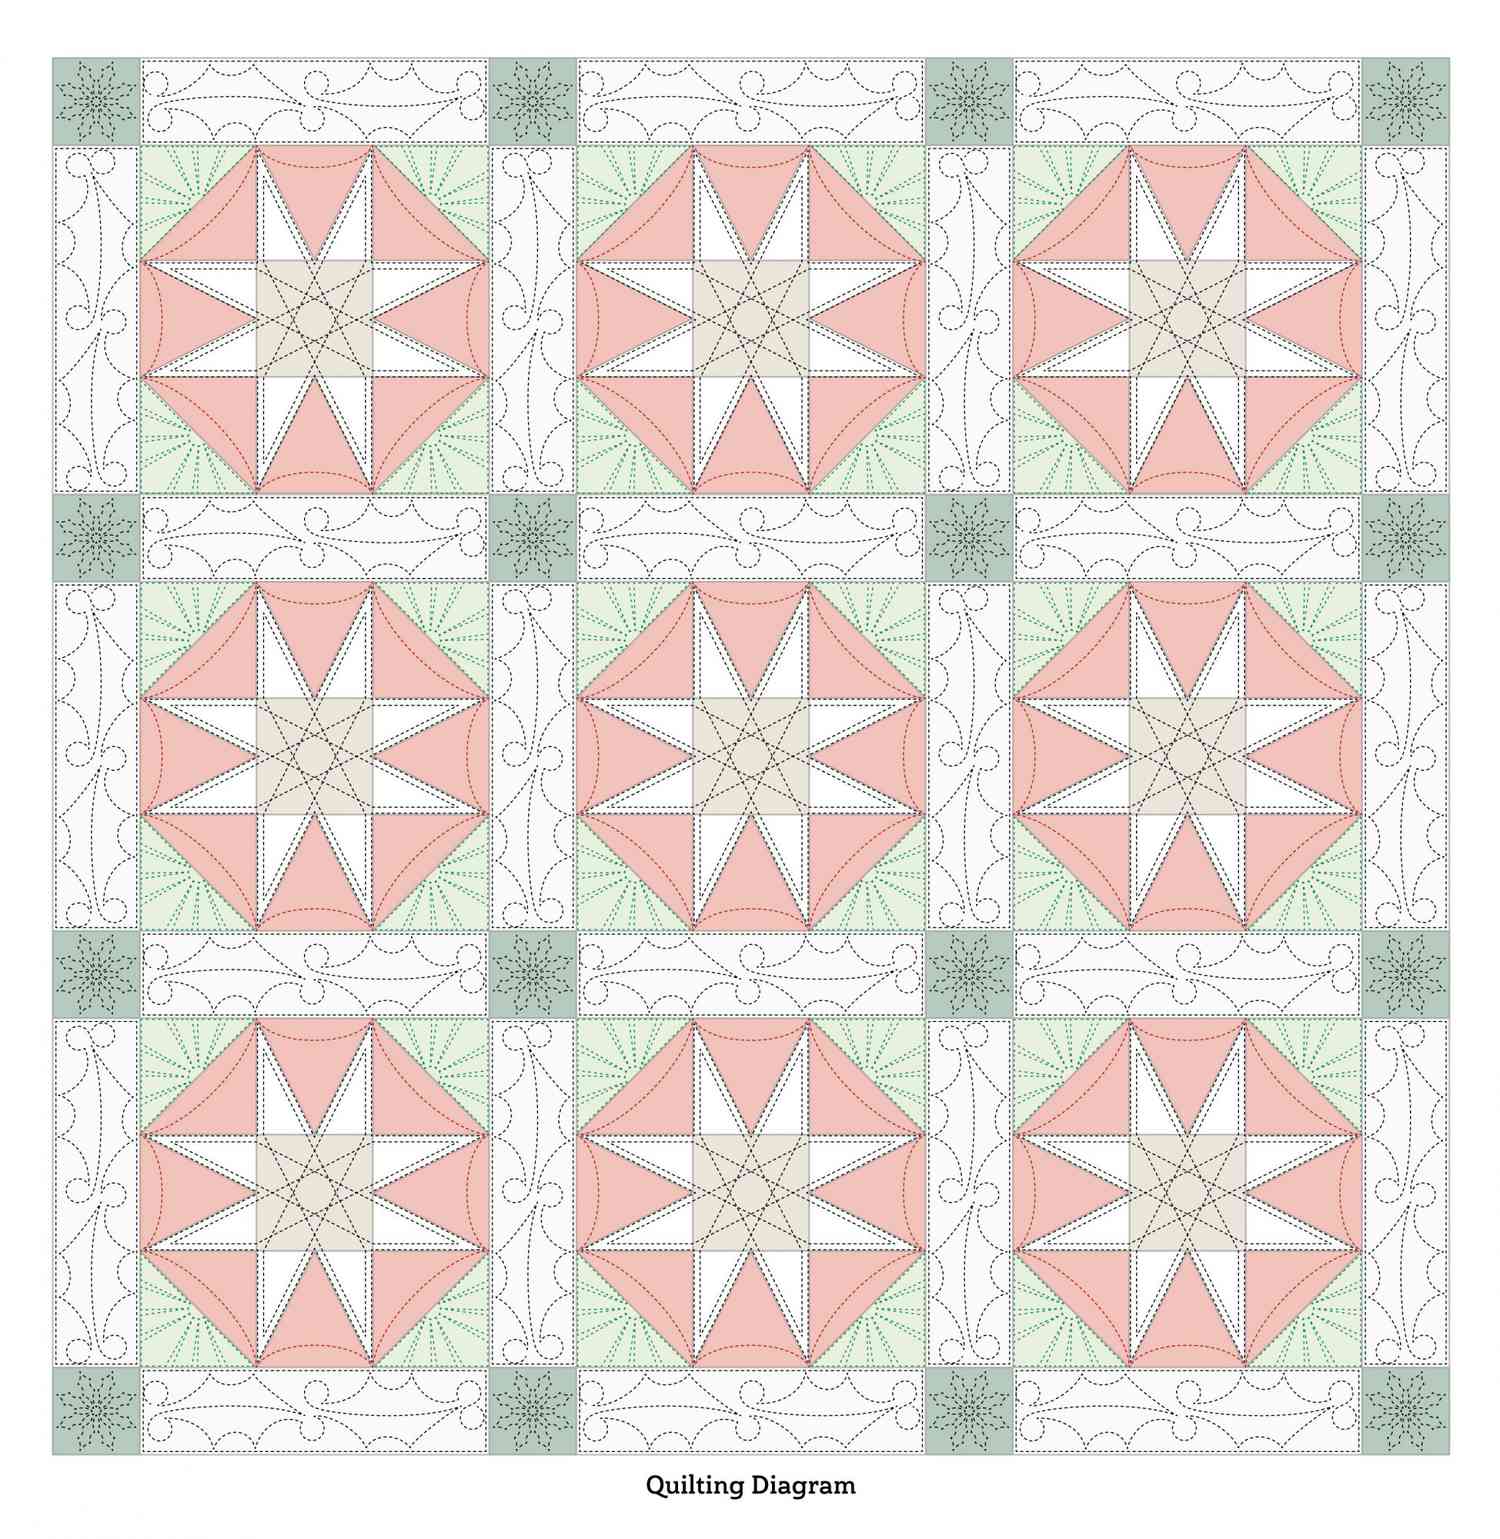
2. Quilt as desired. Handi Quilter Studio Educator Kim Sandberg used two layers of batting—wool on top of 80/20 cotton—to make the quilting stand out. She used thread from the Superior Threads The Bottom Line collection in three colors: silver, green, and red. She chose holly motifs from the Pro-Stitcher library to fill in the sashing and used rulerwork to highlight the piecing in the center of the blocks (Quilting Diagram).
3. Bind with mottled red binding strips.
.................................................................................................................................................................................................................................................................
August 23, 2020
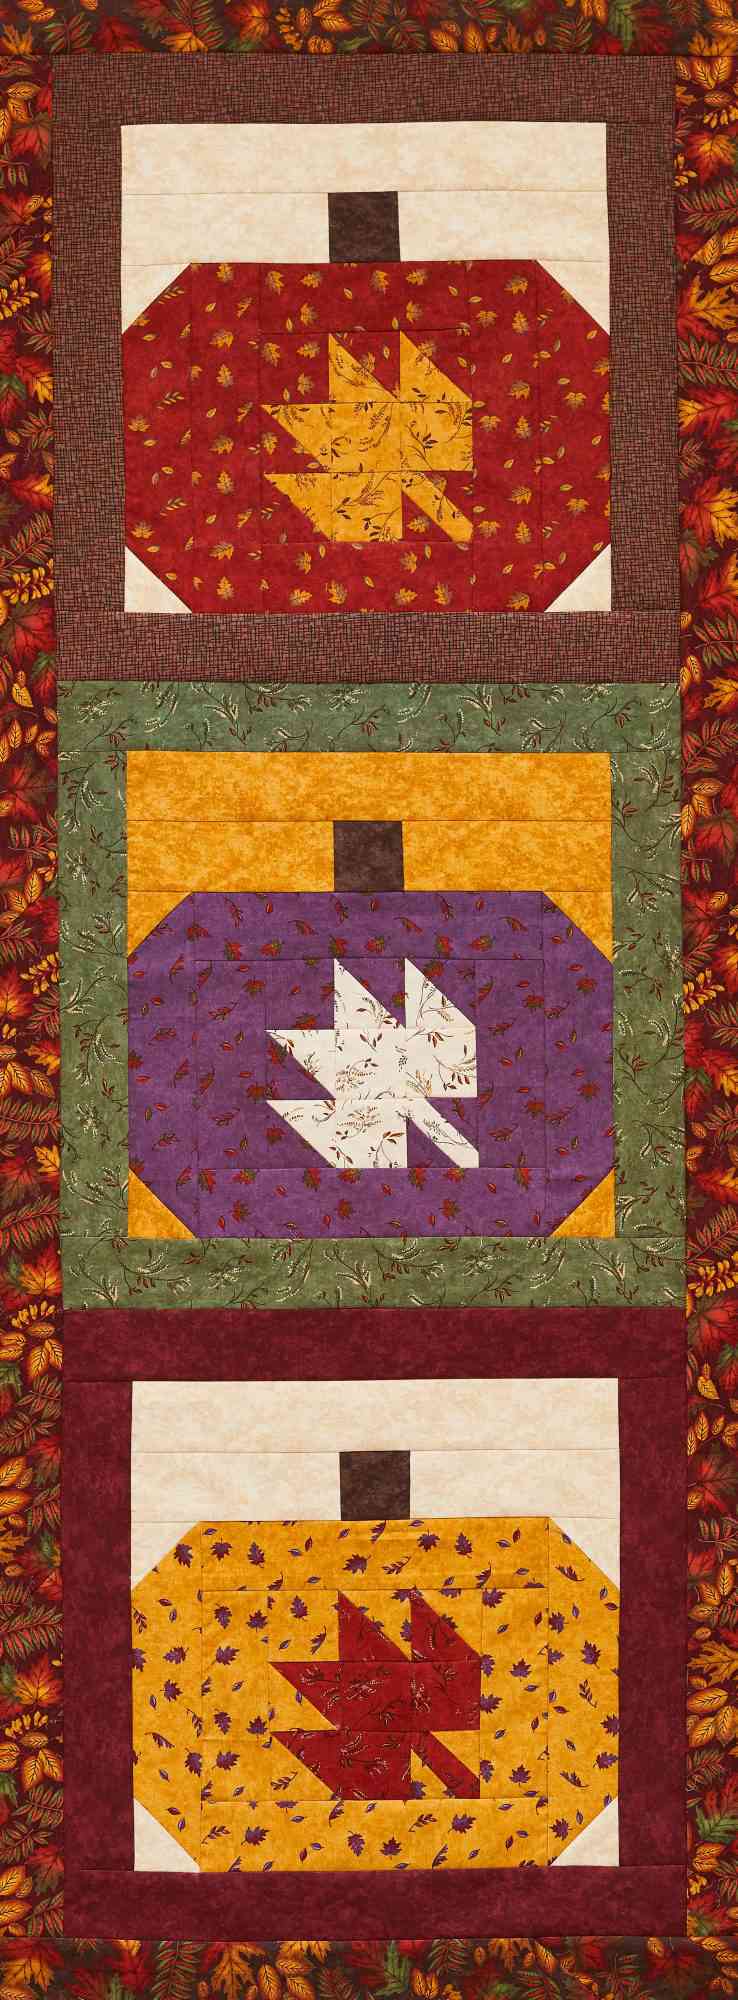
Pumpkin Patch Wall Quilt
Turn pieced pumpkin blocks into a seasonal quilt using a rich palette of fall colors. Fabrics are from the Country Charm collection by Holly Taylor for Moda Fabrics.
INSPIRED BY: Pick of the Patch from designer Chelsi Stratton of Chelsi Stratton Designs
QUIlT TESTER: Diane Tomlinson
Materials
Yardages and cutting instructions are based on 42" of usable fabric width.
- 3—10" squares assorted A prints (blocks)
- 3—18×21" pieces (fat quarters) assorted B prints (blocks)
- 3—18×21" pieces (fat quarters) assorted C prints (blocks)
- 3—18×21" pieces (fat quarters) assorted D prints (blocks)
- 8" square brown print (blocks)
- 3/8 yard brown leaf print (border)
- 1/2 yard binding fabric
- 1-3/4 yards backing fabric
- 31×67" batting
FINISHED QUILT: 22-1/2×58-1/2"
FINISHED BLOCKS: 18" square
Cut Fabrics
Cut pieces in the following order, keeping A–D pieces sorted by letter.
If you prefer to make triangle-squares larger than necessary and trim them to size, cut 3" squares instead of the 2-7/8" squares listed in cutting instructions.
From each A print, cut:
- 2—2-7/8" squares
- 4—2-1/2" squares
From each B print, cut:
- 4—2-1/2×10-1/2" rectangles
- 2—2-1/2×6-1/2" rectangles
- 2—2-7/8" squares
- 1—2-1/2" square
- 2—2" squares
From each C print, cut:
- 1—2-1/2×14-1/2" rectangle
- 2—2-1/2×6-1/2" rectangles
- 4—2-1/2" squares
From each D print, cut:
- 2—2-1/2×18-1/2" rectangles
- 2—2-1/2×14-1/2" rectangles
From brown print, cut:
- 3—20-1/2" squares
From brown leaf print, cut:
- 4—2-1/2×42" strips for border
From binding fabric, cut:
- 5—2-1/2×42" binding strips
Assemble Blocks
These measurements include 1/4" seam allowances. Sew with right sides together unless otherwise stated.
Press seams in directions indicated by arrows on diagrams. If no direction is specified, press seam toward darker fabric.
1. Gather a set of pieces from one A print (two 2-7/8" squares and four 2-1/2" squares), one B print (four 2-1/2×10-1/2" rectangles, two 2-1/2×6-1/2" rectangles, two 2-7/8" squares, one 2-1/2" square, and two 2" squares), one C print (one 2-1/2×14-1/2" rectangle, two 2-1/2×6-1/2" rectangles, and four 2-1/2" squares), and one D print (two 2-1/2×18-1/2" rectangles and two 2-1/2×14-1/2" rectangles).
2. Use a pencil to mark a diagonal line on wrong side of A print 2-7/8" squares, B print 2" squares, and C print 2-1/2" squares.
4. Align a marked B print square with one corner of an A print 2-1/2" square (Diagram 2; note direction of marked line). Sew on marked line. Trim seam allowance to 1/4". Press open attached triangle. Add remaining marked B print square to opposite corner of A print square to make stem subunit. The subunit still should be 2-1/2" square including seam allowances.
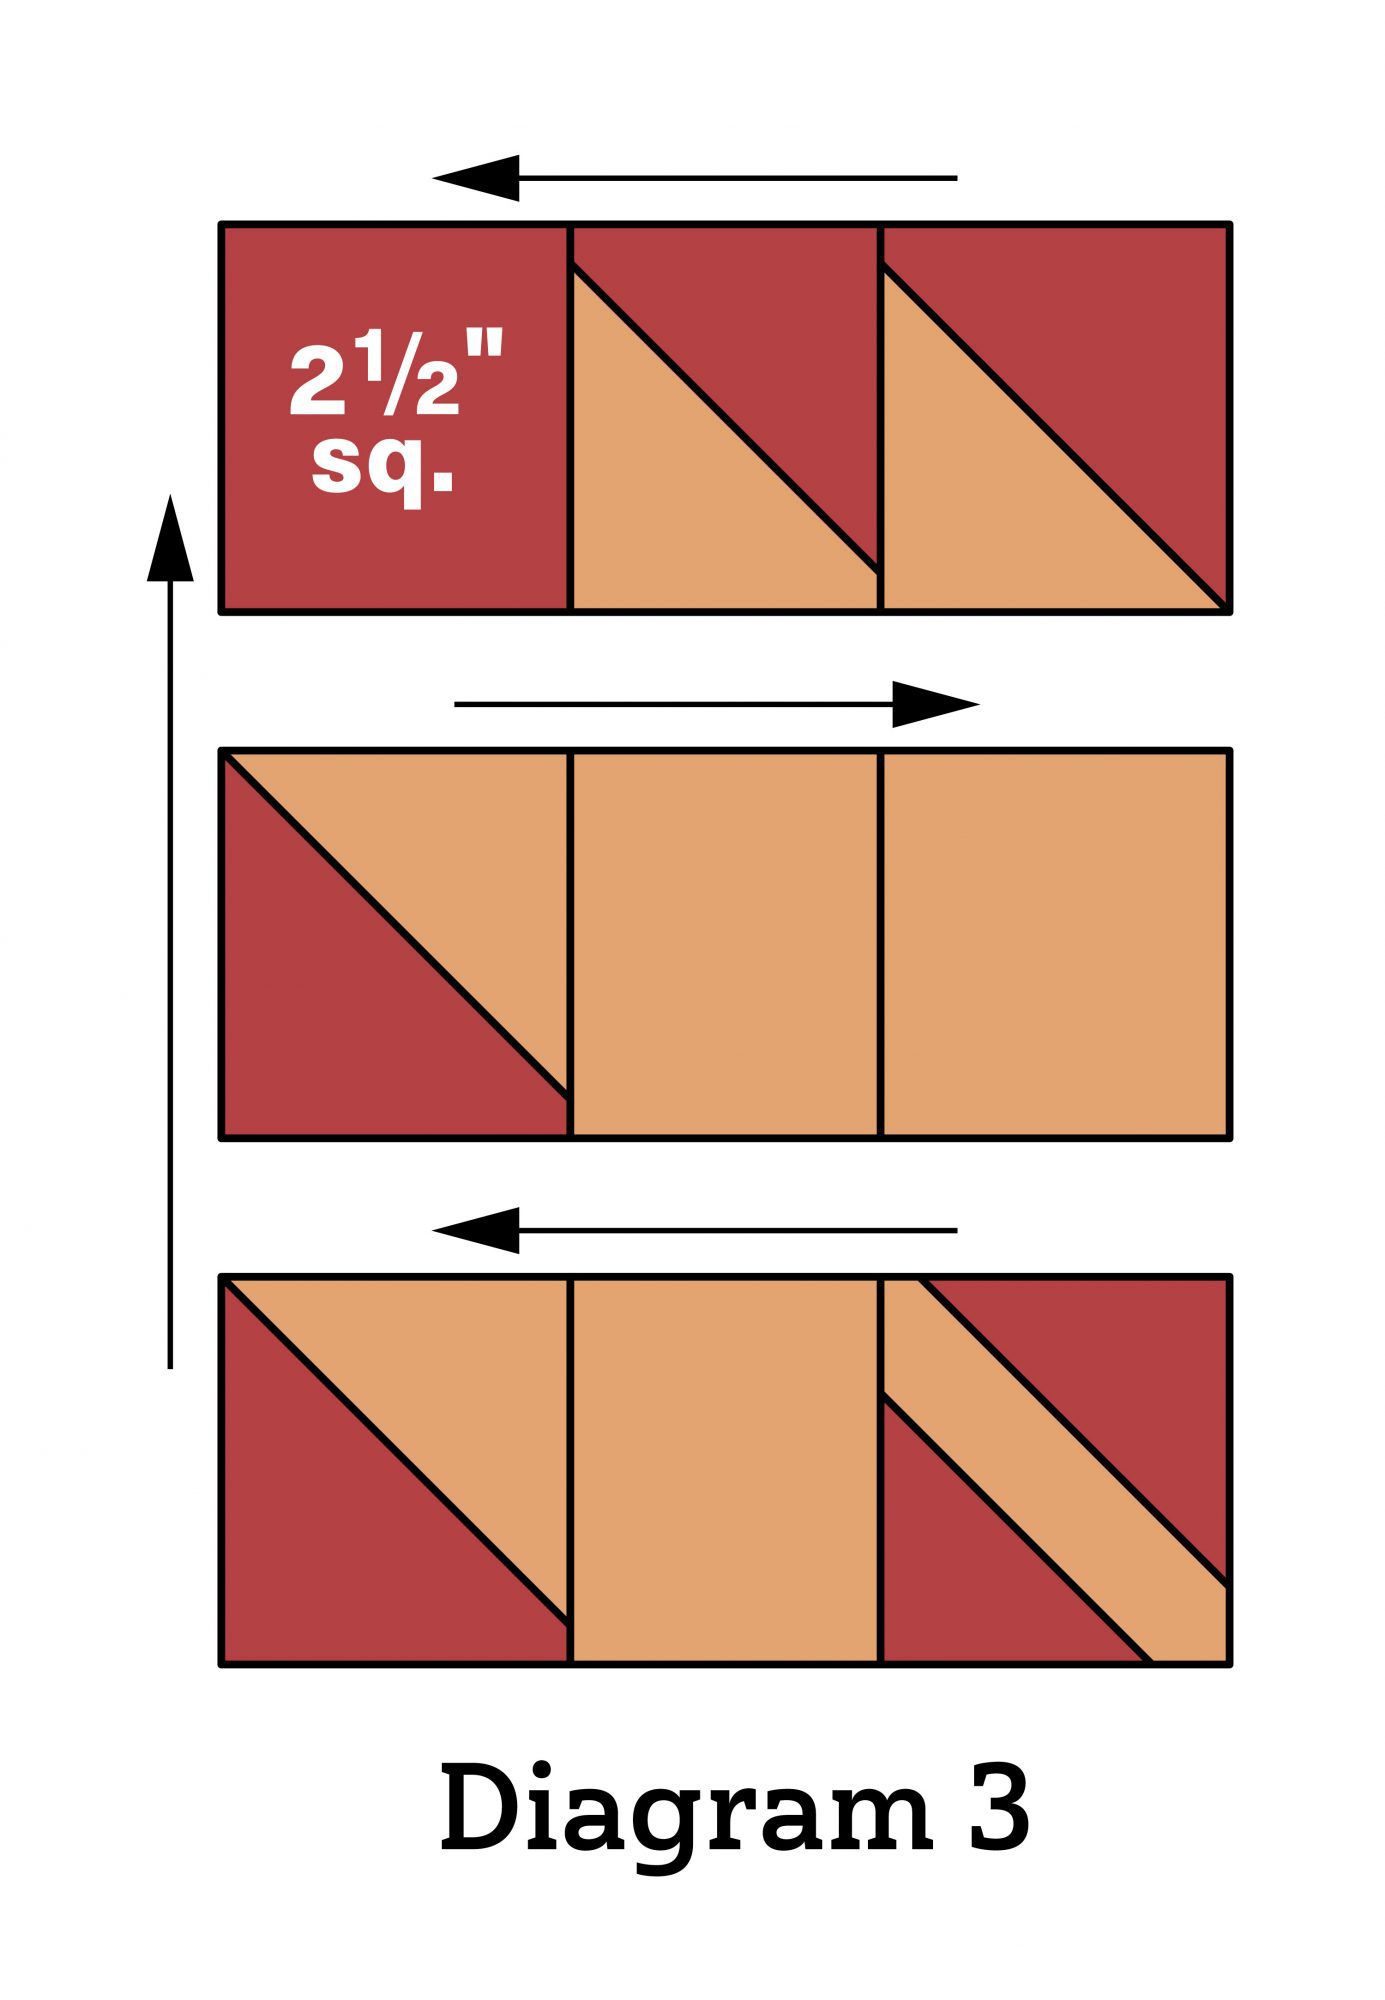
5. Referring to Diagram 3, lay out B print 2-1/2" square, triangle-squares, remaining A print 2-1/2" squares, and stem subunit in three rows. Sew together pieces in rows. Join rows to make leaf unit. The unit should be 6-1/2" square including seam allowances.
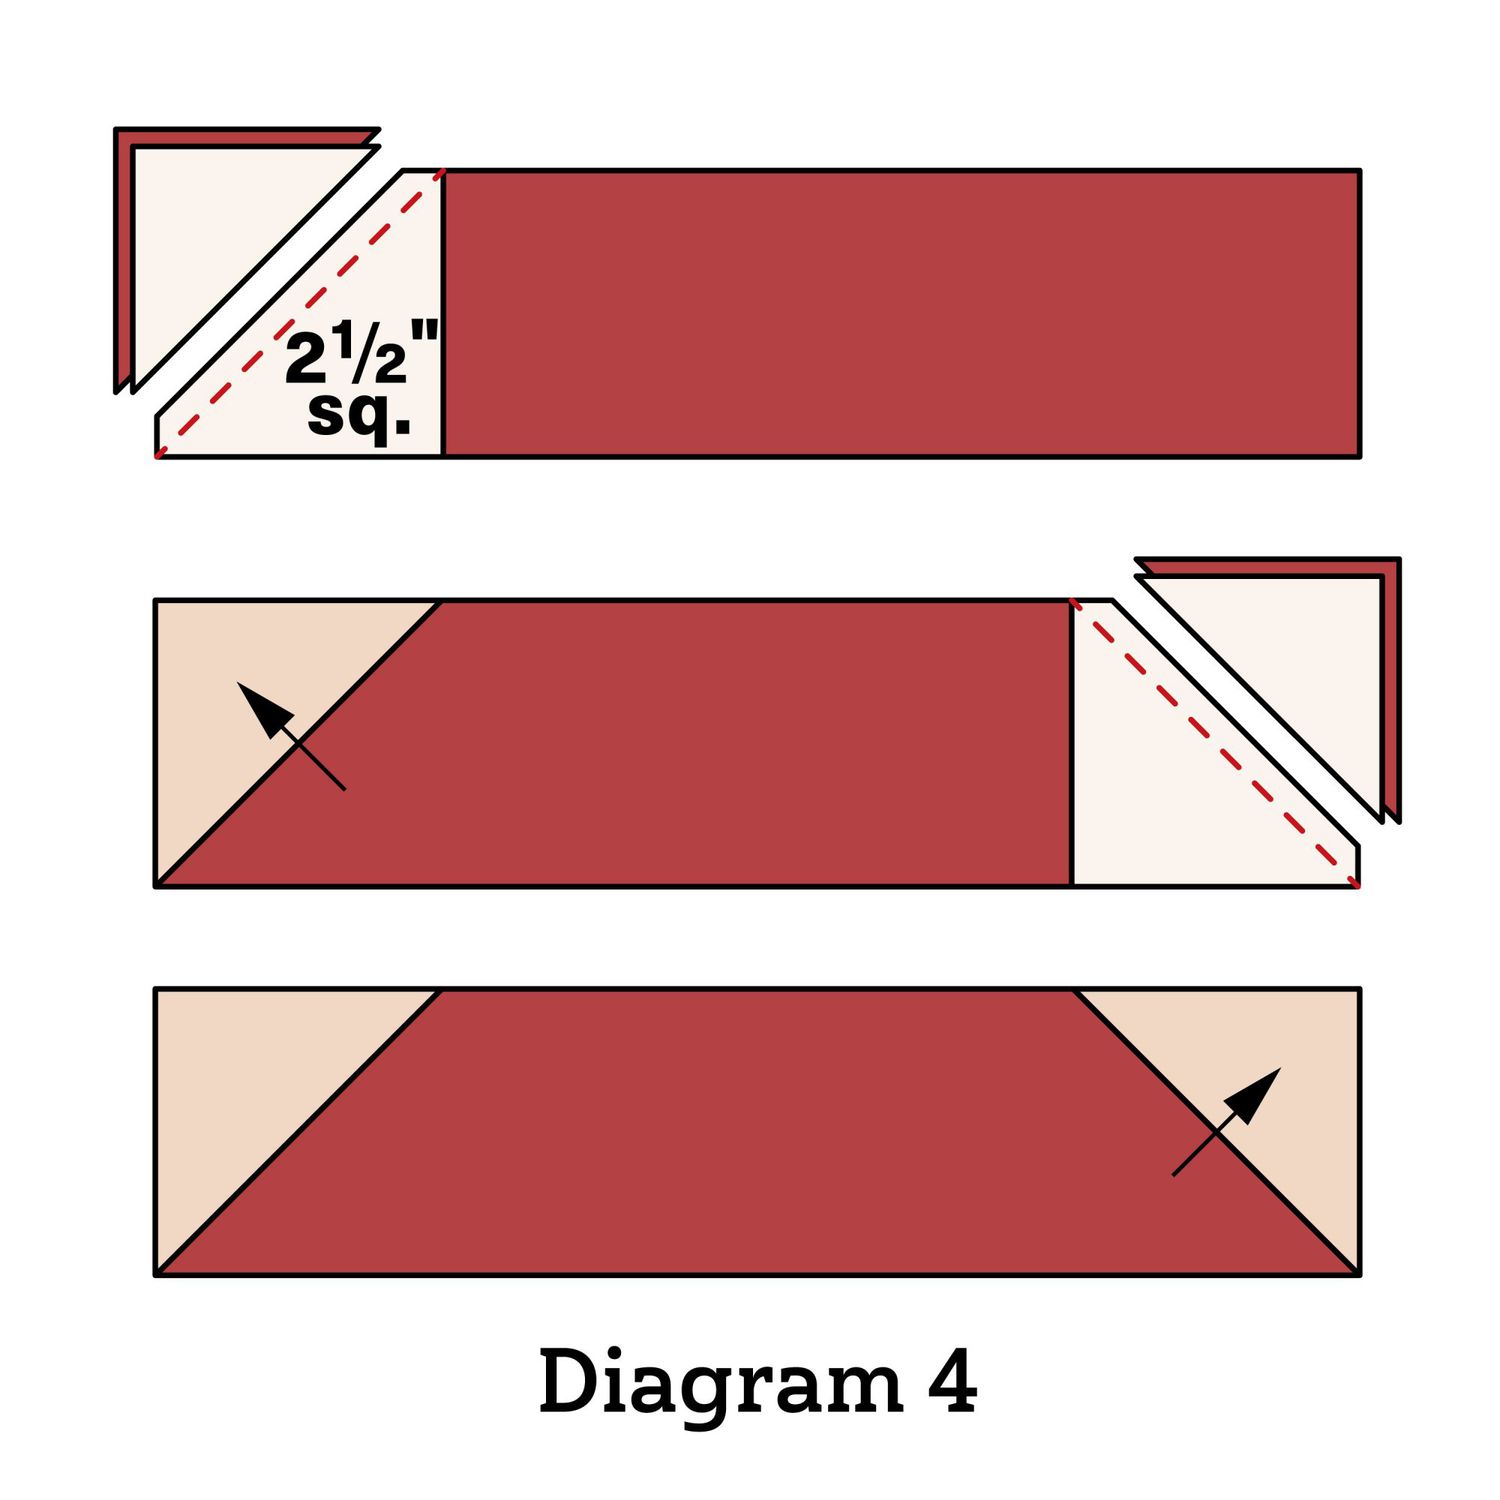
6. Align a marked C print square with one end of a B print 2-1/2×10-1/2" rectangle (Diagram 4; note direction of marked line). Sew on marked line. Trim seam allowance to 1/4". Press open attached triangle. Add a marked C print square to opposite end of rectangle to make a side unit. The unit should be 2-1/2×10-1/2" including seam allowances. Repeat to make a second side unit.
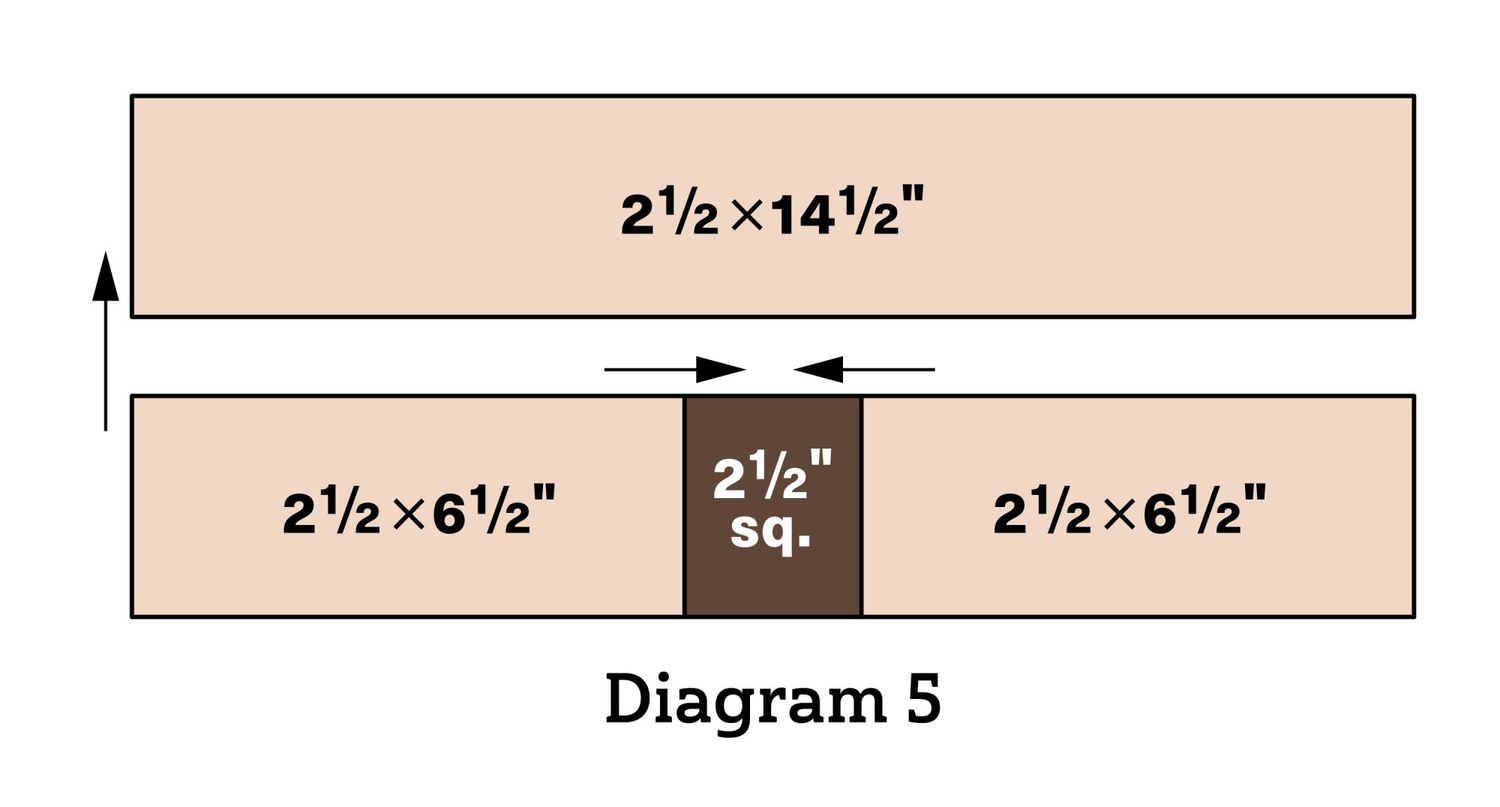
7. Referring to Diagram 5, join C print 2-1/2×6-1/2" rectangles and one brown print 2-1/2" square in a row; add C print 2-1/2×14-1/2" rectangle to make top unit. The unit should be 4-1/2×14-1/2" including seam allowances.
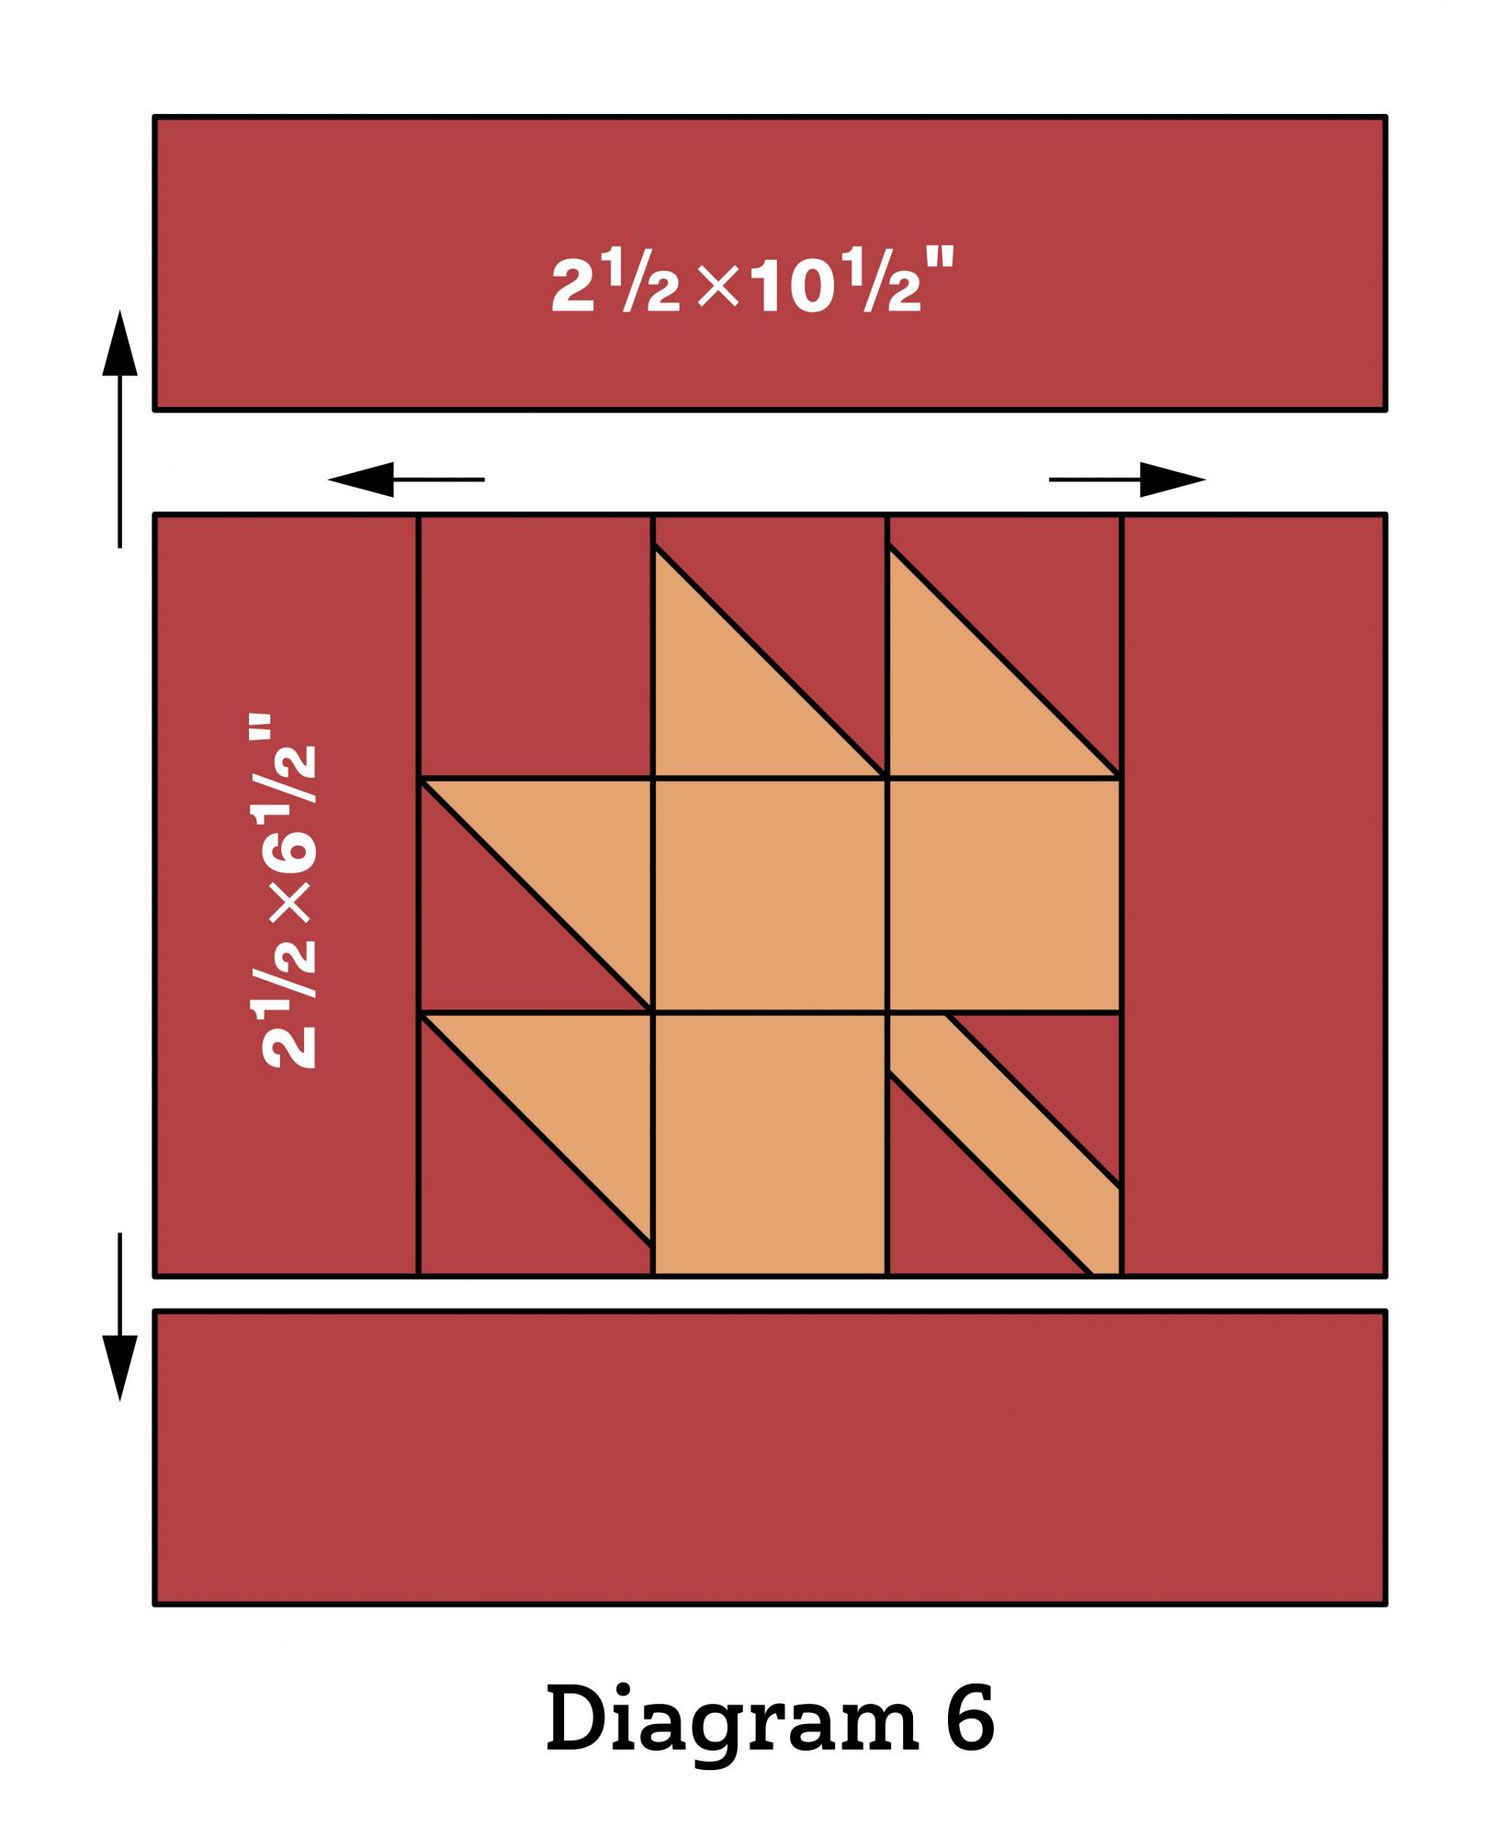
8. Referring to Diagram 6, sew B print 2-1/2×6-1/2" rectangles to side edges of leaf unit. Add remaining B print 2-1/2×10-1/2" rectangles to top and bottom edges.
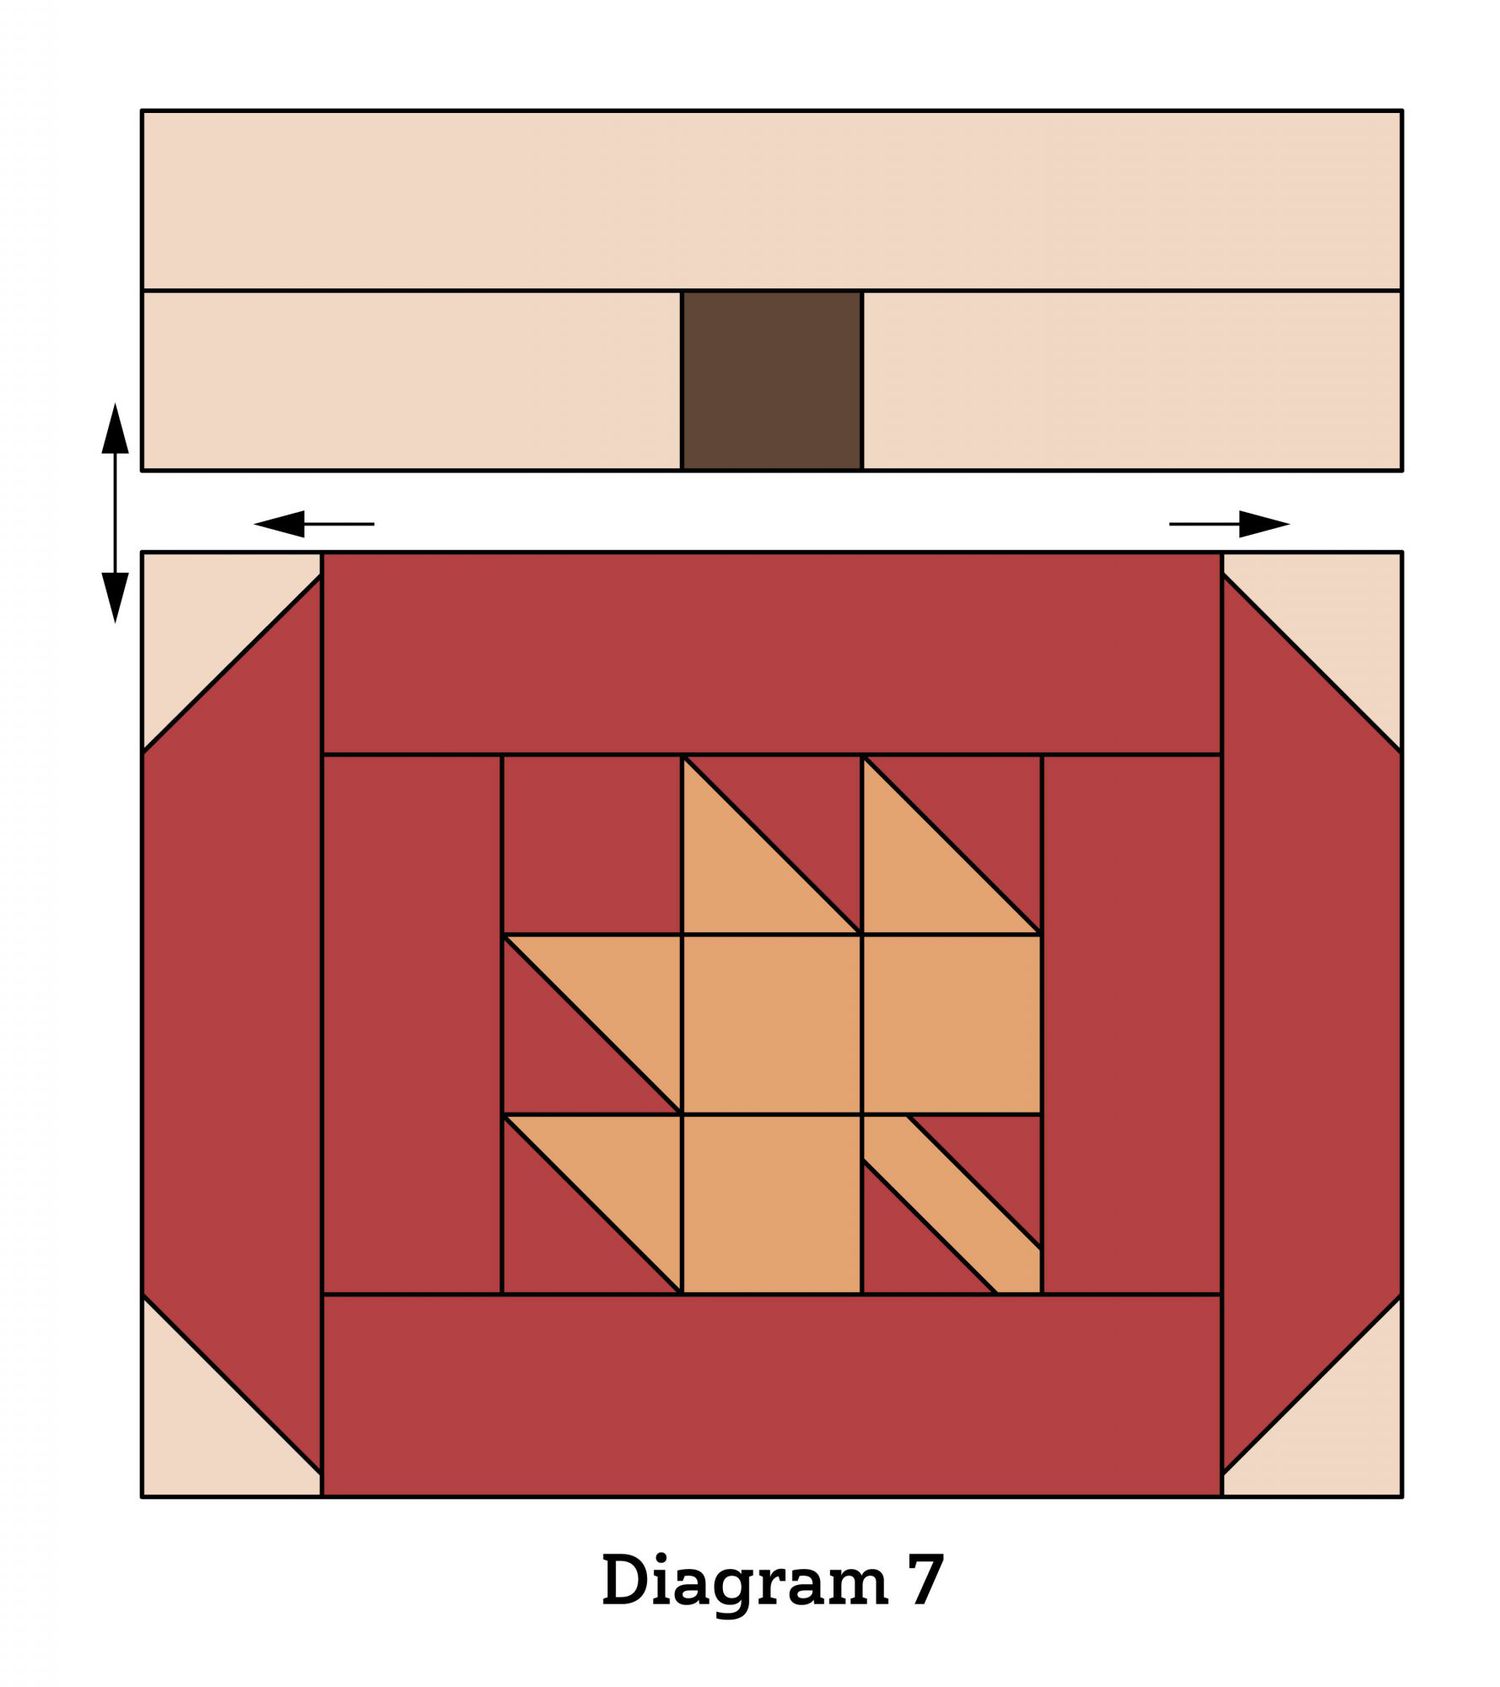
9. Referring to Diagram 7, join side units to side edges of leaf unit. Add top unit to make a pumpkin block. The block should be 14-1/2" square including seam allowances.
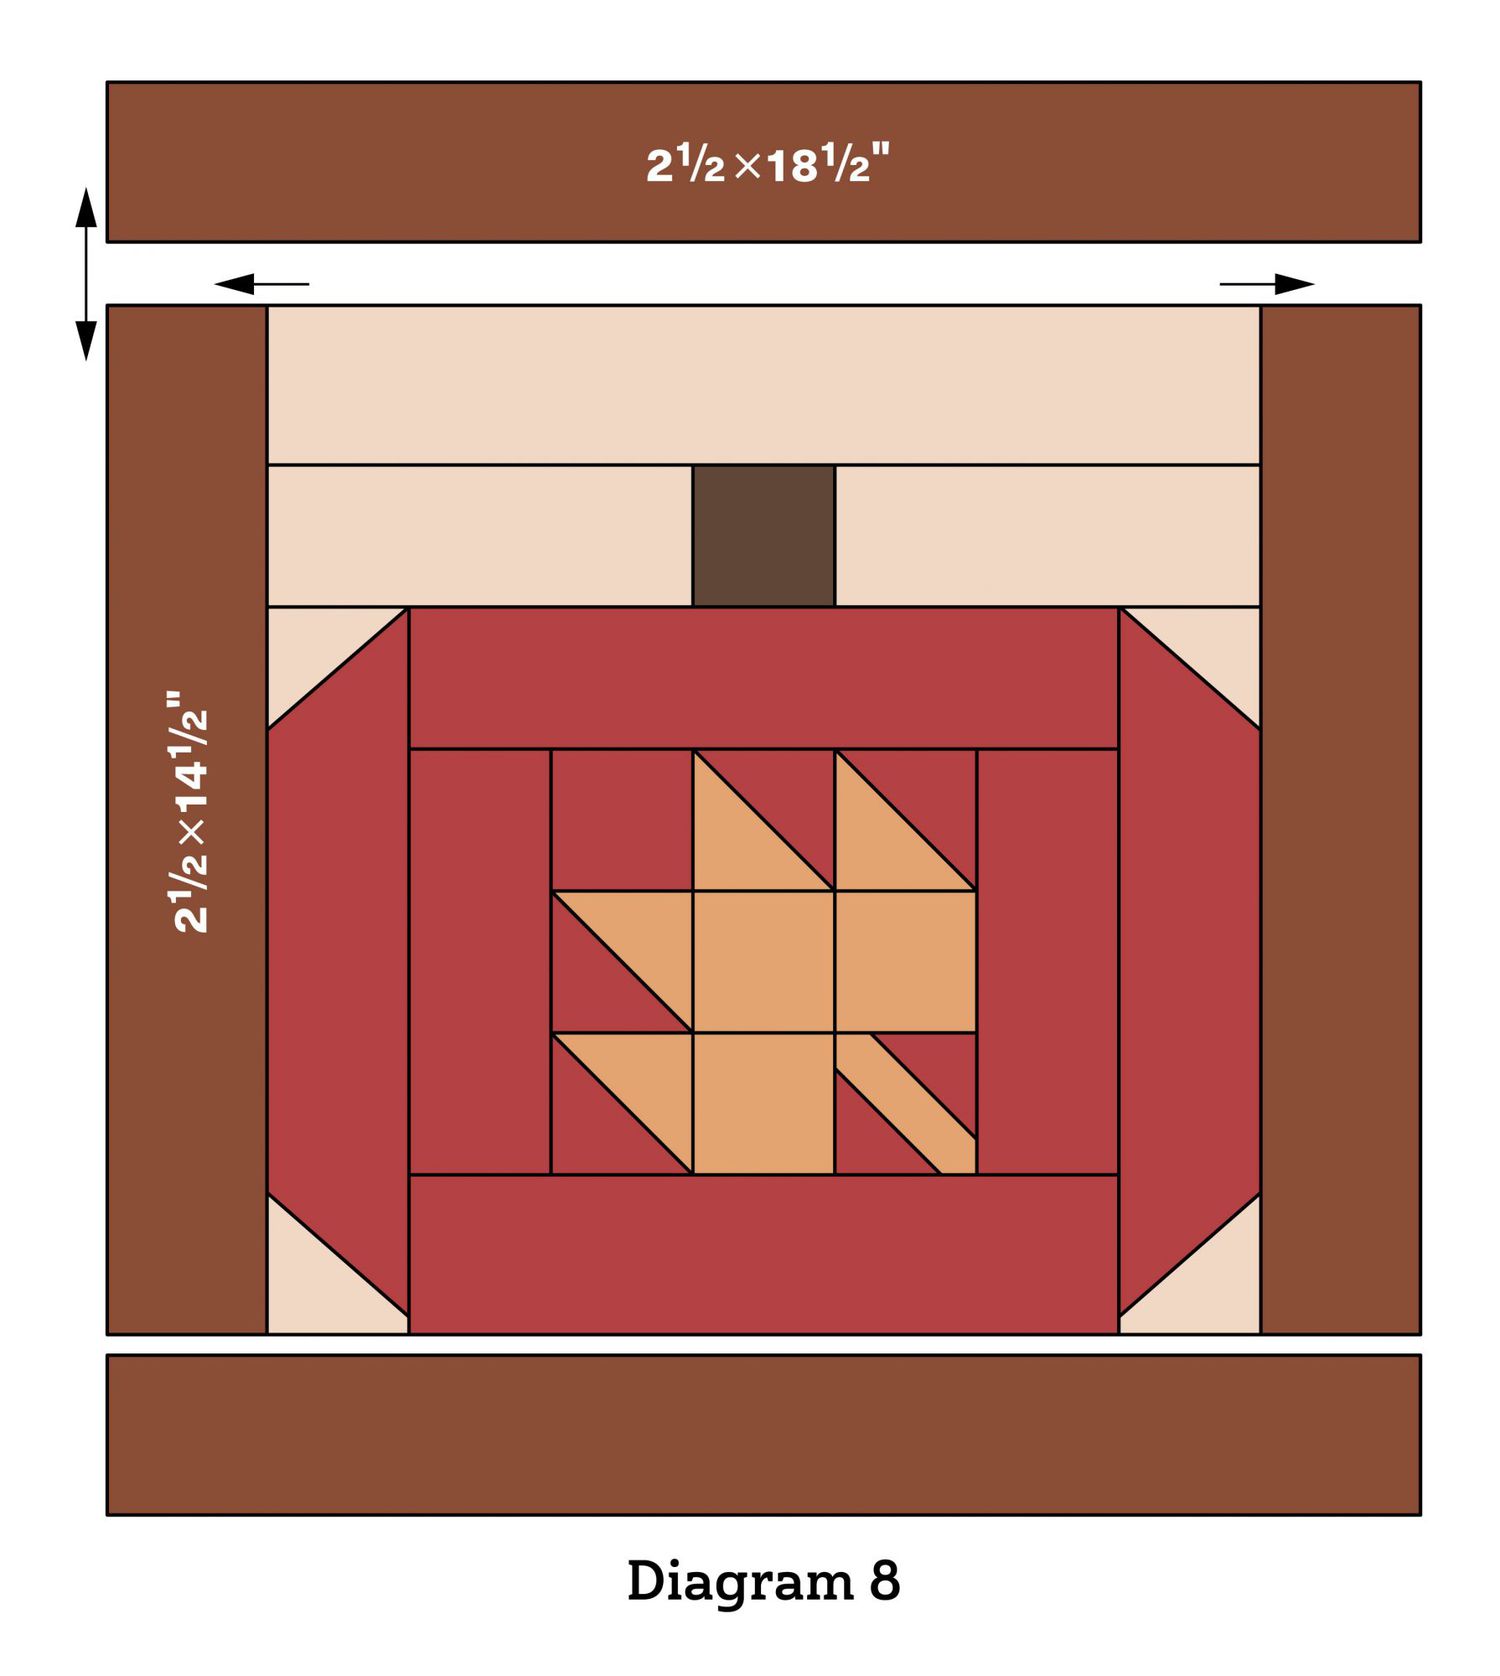
10. Referring to Diagram 8, join D print 2-1/2×14-1/2" rectangles to side edges of block. Add D print 2-1/2×18-1/2" rectangles to top and bottom edges of block. The block now should be 18-1/2" square including seam allowances.
11. Repeat steps 1–10 to make three blocks total.
Assemble Quilt Top
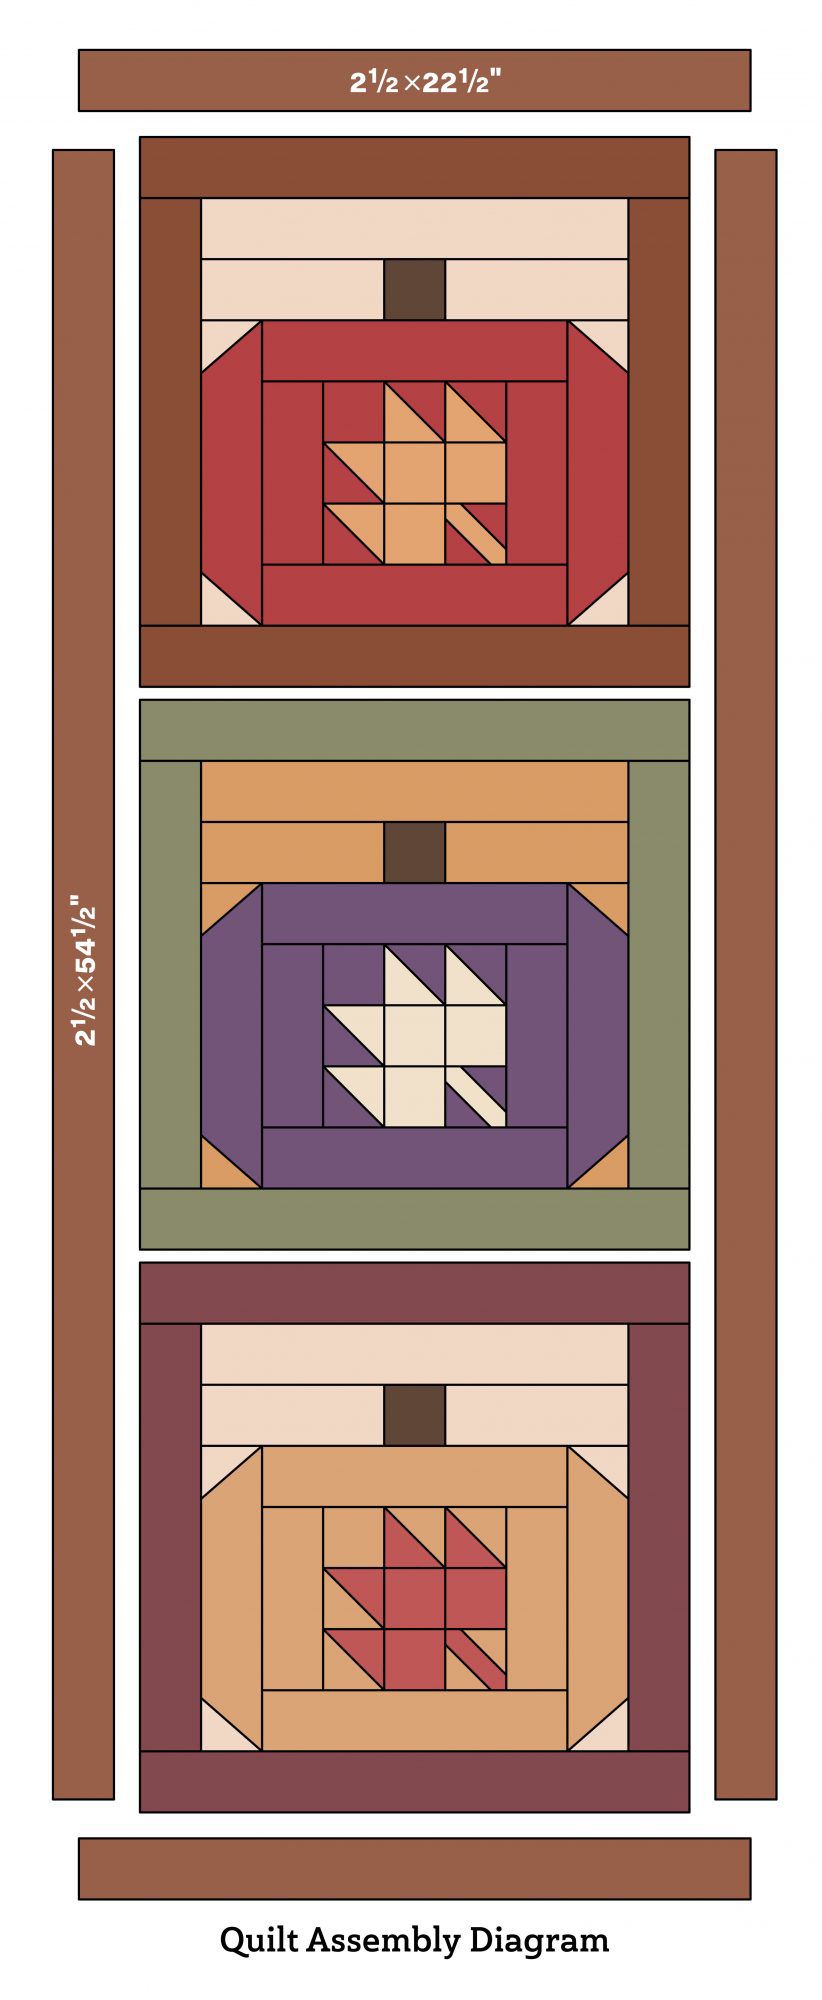
1. Referring to Quilt Assembly Diagram, sew together blocks in a row to make quilt center. Press seams in one direction. The quilt center should be 18-1/2×54-1/2" including seam allowances.
2. Piece and cut brown leaf print 2-1/2×42" strips to make:
- 2—2-1/2×54-1/2" border strips
- 2—2-1/2×22-1/2" border strips
3. Sew long border strips to long edges of quilt center. Add short border strips to remaining edges to complete quilt top. Press all seams toward border.
Finish Quilt
1. Layer quilt top, batting, and backing; baste. Quilt as desired.
2. Bind with binding strips.
Perfect Points Pillow
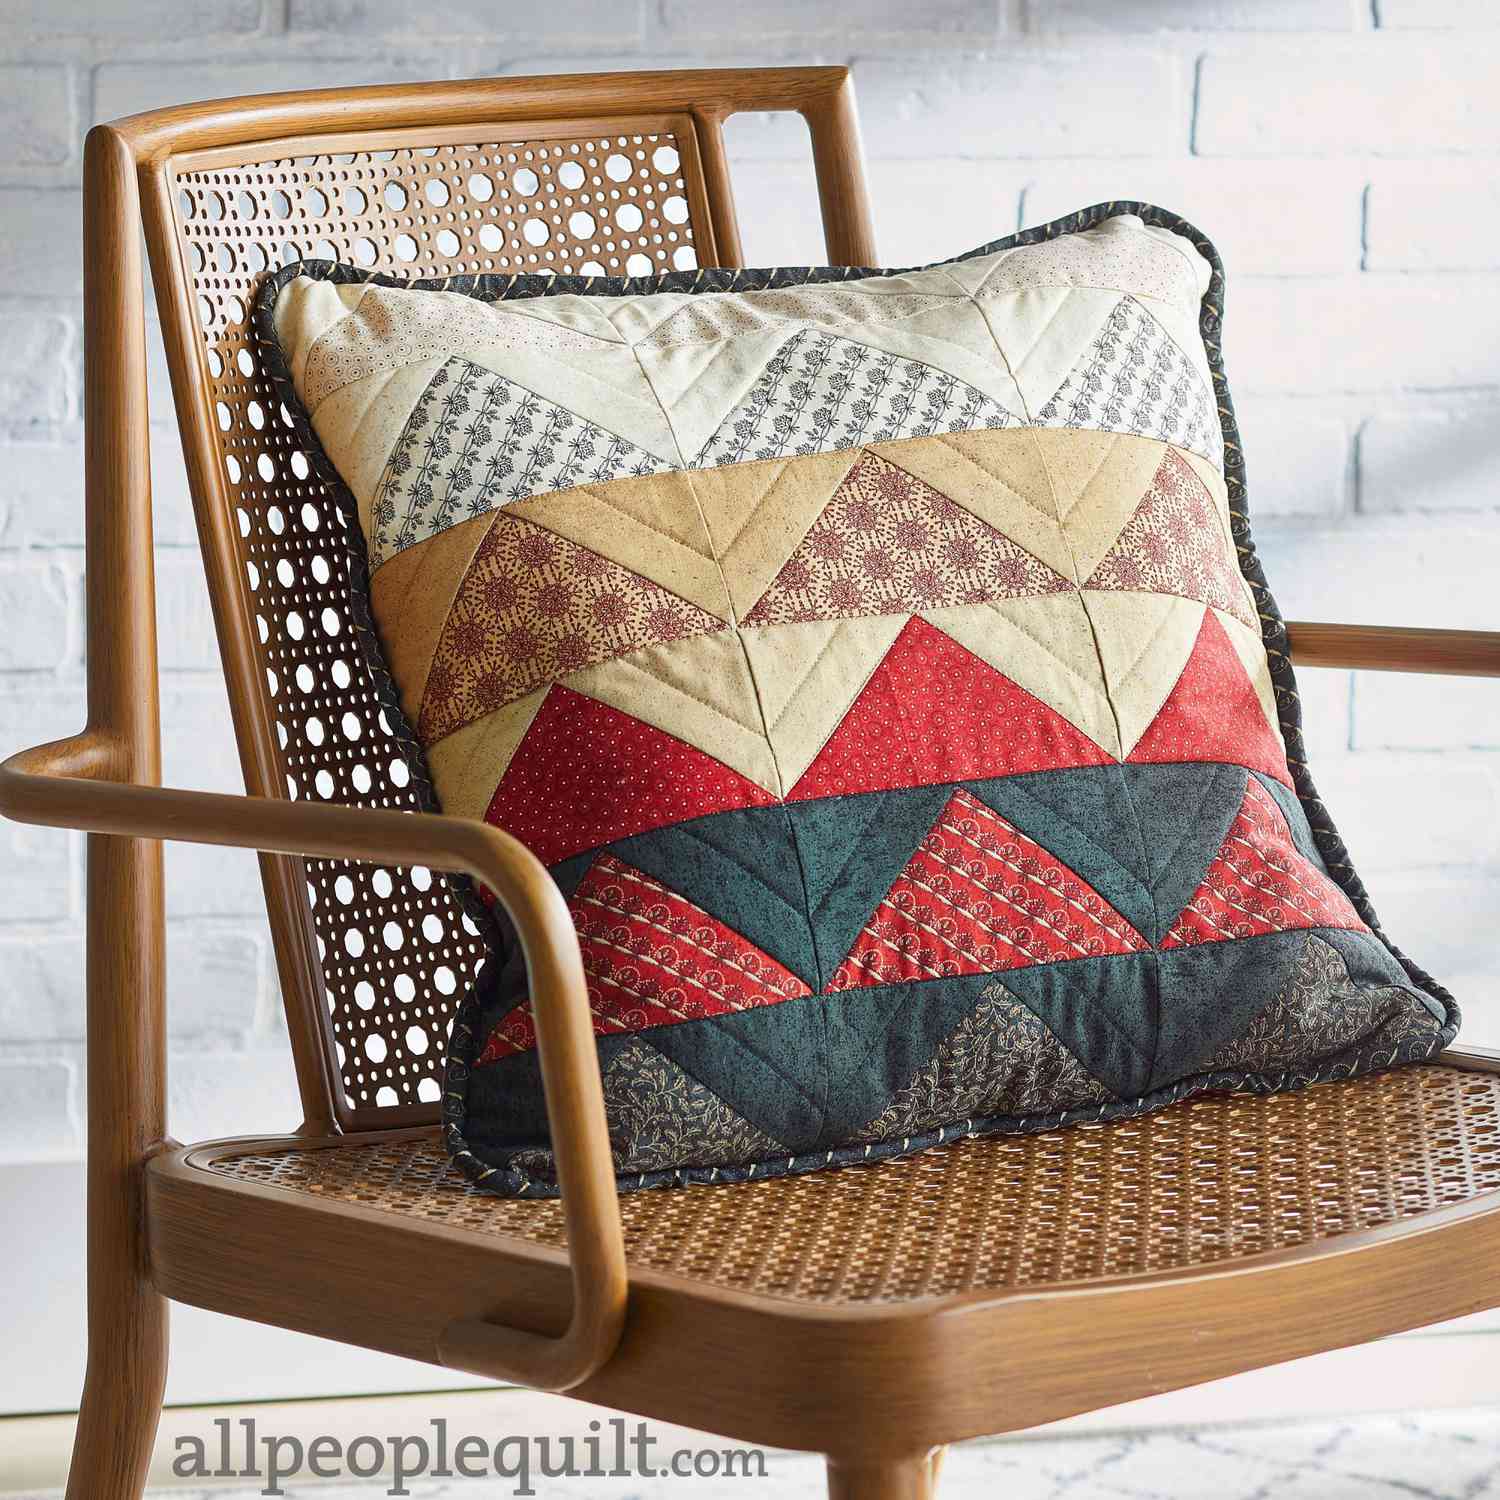
Flying Geese form a gradation of white, red, and black prints in a pretty pillow. Fabrics are from the Snowbound collection by Kathy Schmitz for Moda Fabrics.
Materials
Yardages and cutting instructions are based on 42" of usable fabric width.
- 1/4 yard each white tone-on-tone and black tone-on-tone (blocks)
- 9×21" piece (fat eighth) each cream print, white floral, tan tone-on-tone, tan print, cream tone-on-tone, red print, and black floral (blocks)
- 5/8 yard red floral (blocks, pillow back)
- 1/2 yard black print (piping)
- 2-1/8 yards 3/16-diameter cording (piping)
- 20"-square batting
- 20"-square muslin
- 18"-square pillow form
FINISHED PILLOW: 18" square
FINISHED BLOCK: 3×6"
Cut Fabrics
Cut pieces in the following order.
From white tone-on-tone, cut:
- 12—3-1/2" squares
From cream print, cut:
- 3—3-1/2×6-1/2" rectangles
From white floral, cut:
- 3—3-1/2×6-1/2" rectangles
From tan tone-on-tone, cut:
- 6—3-1/2" squares
From tan print, cut:
- 3—3-1/2×6-1/2" rectangles
From cream tone-on-tone, cut:
- 6—3-1/2" squares
From red print, cut:
- 3—3-1/2×6-1/2" rectangles
From black tone-on-tone, cut:
- 12—3-1/2" squares
From red floral, cut:
- 1—18-1/2" square
- 3—3-1/2×6-1/2" rectangles
From black floral, cut:
- 3—3-1/2×6-1/2" rectangles
From black print, cut:
- Enough 2-1/4-wide bias strips to make 90" in length
Assemble Flying Geese Blocks
These measurements include 1/4" seam allowances. Sew with right sides together unless otherwise stated.
Press seams in directions indicated by arrows on diagrams. If no direction is specified, press seam toward darker fabric.
1. Use a pencil to mark a diagonal line on wrong side of each 3-1/2" square.
2. Align a marked white tone-on-tone square with one end of a cream print 3-1/2×6-1/2" rectangle (Diagram 1; note direction of marked line). Sew on marked line. Trim seam allowance to 1/4"; press open attached triangle. Add a marked white tone-on-tone square to opposite end of rectangle to make a white-cream Flying Geese block. The block should be 3-1/2×6-1/2" including seam allowances. Repeat to make three white-cream Flying Geese blocks total.
3. Repeat Step 2 to make three each of white-white, tan-tan, cream-red, black-red, and black-black Flying Geese blocks.
Assemble Pillow Top
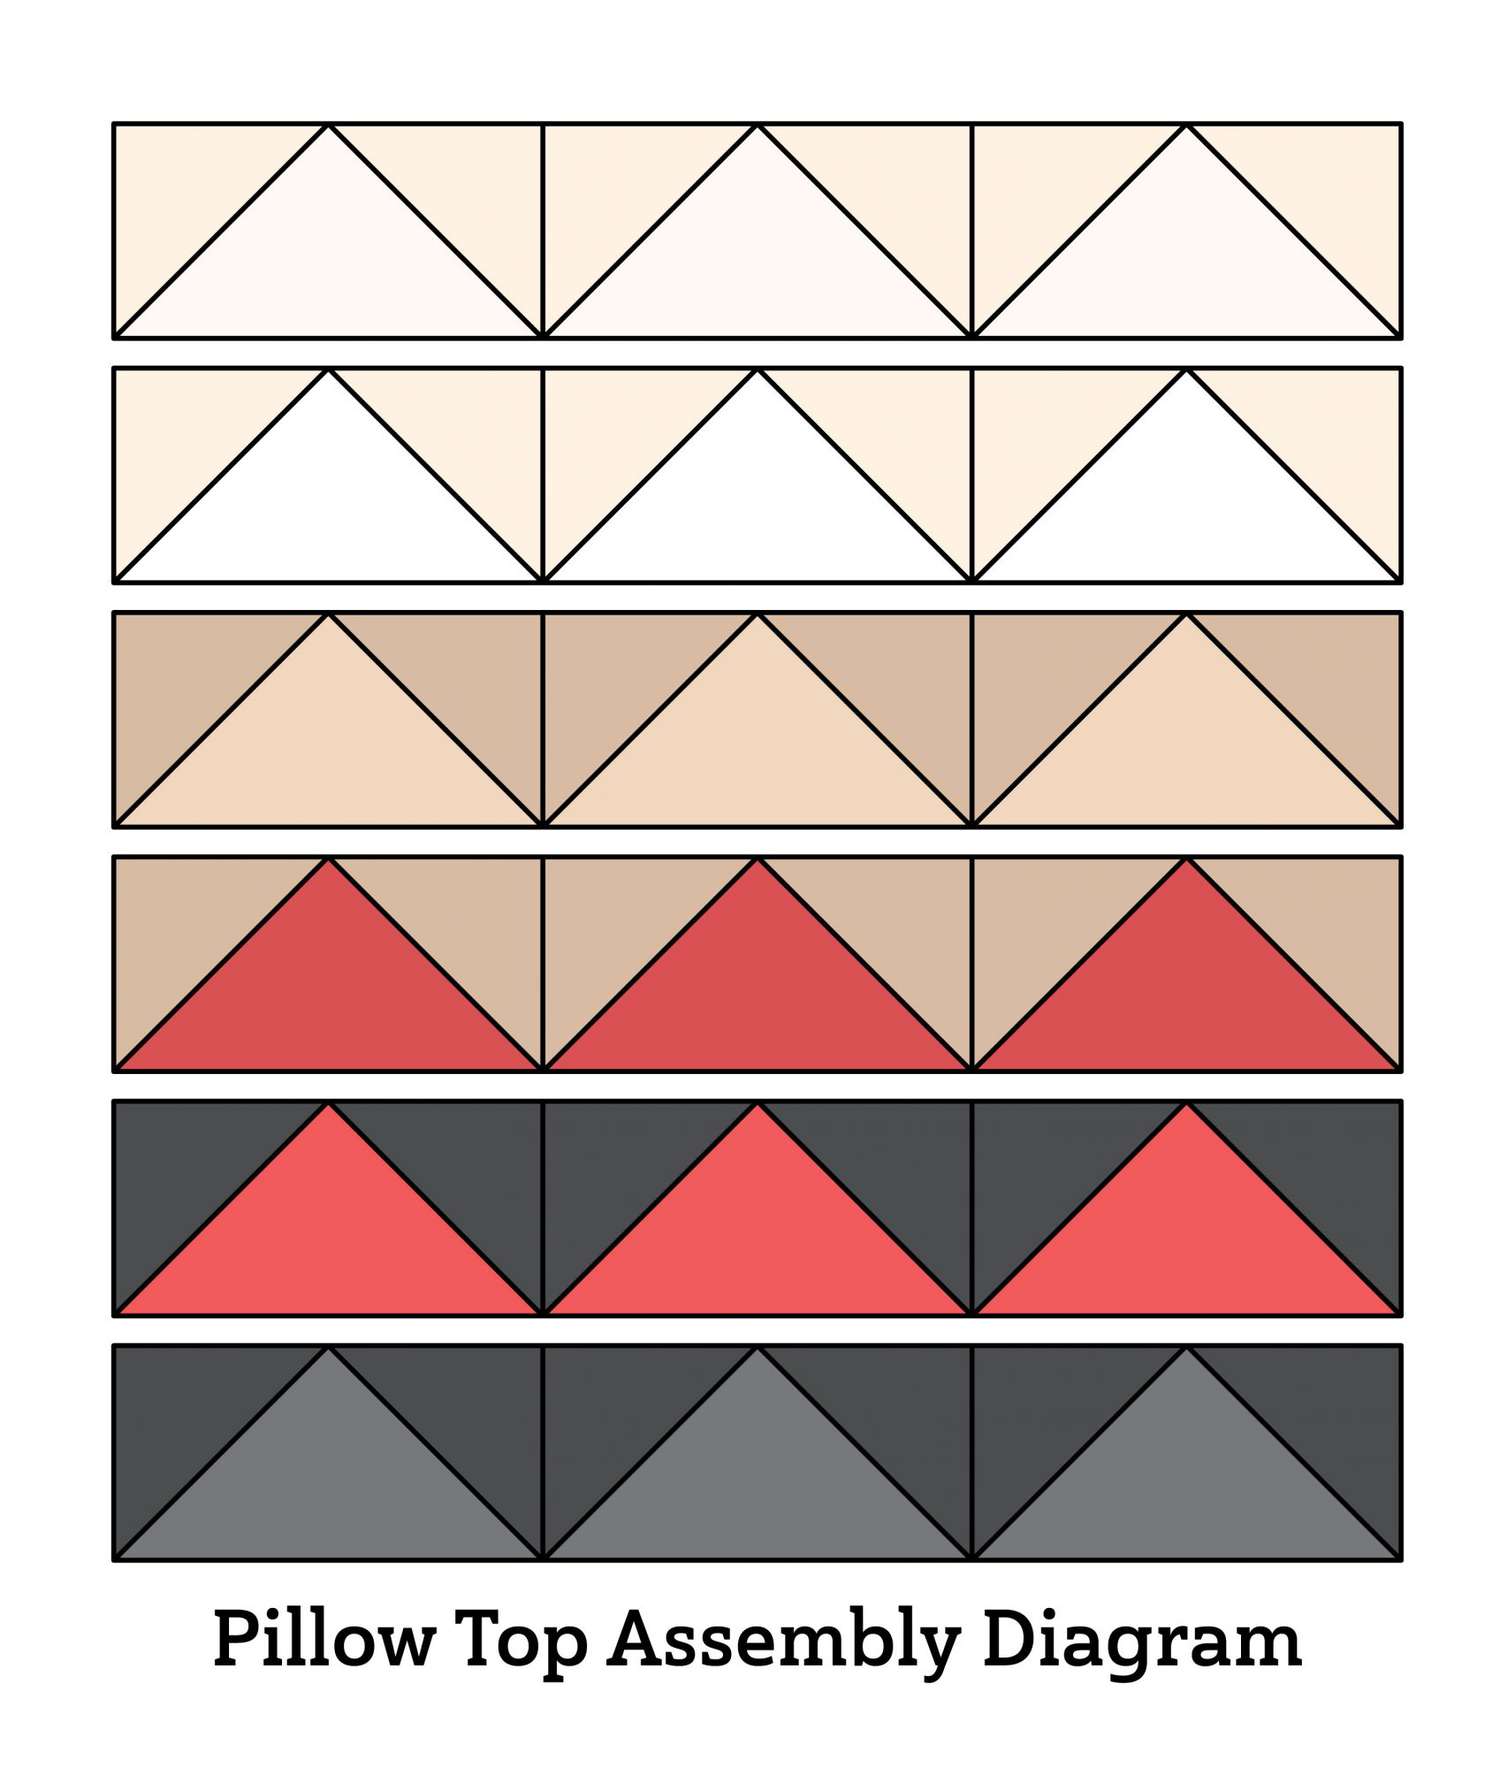
1. Referring to Pillow Top Assembly Diagram, lay out blocks in six rows. Sew together pieces in rows. Press seams in one direction, alternating direction with each row.
2. Join rows to make pillow top. Press seams in one direction. The pillow top should be 18-1/2" square including seam allowances.
Finish Pillow
1. Layer pillow top, batting, and muslin squares; baste. Quilt as desired. Trim batting and muslin even with pillow top edges.
2. Sew together black print 2-1/4"-wide bias strips to make one long pieced bias strip.
3. Fold pieced bias strip in half lengthwise with wrong side inside; press. Insert 3/16"-diameter cording in folded bias strip.
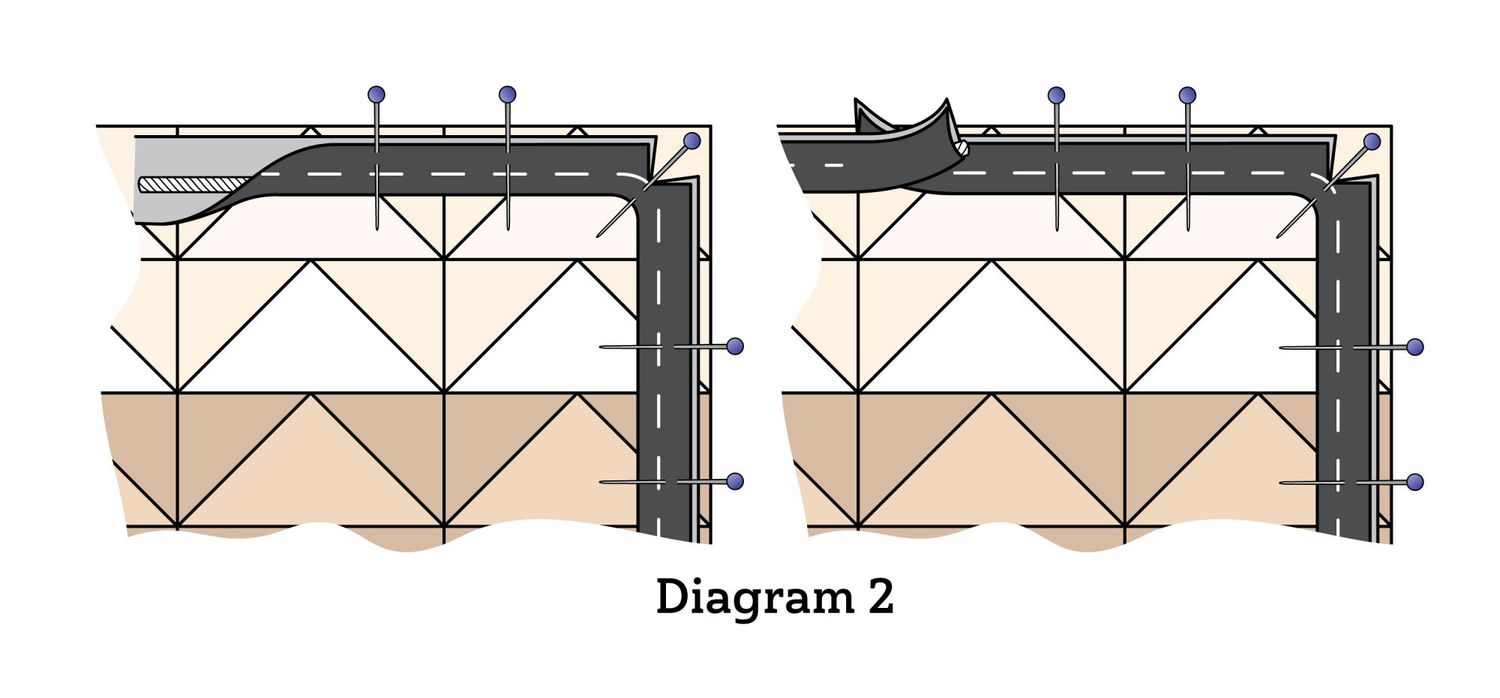
4. Aligning raw edges, using pins as needed, and starting 1-1/2" from piping end, baste piping to front edges of pillow top. As you stitch each corner, clip seam allowance to within a few threads of stitching line (Diagram 2); gently ease piping in place.
5. Lap piping ends, pushing piping tails into seam allowance (Diagram 2).
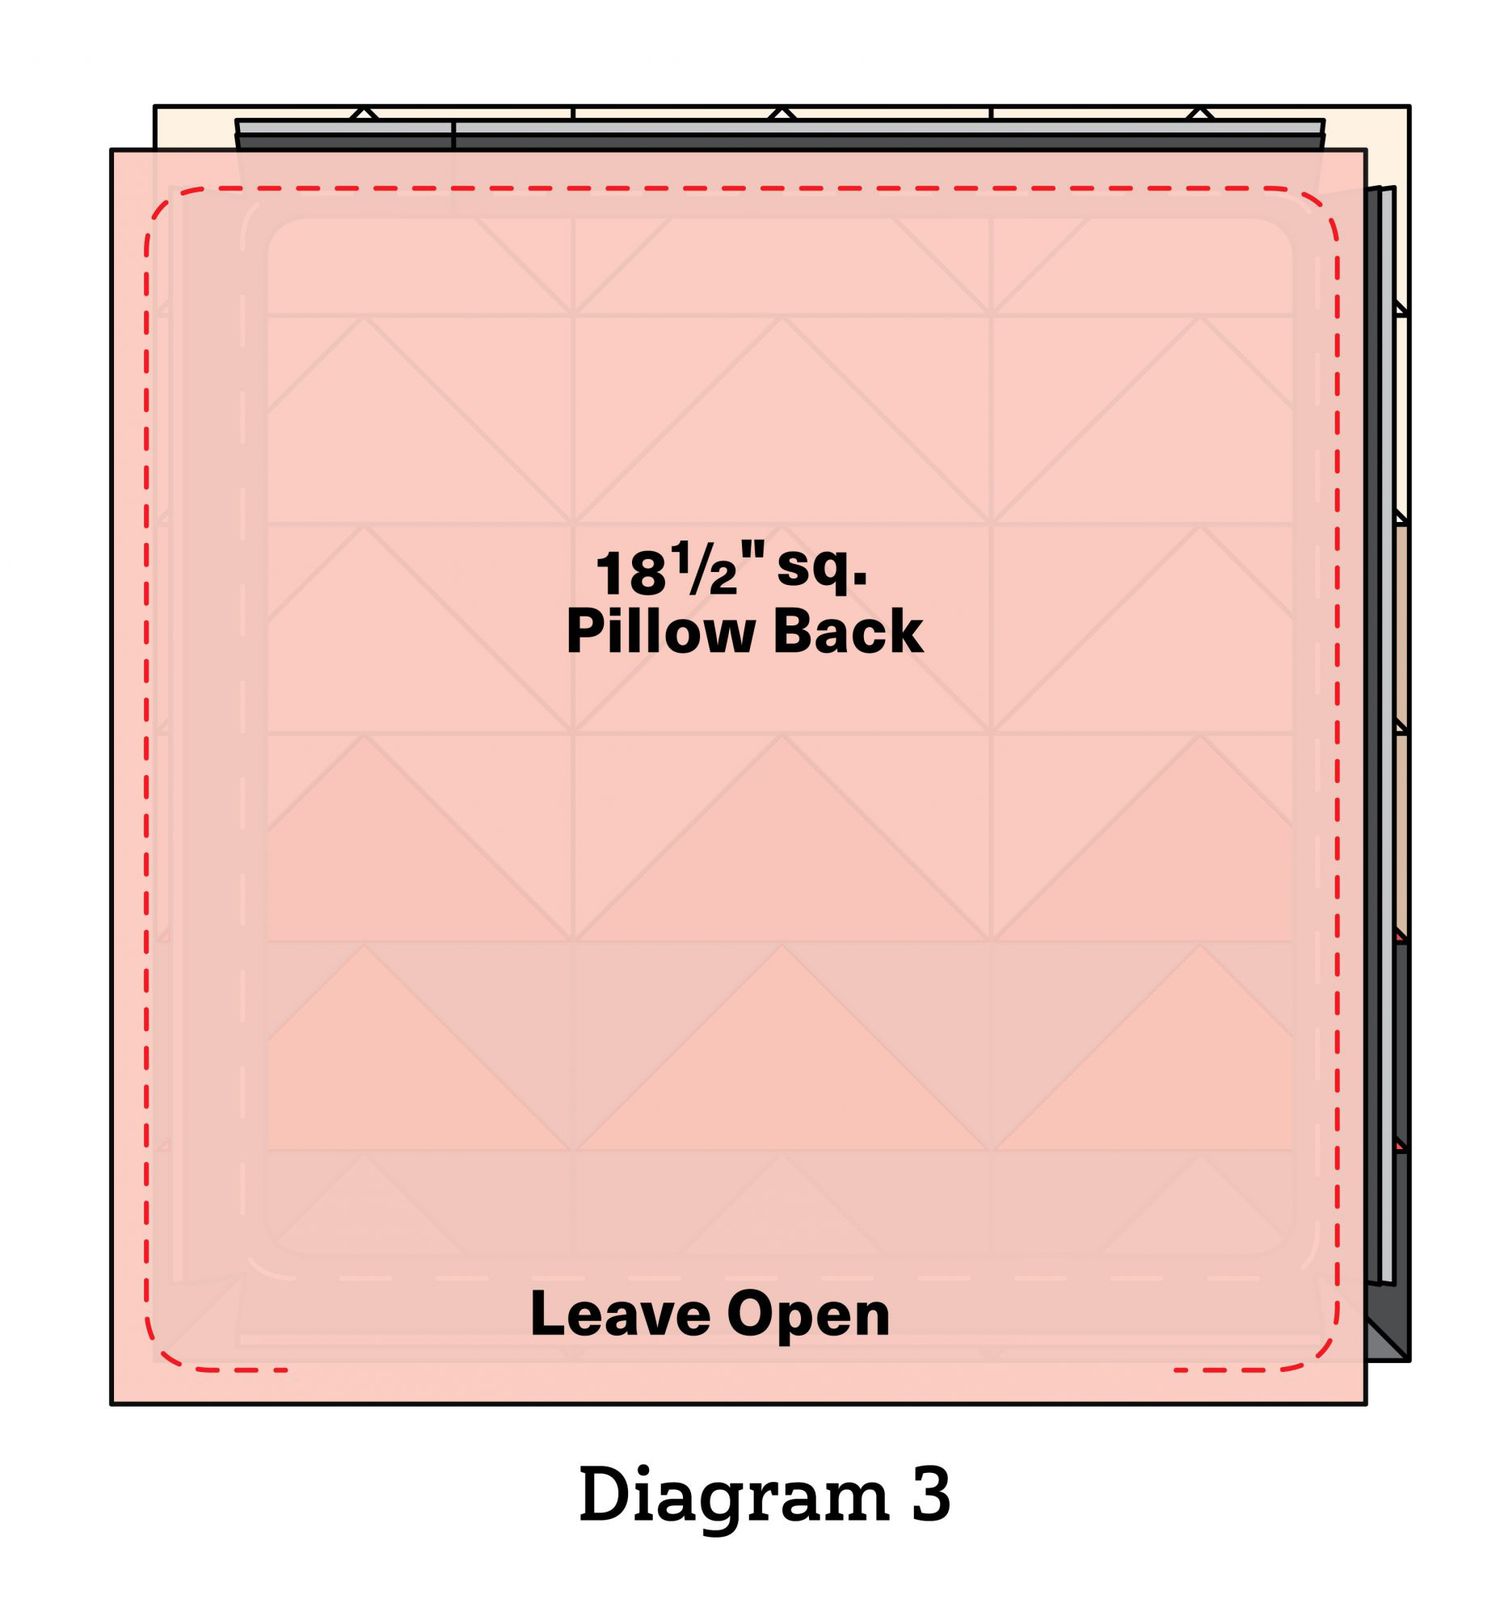
6. Layer pillow top and red floral 18-1/2" square with right sides together. Stitch 1/4" from outer edges, rounding stitches in corner to catch the piping and leaving a 10" opening for turning (Diagram 3), to make pillow cover. Trim piping ends even with pillow cover edges.
7. Turn pillow cover right side out through opening; press.
8. Insert pillow form in pillow cover through opening. Hand-stitch opening closed to complete pillow. Rip out any visible basting stitches on piping.
August 9, 2020
Fall Mug Rugs
Set cups of apple cider on autumn-theme mug rugs.
Fabrics are from the Grunge Basics
and Grunge Hits the Spot collections by BasicGrey for Moda Fabrics.
-
Designer: Kristina Brinkerhoff of Center Street Quilts
Finished mug rugs: 5-1/2×8-1/2"
Finished blocks: 5" square
Materials for Three Mug Rugs
Yardages and cutting instructions are based on 42" of usable fabric width.
- 10" square each mottled brown and mottled black (blocks)
- 1/4 yard solid white (blocks)
- 1/2 yard mottled orange (blocks, backing, binding)
- 5" square gold print (blocks)
- 1/4 yard total assorted mottled orange, brown, and gold (mug rug tops)
- 3—5-1/2×8-1/2" rectangles batting
Cut Fabrics
Cut pieces in the following order.
From mottled brown, cut:
- 1—3-1/2?×4" rectangle
- 5—1-1/2" squares
From solid white, cut:
- 1—2×5-1/2" rectangle
- 4—2" squares
- 2—1-1/2×4" rectangles
- 4—1-1/2?×3-1/2" rectangles
- 8—1-1/2" squares
- 2—1-1/4×1-1/2" rectangles
- 2—1?×2-3/4" rectangles
- 2—1" squares
From mottled orange, cut:
- 3—2-1/2×42" binding strips
- 3—5-1/2×8-1/2" backing rectangles
- 8—1-1/2" squares
From gold print, cut:
- 1—1-1/2×4" rectangle
- 1—1" square
From mottled black, cut:
- 1—4?×5-1/2" rectangle
- 2—2" squares
From assorted mottled orange, brown, and gold, cut:
- 15—1-1/2×3-1/2" rectangles
Assemble Star Block
Measurements include 1/4" seam allowances. Sew with right sides together unless otherwise stated.
Press seams in directions indicated by arrows on diagrams. If no direction is specified, press seam toward darker fabric.
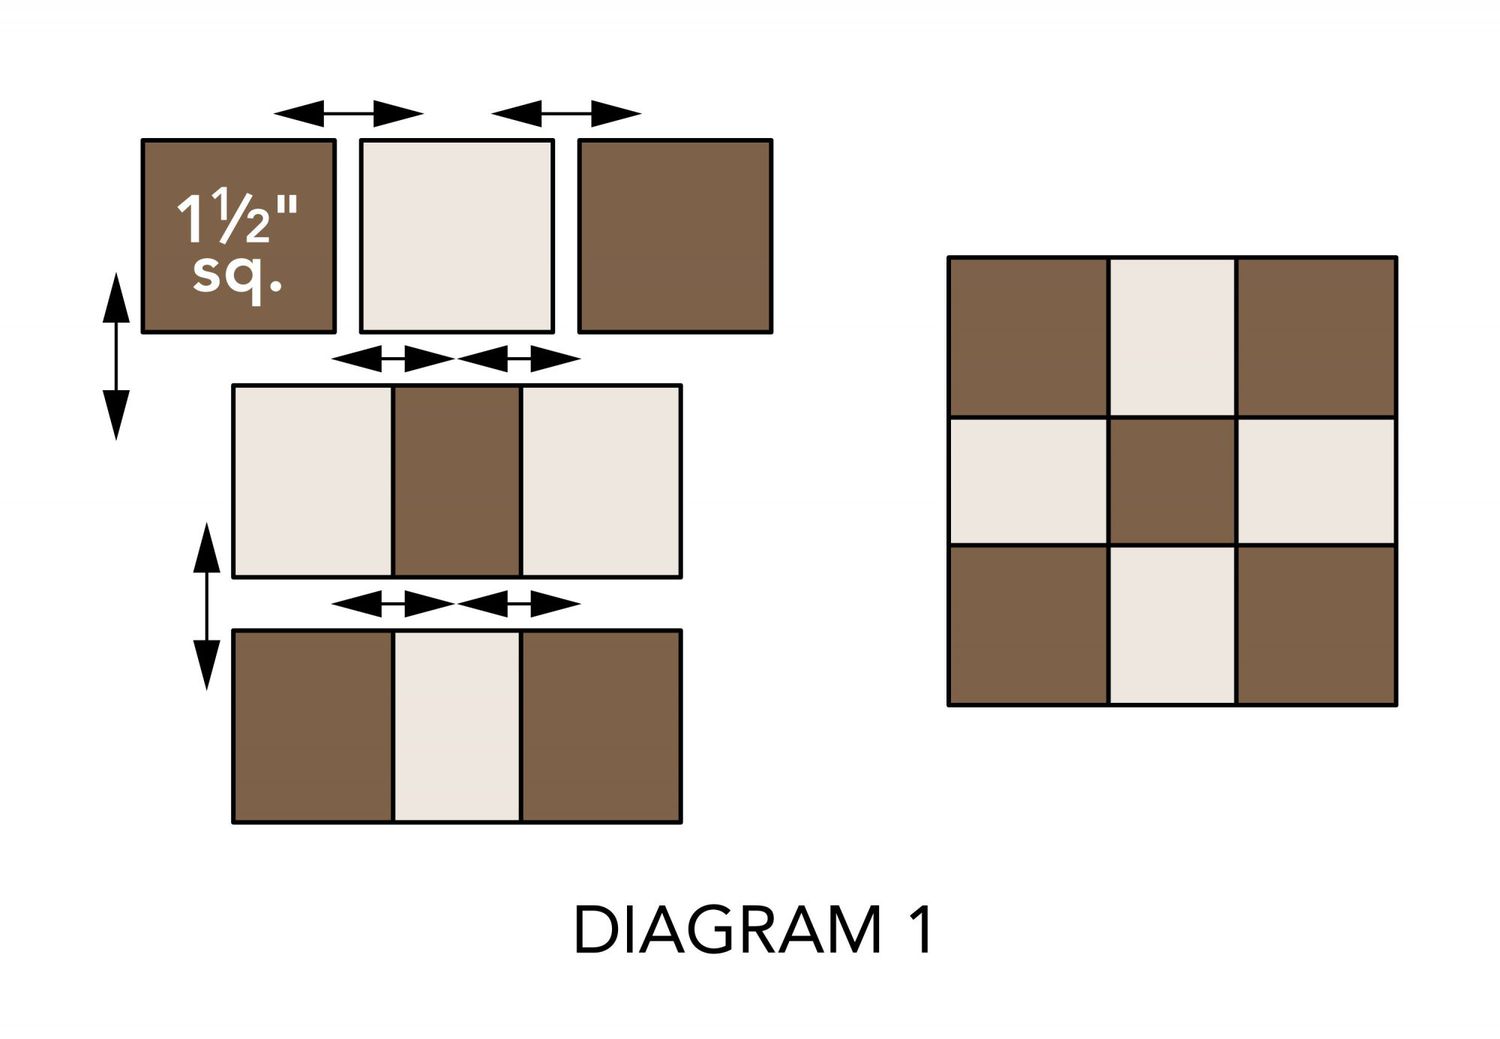
1) Lay out mottled brown 1-1/2" squares and four solid white 1-1/2" squares in three rows (Diagram 1). Sew together squares in rows. Join rows to make a Nine-Patch unit. The unit should be 3-1/2" square including seam allowances.
2) Mark a diagonal line on wrong side of each mottled orange 1-1/2" square.
3) Align a marked mottled orange square with a short end of a solid white 1-1/2×3-1/2" rectangle (Diagram 2; note direction of marked line).
Sew on marked line. Trim excess fabric, leaving a 1/4" seam allowance. Press open attached triangle. Repeat on opposite end to make a side unit.
The unit still should be 1-1/2×3-1/2" including seam allowances. Repeat to make four side units total.4) Referring to Diagram 3, lay out Nine-Patch unit, four side units, and four solid white 1-1/2" squares in three rows. Sew together pieces in rows. Join rows to make a star block. The block should be 5-1/2" square including seam allowances.
Assemble Acorn Block
1) Join solid white 1×2-3/4" rectangles to gold print 1" square to make an acorn stem unit (Diagram 4). The unit should be 1×5-1/2" including seam allowances.
2) Mark a diagonal line on wrong side of solid white 1" squares and two solid white 2" squares.
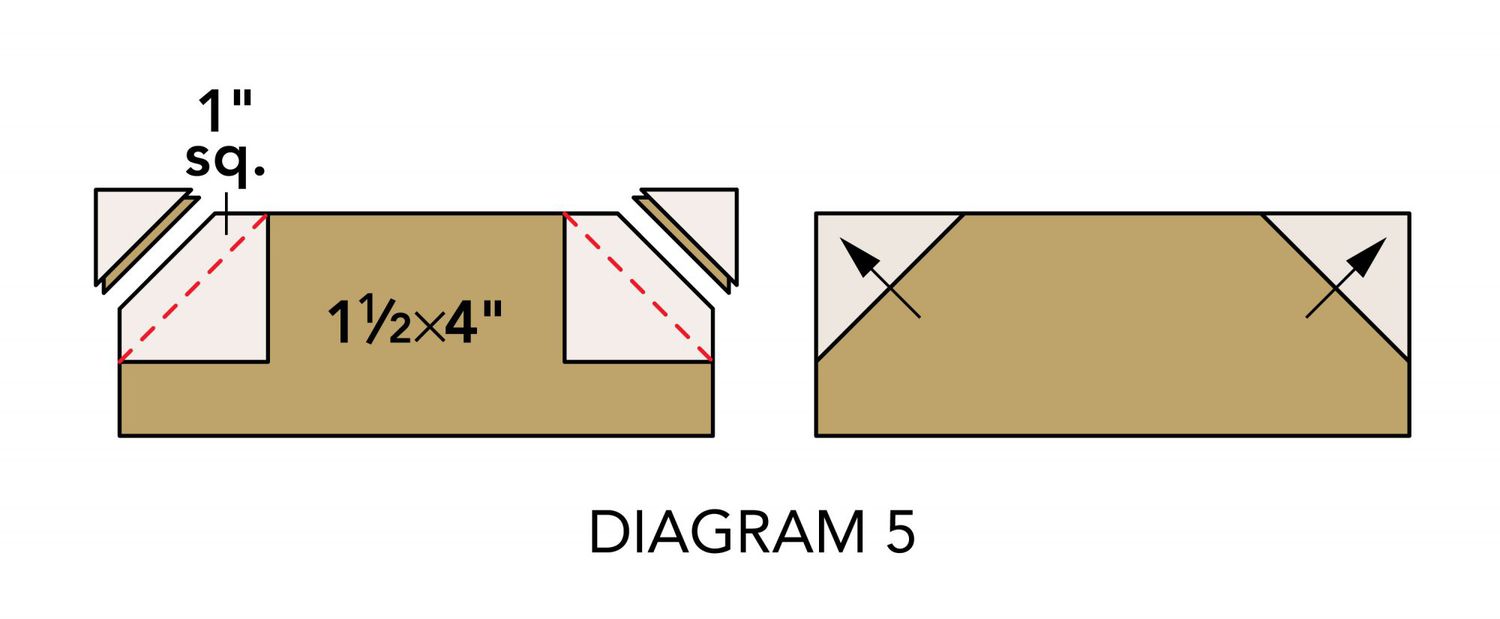
3) Referring to Diagram 5, align a marked solid white 1" square with one corner of a gold print 1-1/2?×4" rectangle. Sew on marked line. Trim excess fabric, leaving a 1/4" seam allowance. Press open attached triangle. Add remaining marked solid 1" white square to opposite corner of gold print rectangle to make an acorn cap unit. The unit still should be 1-1/2×4" including seam allowances.
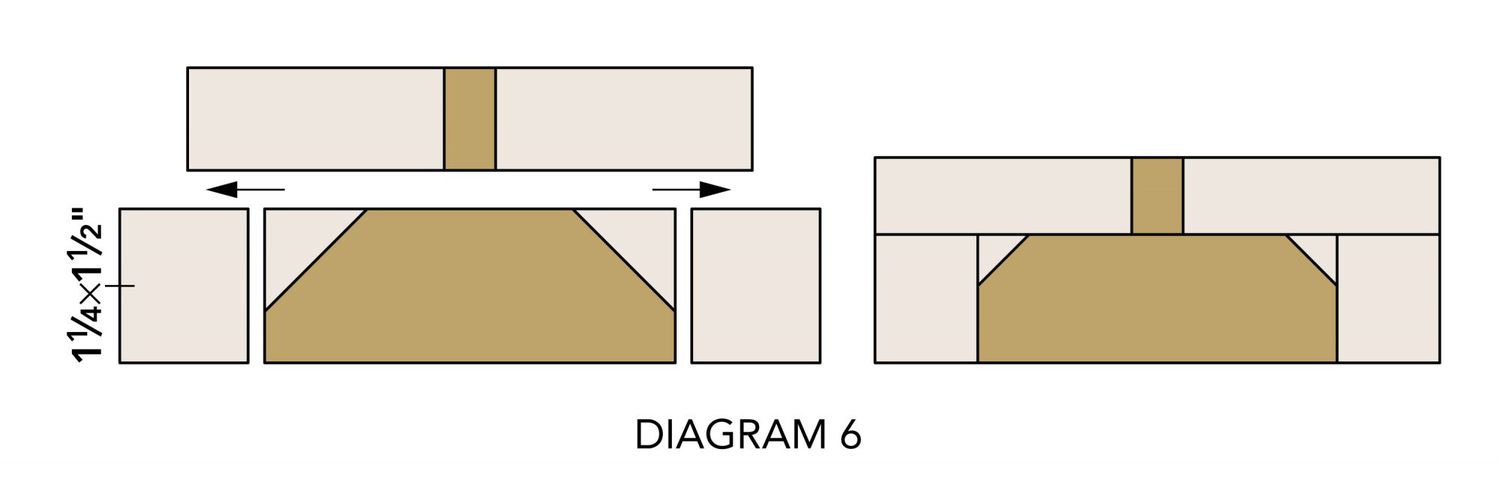
4) Join solid white 1-1/4×1-1/2" rectangles to acorn cap unit (Diagram 6). Sew acorn stem unit and acorn cap unit together to make an acorn top unit. The unit should be 2×5-1/2" including seam allowances.
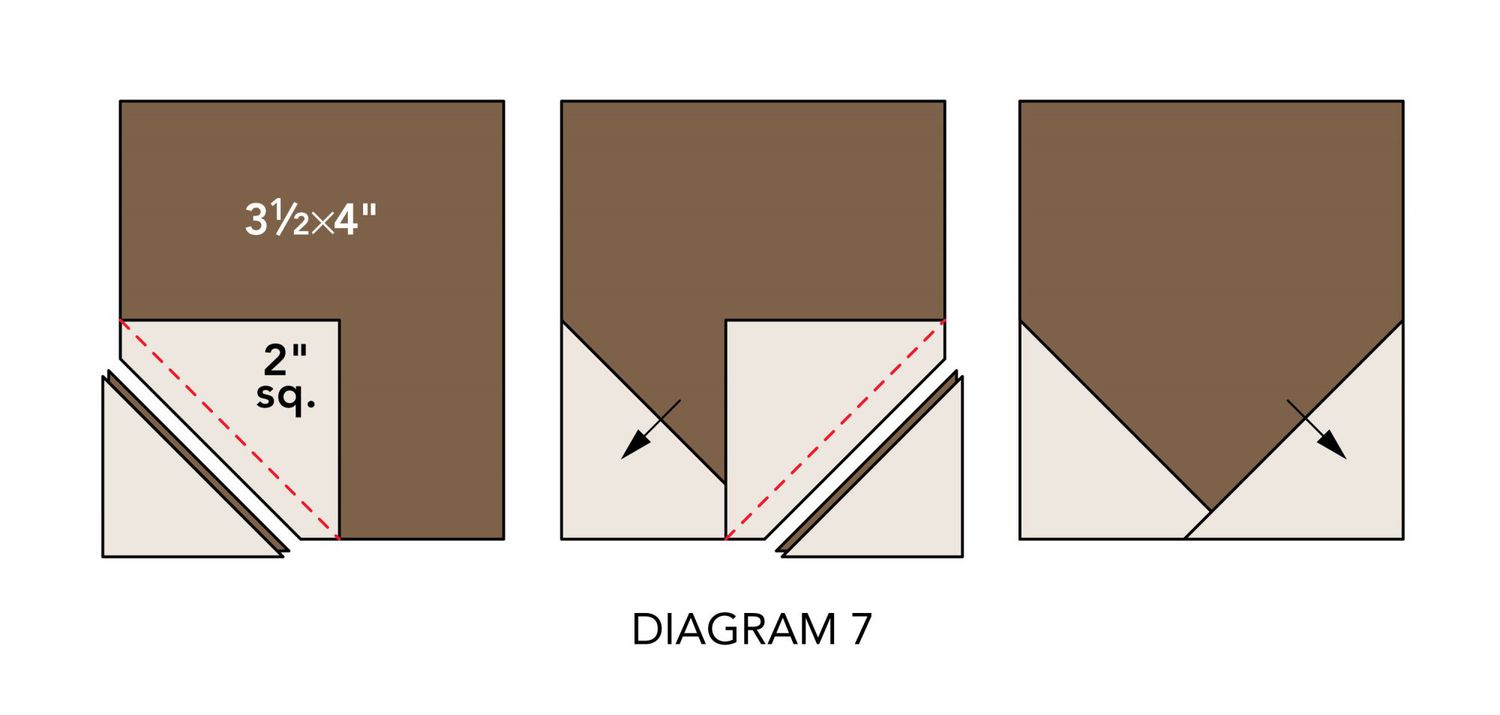
5) Referring to Diagram 7, align a marked solid white 2" square with one corner of a mottled brown 3-1/2?×4" rectangle. Sew on marked line. Trim excess fabric, leaving a 1/4" seam allowance. Press open attached triangle. Add remaining marked solid white 2" square to opposite corner of mottled brown rectangle to make an acorn bottom unit. The unit still should be 3-1/2×4" including seam allowances.
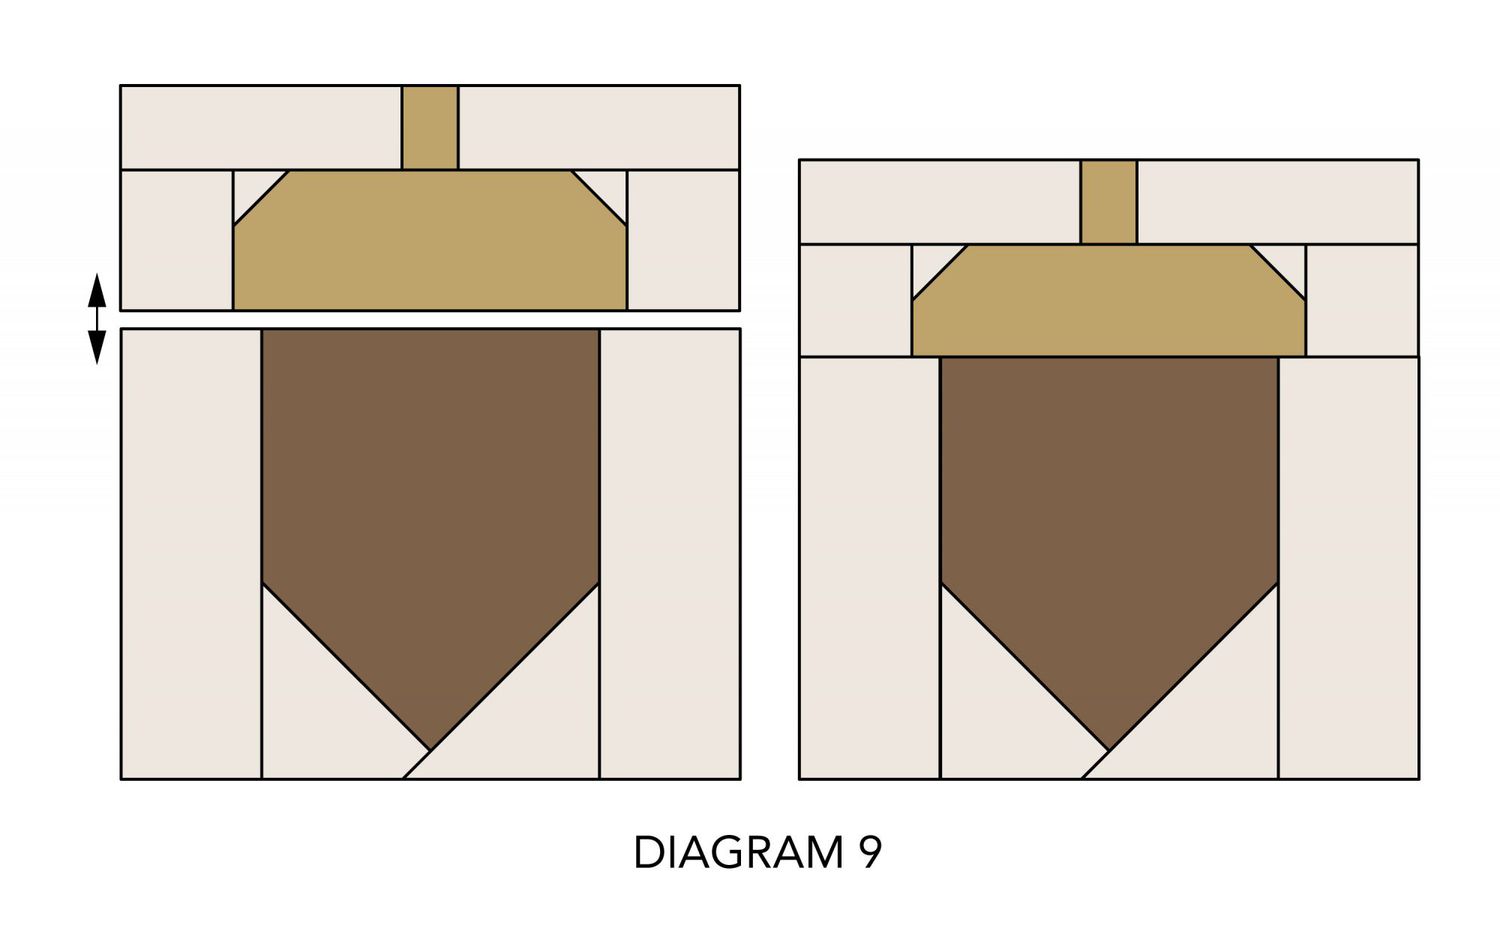
6) Join solid white 1-1/2×4" rectangles to acorn bottom unit (Diagram 8). Sew acorn top unit and acorn bottom unit together to make an acorn block (Diagram 9). The block should be 5-1/2" square including seam allowances.
Assemble Cat Block
1) Mark a diagonal line on wrong side of each mottled black 2" square and remaining solid white 2" squares.
2) Referring to Diagram 10, align a marked mottled black square with one corner of a solid white 2×5-1/2" rectangle. Sew on marked line. Trim excess fabric, leaving a 1/4" seam allowance. Press open attached triangle. Add remaining marked mottled black square to opposite corner of solid white rectangle to make a cat ears unit. The unit still should be 2×5-1/2" including seam allowances.
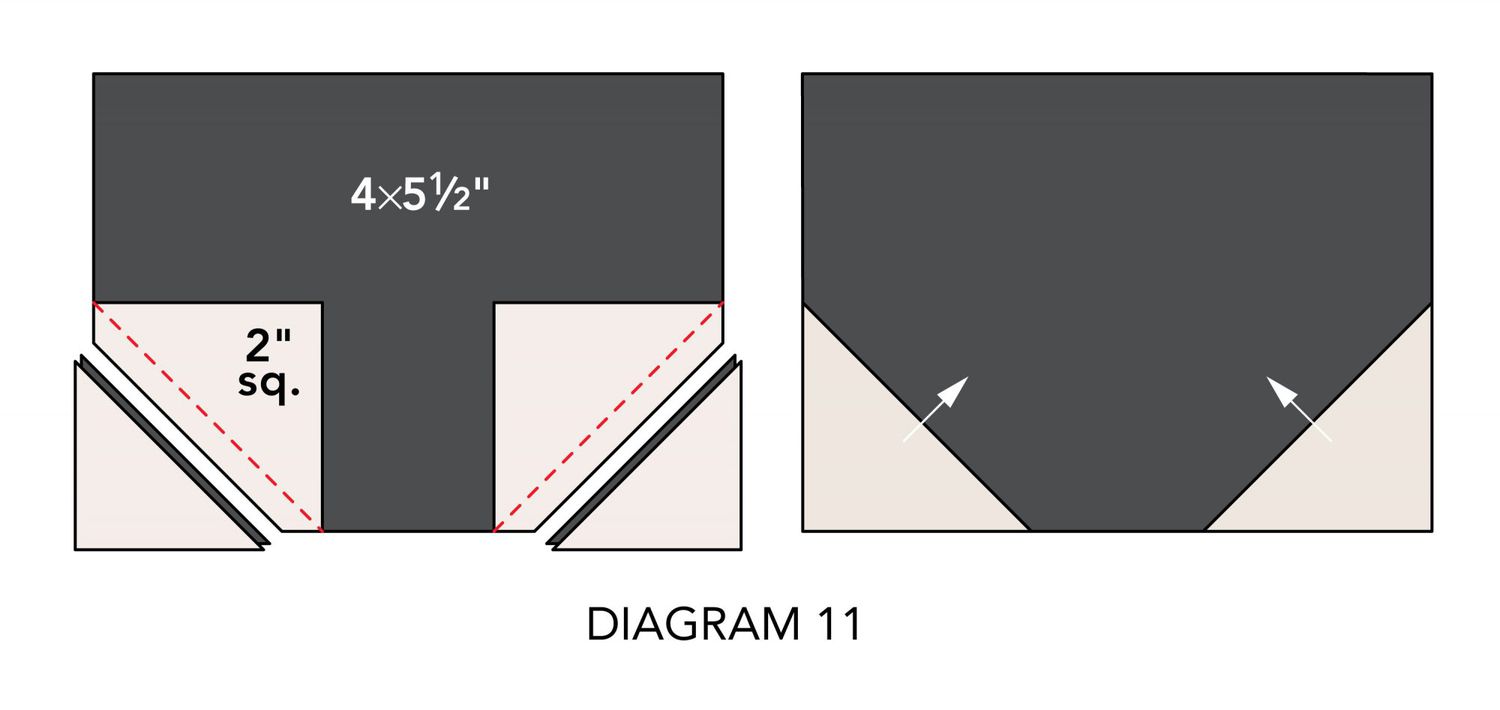
3) Referring to Diagram 11, align a marked solid white 2" square with one corner of mottled black 4?×5-1/2" rectangle. Sew on marked line. Trim excess fabric, leaving a 1/4" seam allowance. Press open attached triangle. Add remaining marked solid white 2" square to opposite corner of mottled black rectangle to make a cat face unit. The unit still should be 4?×5-1/2" including seam allowances.
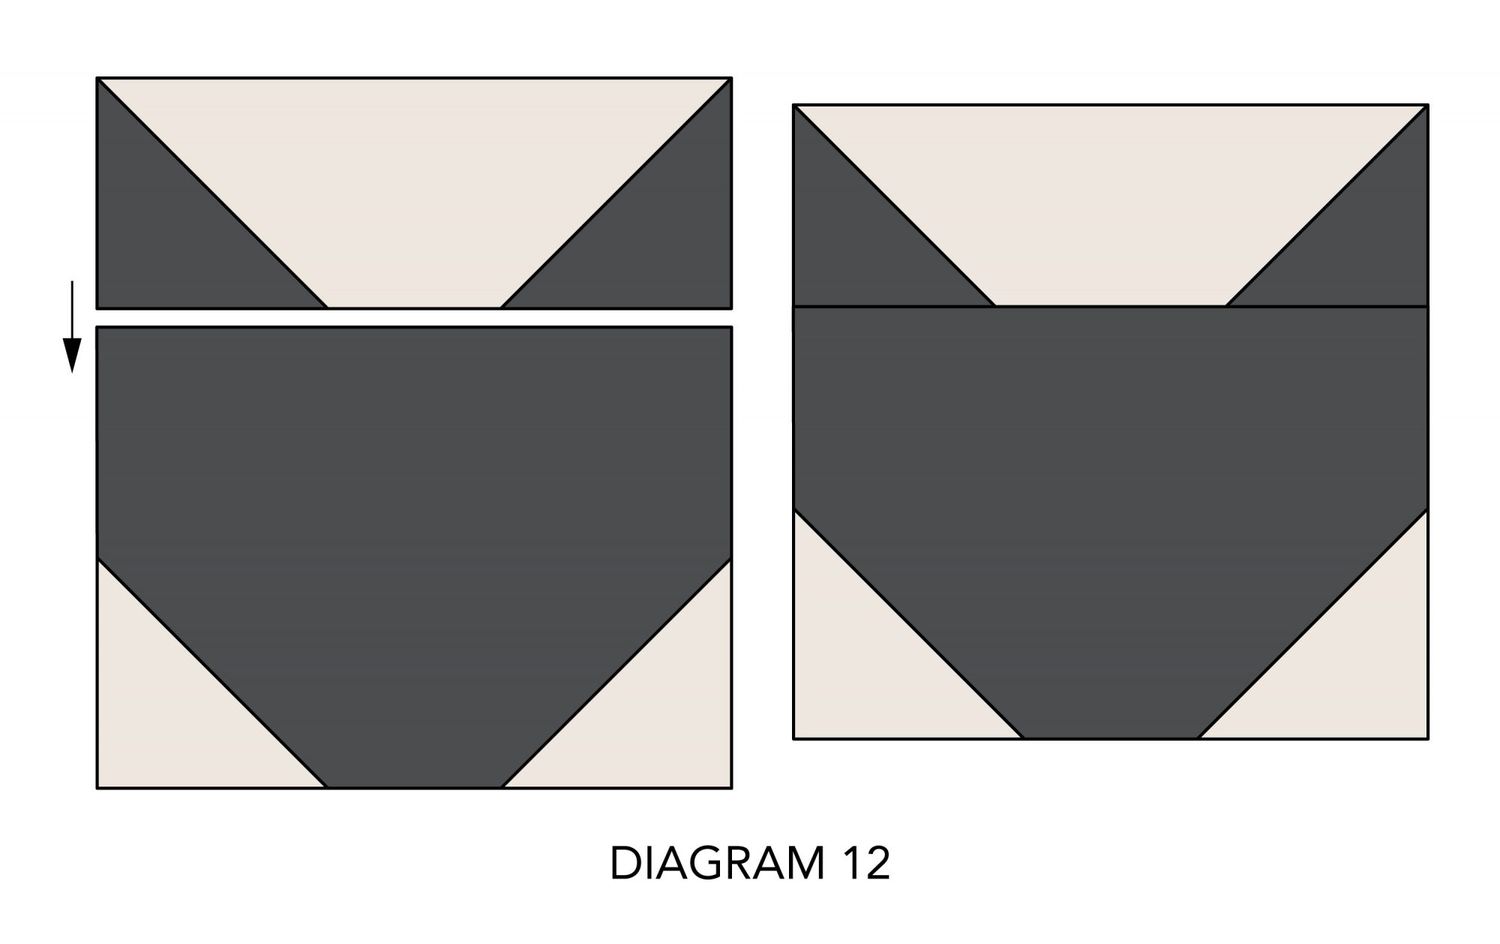
4) Sew together cat ears unit and cat face unit to make a cat block (Diagram 12). The block should be 5-1/2" square including seam allowances.
Assemble Mug Rugs
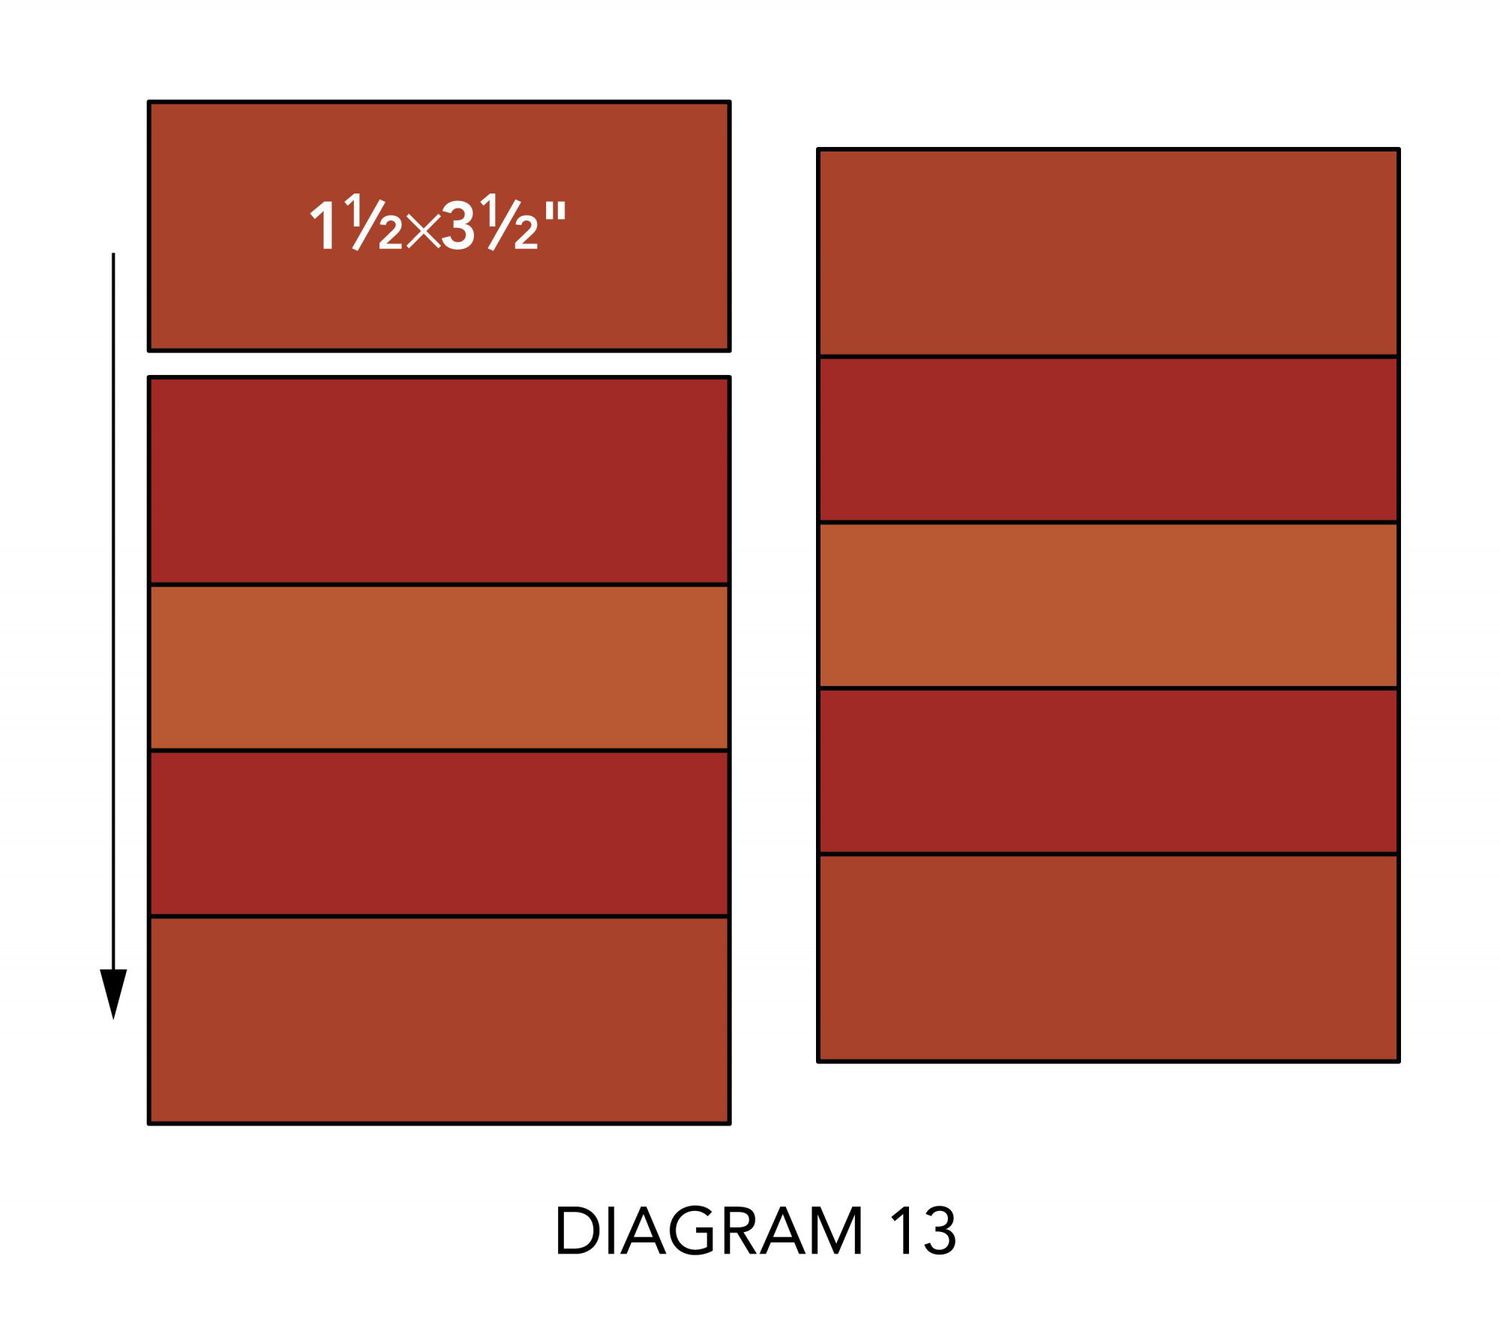
1) Sew together five assorted mottled orange, brown, and gold 1-1/2×3-1/2" rectangles (Diagram 13) to make a pieced unit. The pieced unit should be 3-1/2×5-1/2" including seam allowances. Repeat to make three pieced units total.
2) Sew a block to each pieced unit to make three mug rug tops (Diagram 14). Each mug rug top should be 5-1/2×8-1/2" including seam allowances.
.................................................................................................................................................................................................................................................................
July 30, 2020
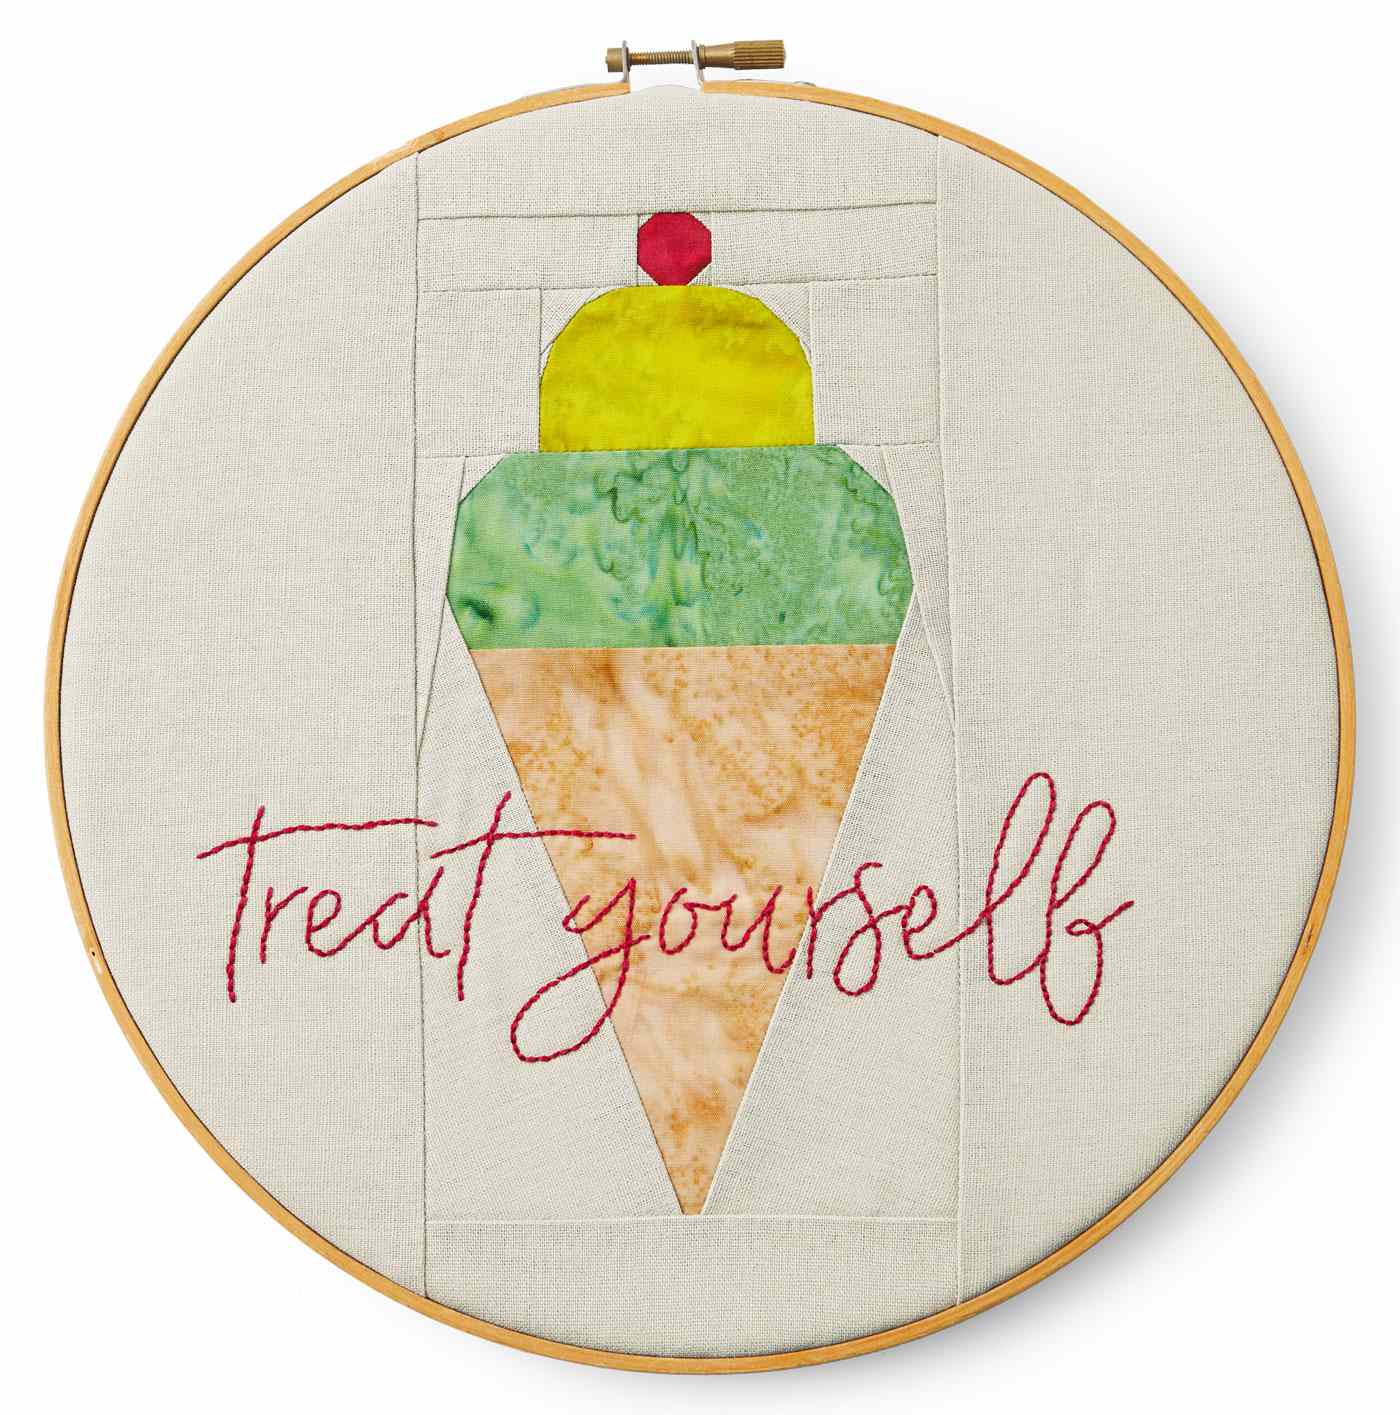
Ice Cream Wall Art
Treat yourself to a foundation-pieced ice cream cone block. Frame it for cool wall decor. Fabrics are from the Artisan Batiks: Prisma Dyes collection by Lunn Studios and Essex Linen collection, both from Robert Kaufman Fabrics.
Inspired by Festive Foundations: Summer from designer Charise Randell
Project tester: Martha Gamm
Materials
Yardages and cutting instructions are based on 42" of usable fabric width.
- Scraps of red, yellow, green, and tan batiks
- 1⁄3 yard cream linen
- Lightweight copy paper, tracing paper, or foundation material of your choice
- Flat head pins
- Embroidery floss: red
- Air-soluble marking pen
- 10"-diameter embroidery hoop
- 10"-square felt (optional)
- Add-A-Quarter ruler (addaquarter.com; optional)
Finished block: 4-1⁄4 ×10"
Finished size: 10" diameter
Cut Fabrics
Cut pieces in the following order. Because the blocks are foundation-pieced, fabric pieces are cut larger than necessary. You'll trim them to the correct sizes after stitching them to a foundation.
From red batik, cut:
- 1-1-1⁄2" square (position A1)
From cream linen, cut:
- 2-4-1⁄8 ×10⁻¹⁄2" rectangles
- 2-1-1⁄4 ×12" rectangles
- 8-1" squares (positions A2–A5, B2, B3, B6, and B7)
- 2-1-1⁄2 ×3" rectangles (positions A6 and A7)
- 1-1-3⁄4 ×5-1⁄4" rectangle (position A8)
- 4-1-1⁄2" squares (positions B4, B8, C3, and C4)
- 2-2-1⁄2" squares (positions B5 and B9)
- 2-1-1⁄2 ×4" rectangles (positions C7 and C8)
- 2-3-1⁄2×6" rectangles (positions C5 and C6)
- 1-2×5-1⁄4" rectangle (position C9)
From yellow batik, cut:
- 1-2-1⁄2 ×3-1⁄4" rectangle (position B1)
From green batik, cut:
- 1-2-1⁄2 ×4-3⁄4" rectangle (position C1)
From tan batik, cut:
- 1-4-1⁄2 ×5-1⁄2" rectangle (position C2)
Prepare Foundation Papers
1) Click on "Download this Project" above for the full-size foundation pattern. Print each foundation section once on foundation material. Be sure to print the sections at 100% or full scale and check the accuracy of printing with the 1"-square guide.
2) Cut out foundation sections A–C roughly 1⁄4" outside dashed lines to make three foundation papers.
Assemble Ice Cream Unit
To foundation-piece, stitch fabric pieces to a foundation paper with marked side of paper facing up and fabric pieces layered underneath. The resulting pieced unit is a mirror image of the foundation paper. When foundation-piecing, use a tiny stitch length (12–16 stitches per inch).
Press seams in directions indicated by arrows on diagrams. If no direction is specified, press seam toward darker fabric.
1) Gather red batik and cream linen pieces for foundation paper A.
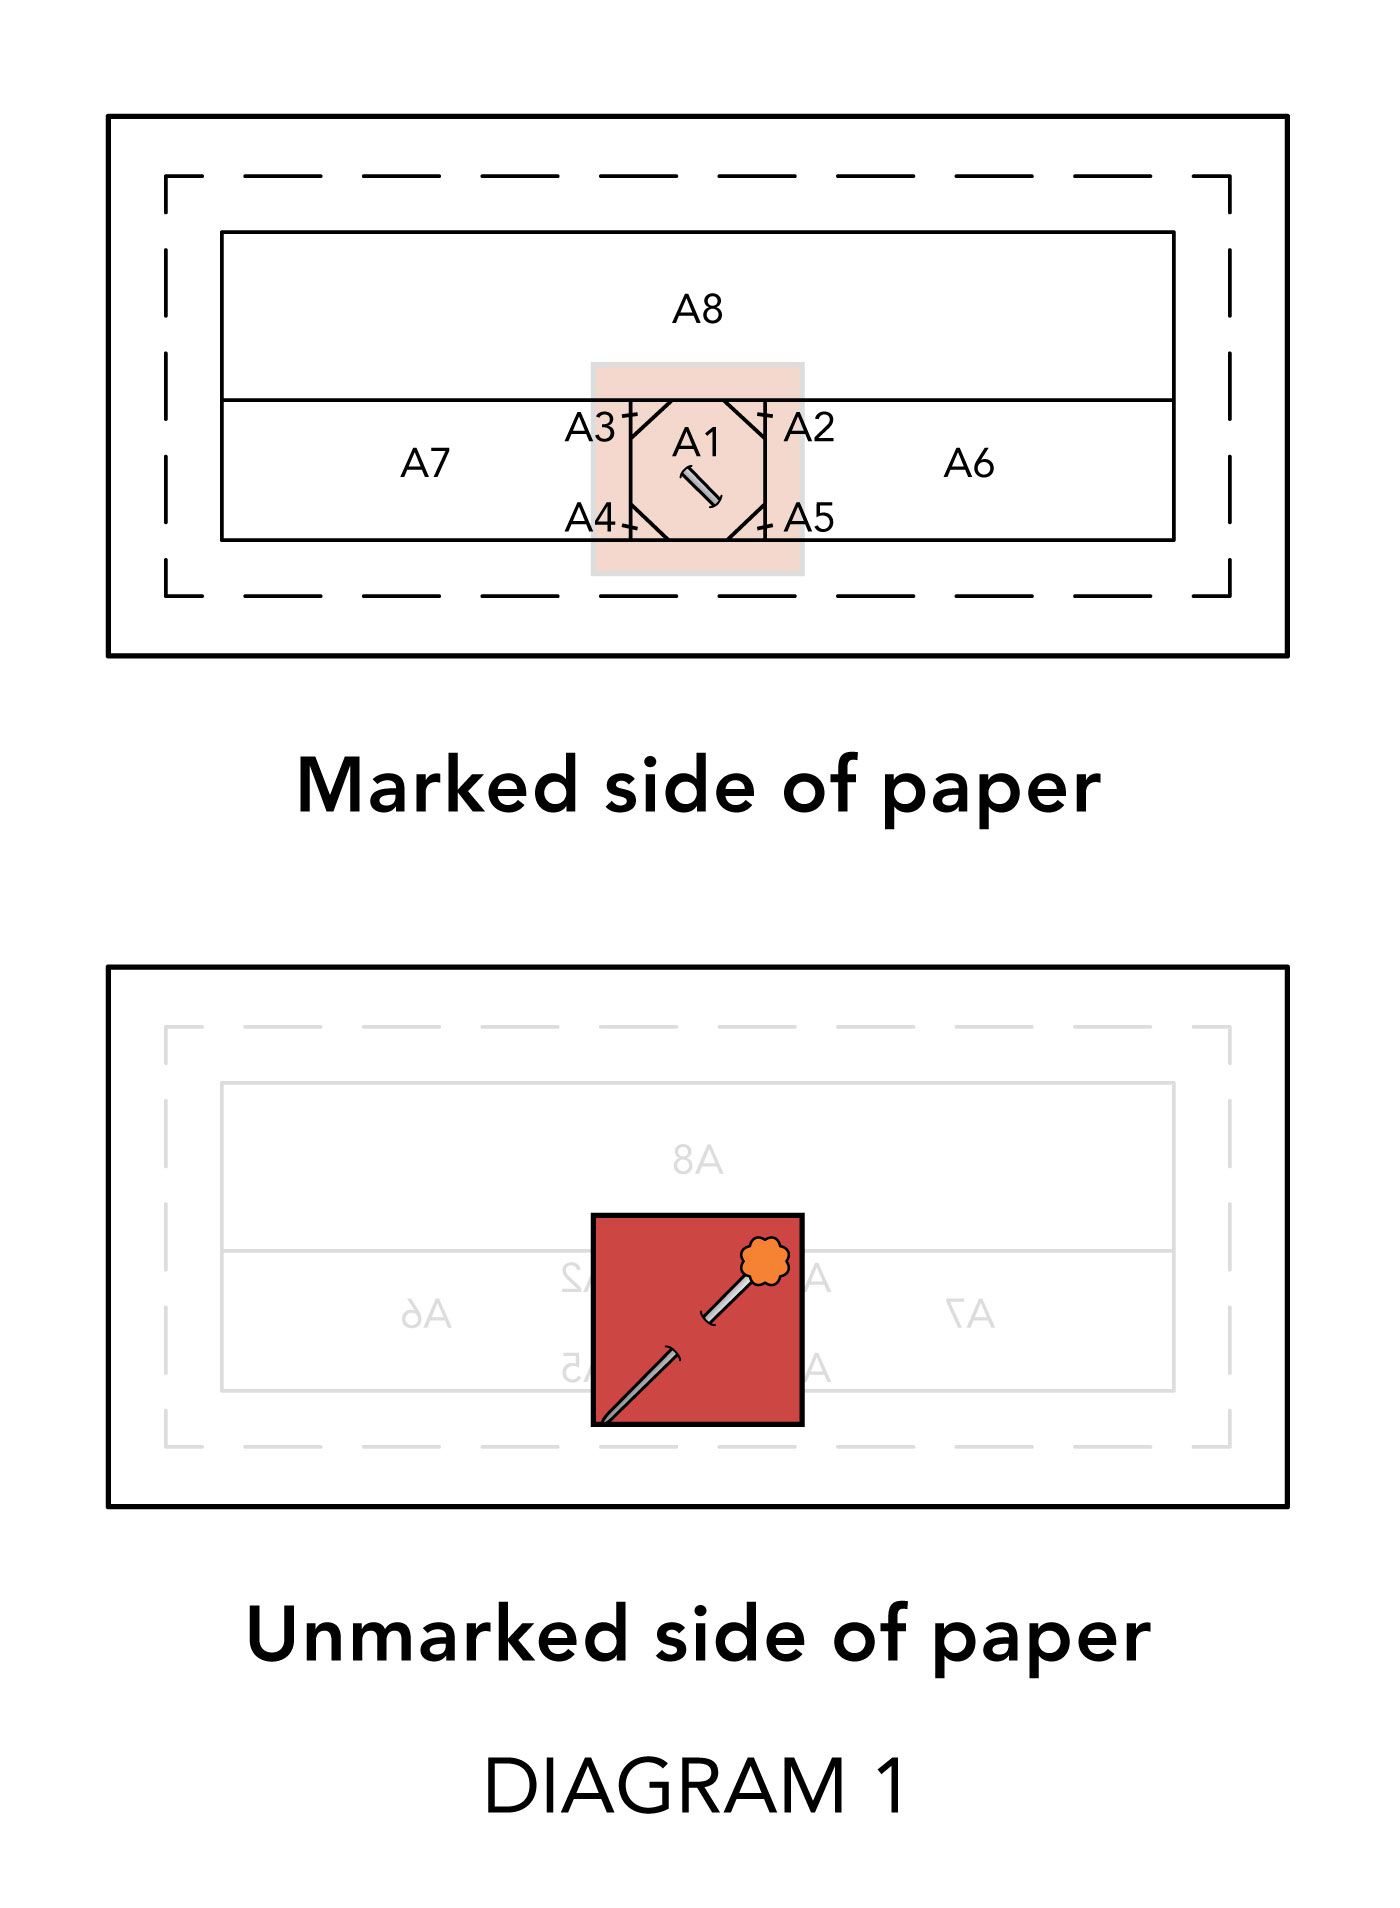
2) Turn foundation paper over so marked side is down. Place red batik position A1 square right side up on foundation paper position A1 (Diagram 1). Pin with a flat head pin. Hold paper up to light to confirm that fabric piece completely covers position A1.
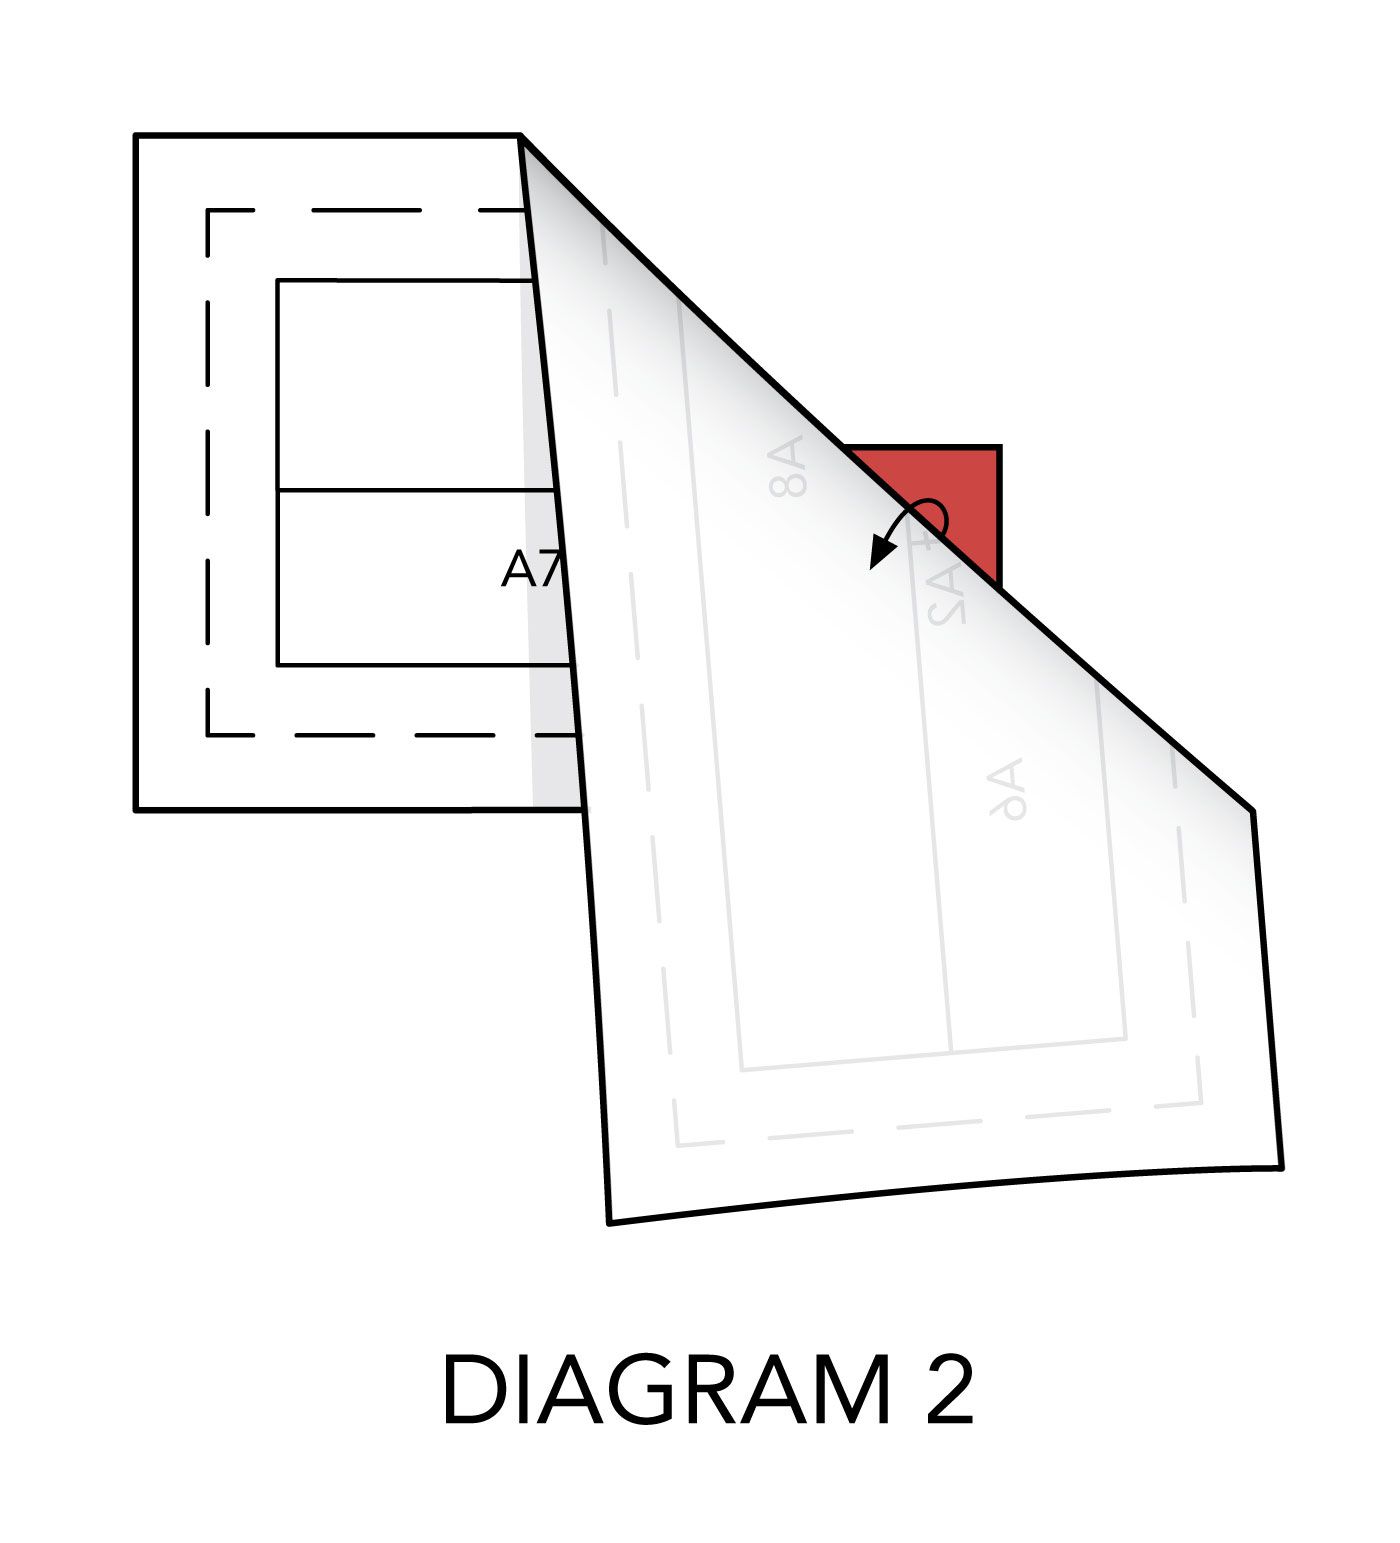
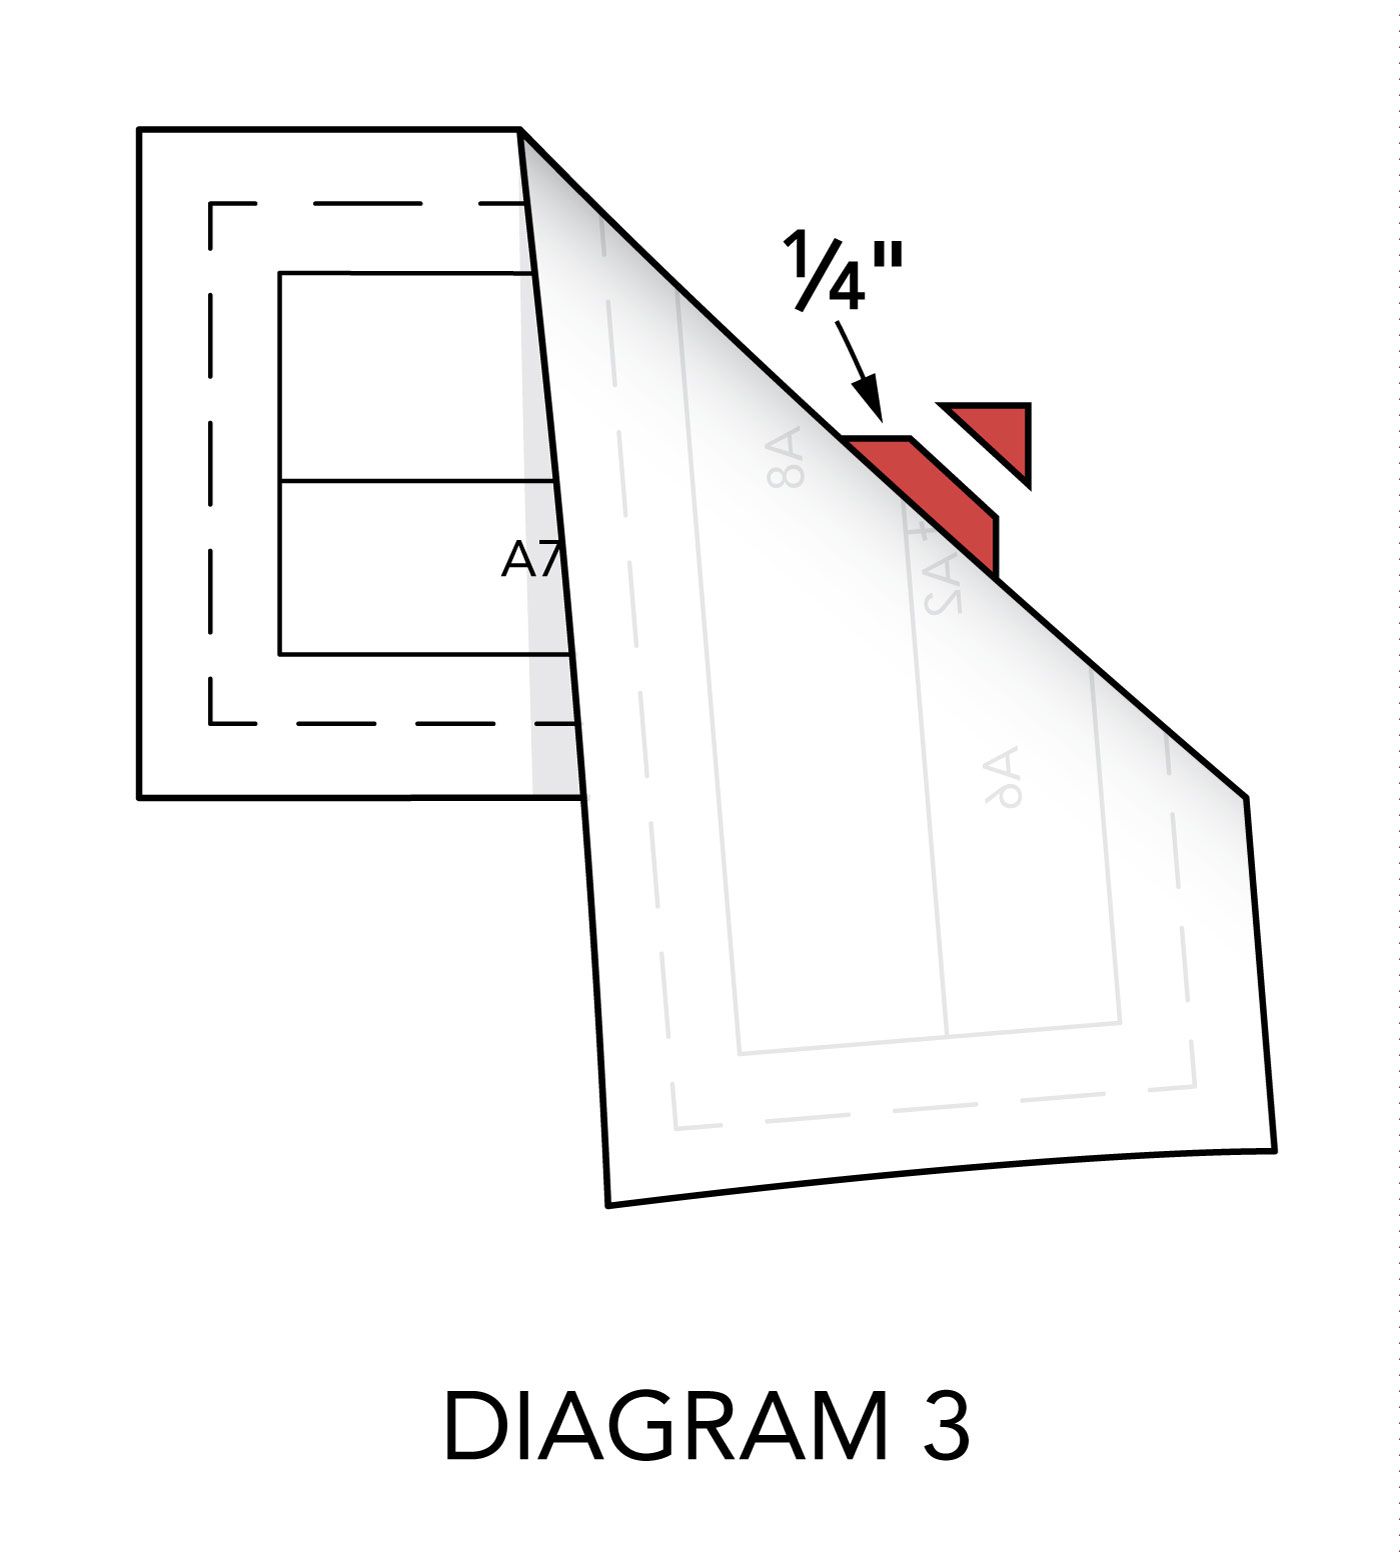
3) Turn foundation paper over so marked side is up. Referring to Diagram 2, fold foundation paper back on the stitching line between positions A1 and A2.
4) Measure 1⁄4" from folded edge of foundation paper. Using a clear ruler and rotary cutter, trim fabric piece to create 1⁄4" seam allowance (Diagram 3). If using an Add-A-Quarter ruler, place ruler lip against folded edge of paper and use rotary cutter to trim fabric piece along ruler edge. Unfold paper.
5) Turn foundation paper so marked side is down. With right sides together, align edge of cream linen position A2 square with trimmed edge of red batik position A1 rectangle; pin and check placement of position A2 square.
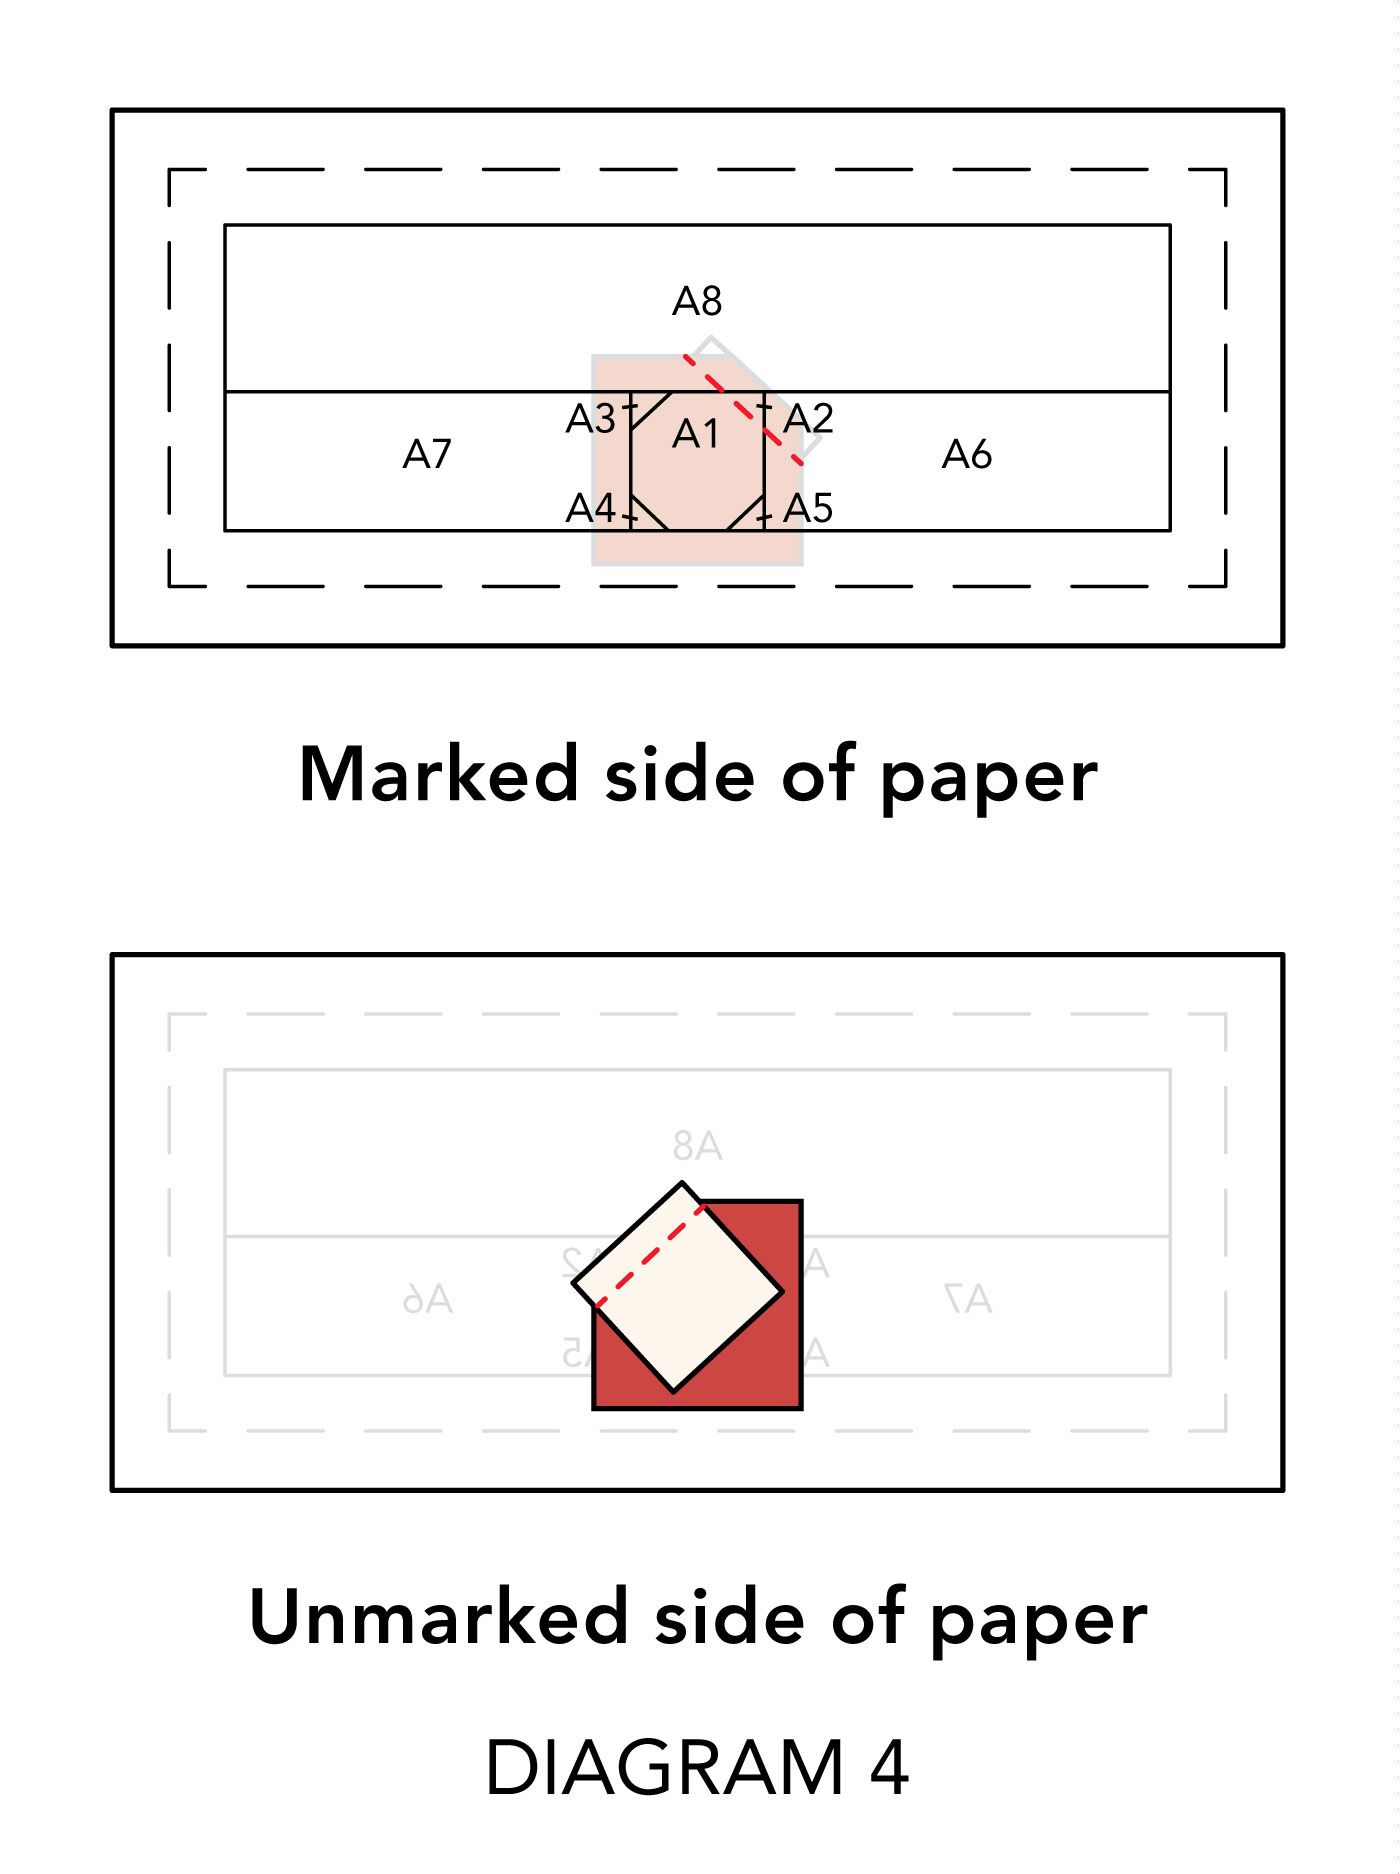
6) Turn foundation paper marked side up. Sew on stitching line through all layers, backstitching at beginning and end of line (Diagram 4). Turn paper marked side down. Using a dry iron, press open position A2 square, pressing seam toward newly added piece (Diagram 5).
7) Fold foundation paper on stitching line between position A3 and positions A1 and A2 unit. As before, trim 1⁄4" from folded edge.
8) Turn foundation paper marked side down. With right sides together, align edge of cream linen position A3 piece with trimmed edge of positions A1 and A2 unit; pin and check placement of position A3 piece.
9) Turn foundation paper up marked side up. Sew on stitching line between position A3 and positions A1 and A2 unit through all layers, backstitching at beginning and end of line.
10) Continue adding pieces in numerical order, trimming, stitching, and pressing in the same manner, until you have pieced entire foundation paper A; press, leaving paper in place. Using a clear ruler and rotary cutter, trim on dashed outer lines to make section A (Diagram 6). The section should be 1-7⁄8 ×4-3⁄4" including seam allowances.
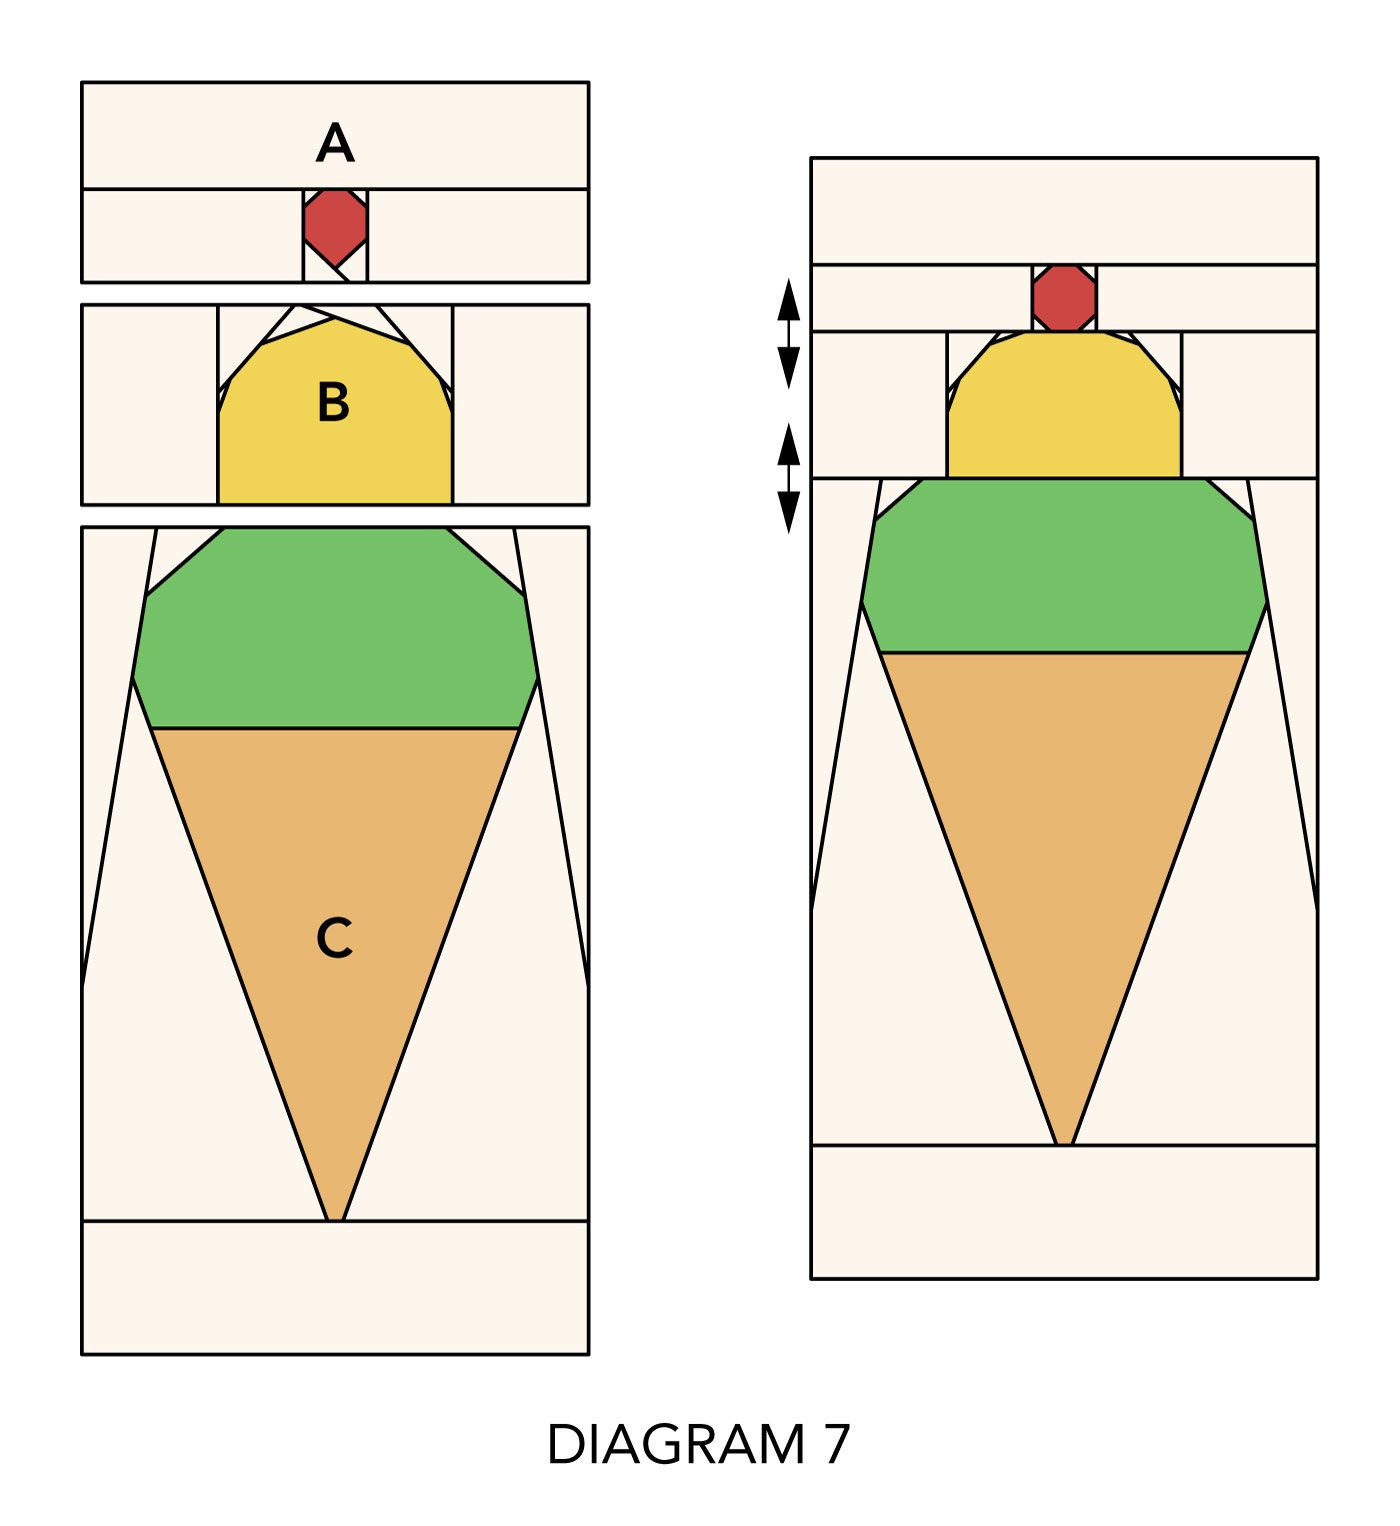
11) In the same manner, use yellow batik, green batik, tan batik, and cream linen pieces to foundation-piece sections B and C (Diagram 7). Section B should be 1-7⁄8 ×4-3⁄4" including seam allowances. Section C should be 4-3⁄4×7-3⁄4" including seam allowances.
12) Referring to Diagram 7, join sections to make ice cream unit. The unit should be 4-3⁄4 ×10⁻¹⁄2" including seam allowances.
Assemble and Embroider Block
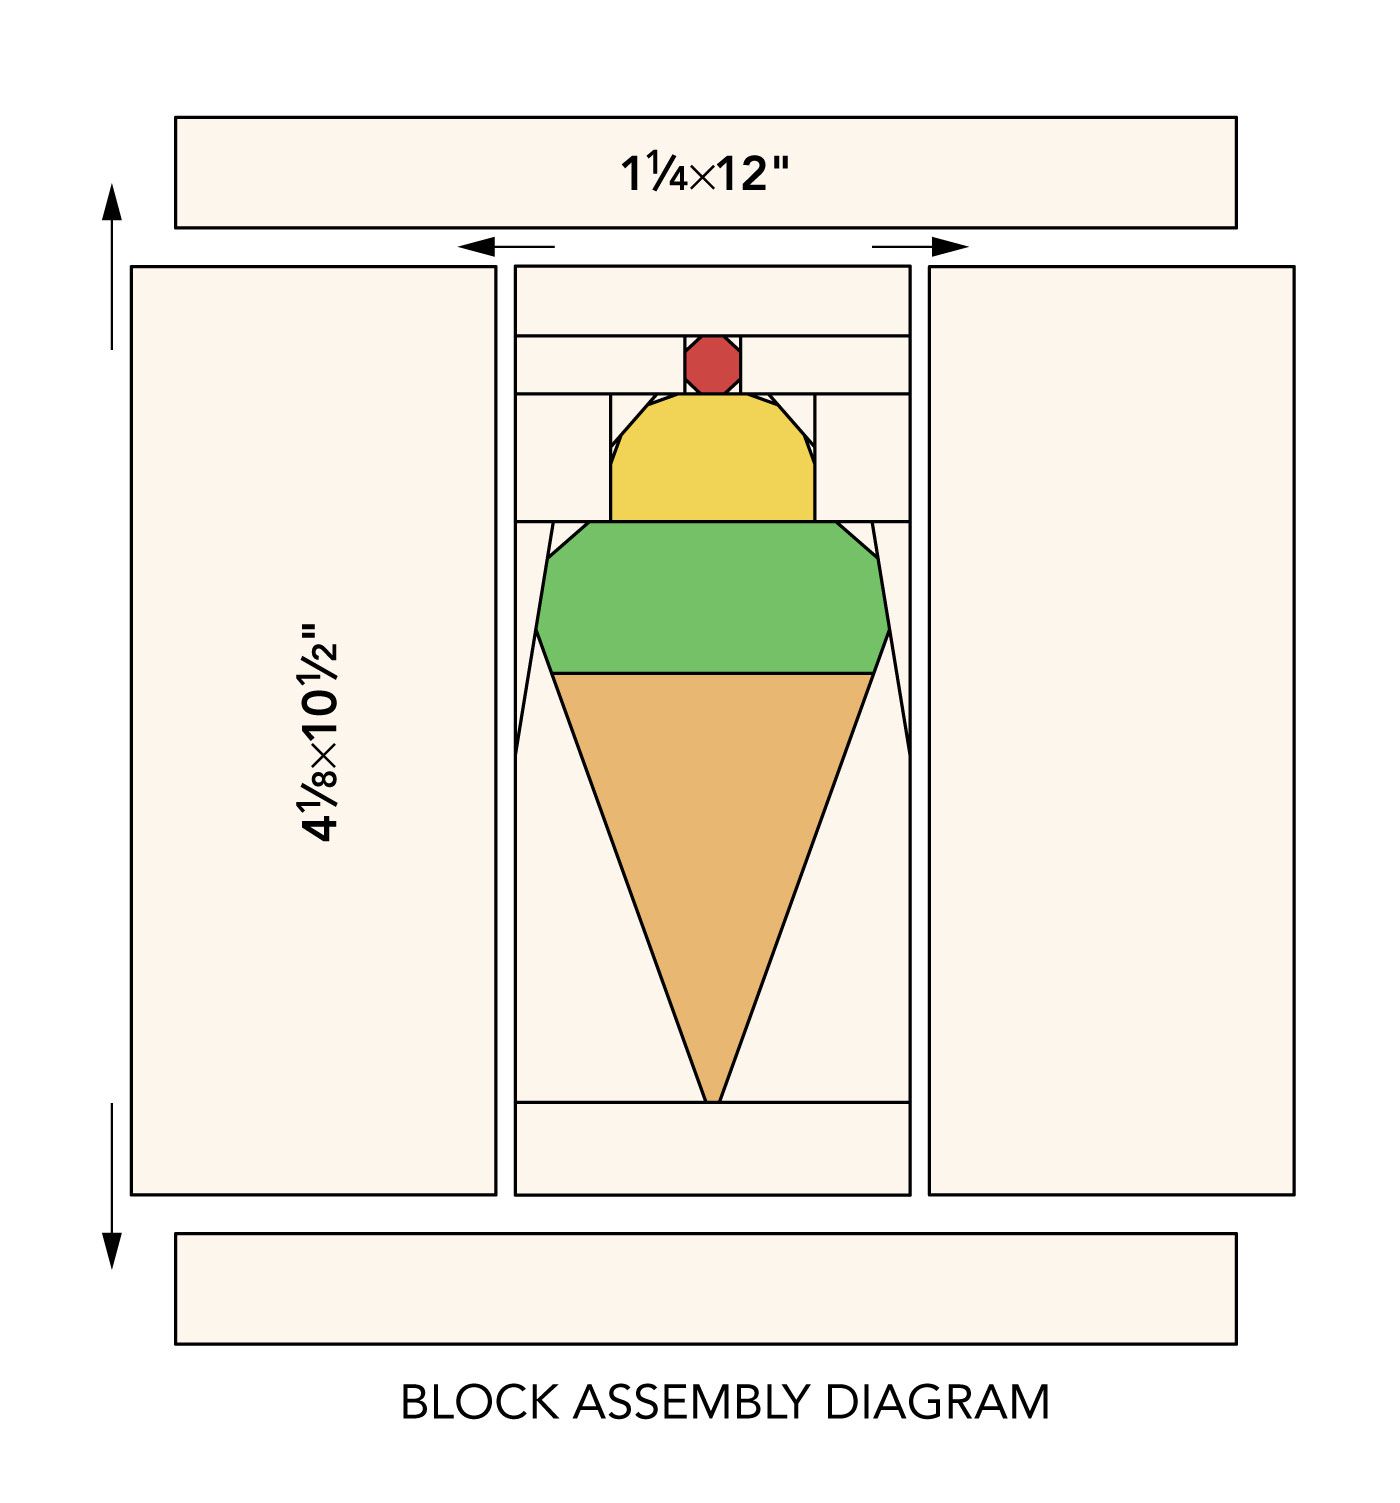
1) Referring to Block Assembly Diagram, sew cream linen 4-1⁄8 ×10⁻¹⁄2" rectangles to ice cream unit. Add cream linen 1-1⁄4 ×12" rectangles to complete ice cream block. The block should be 12" square including seam allowances.
2) Remove foundation papers from block with tweezers or blunt edge of a seam ripper, taking care not to tug or pull out any stitches. Press block from wrong side.
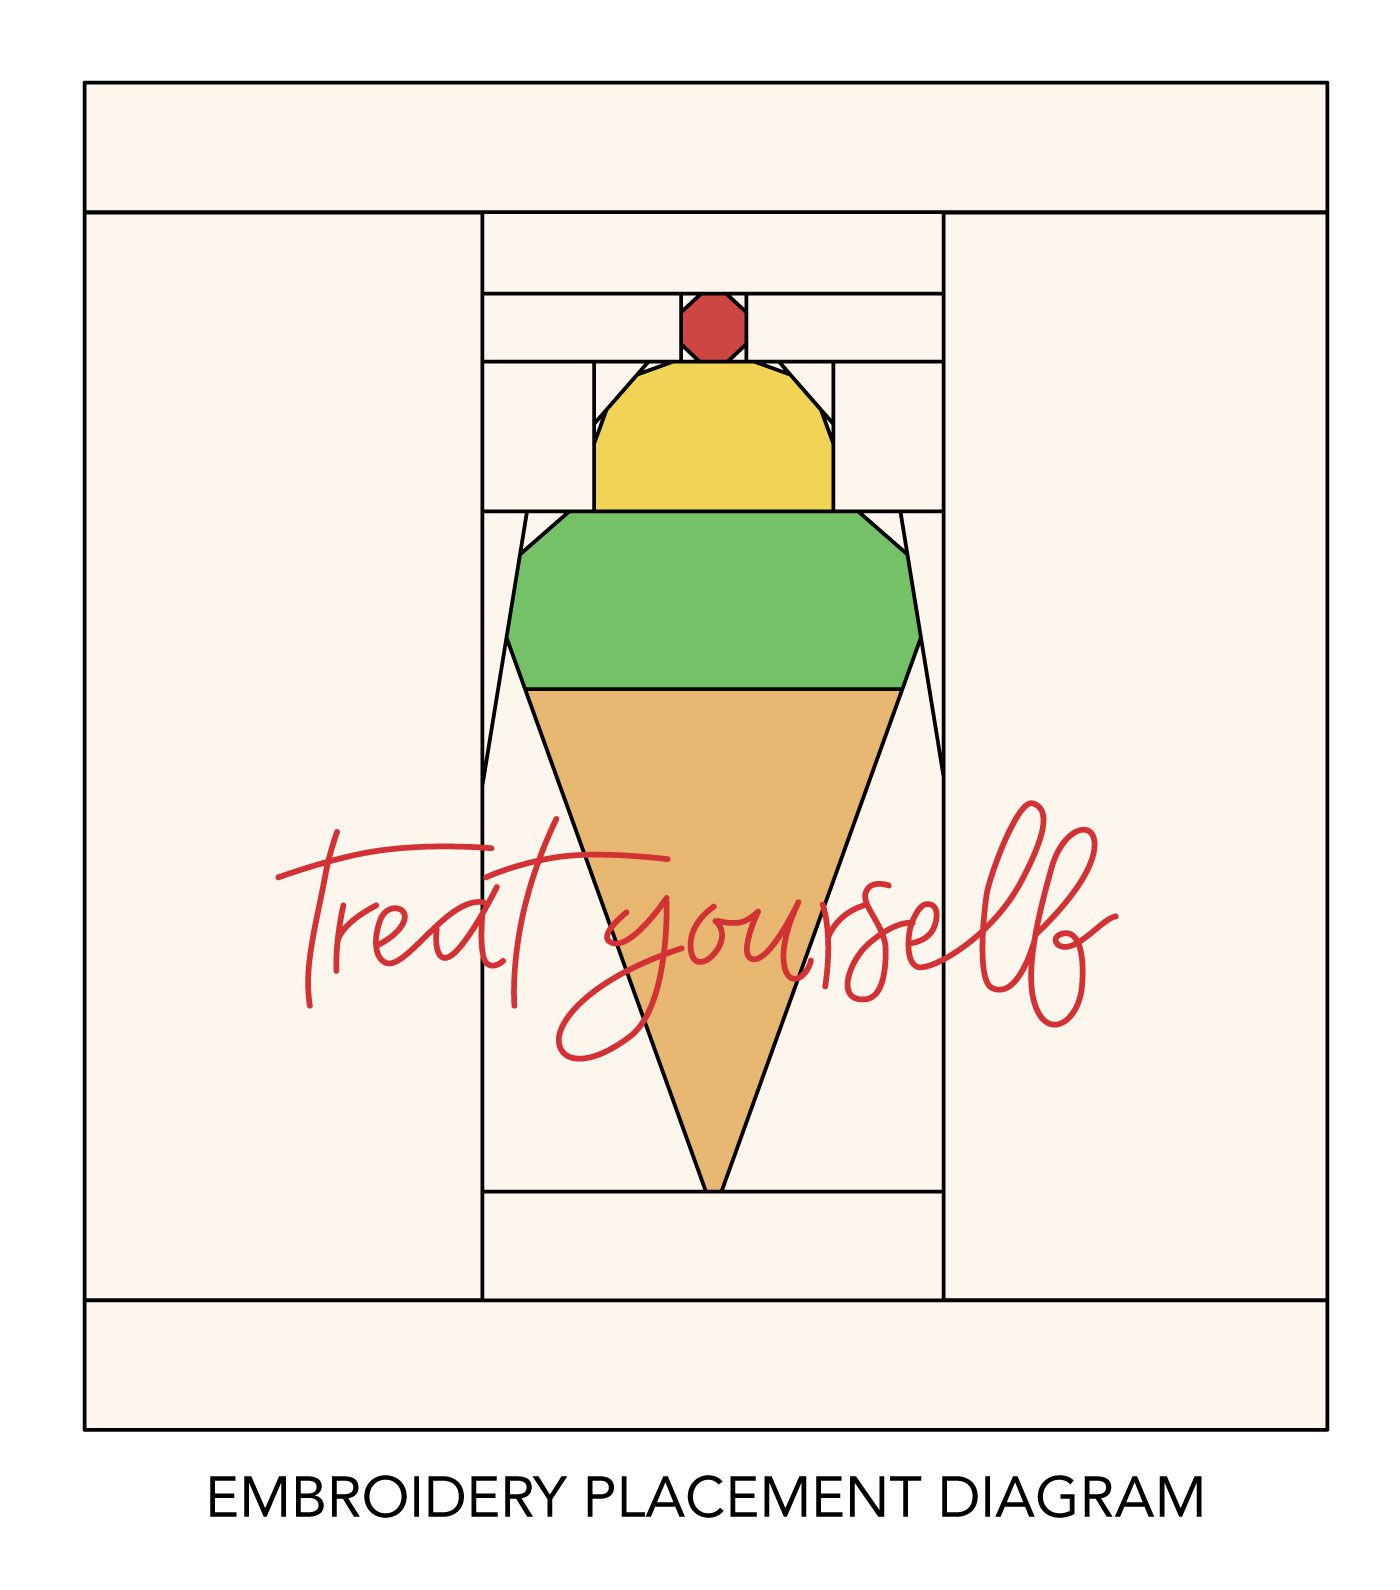
3) Using a light box or a sunny window and referring to Embroidery Placement Diagram, use an air-soluble marking pen to lightly trace the Embroidery Pattern on page 6 onto block. Place the block in the embroidery hoop, centering the design inside the opening. Pull fabric taut and tighten the screw.
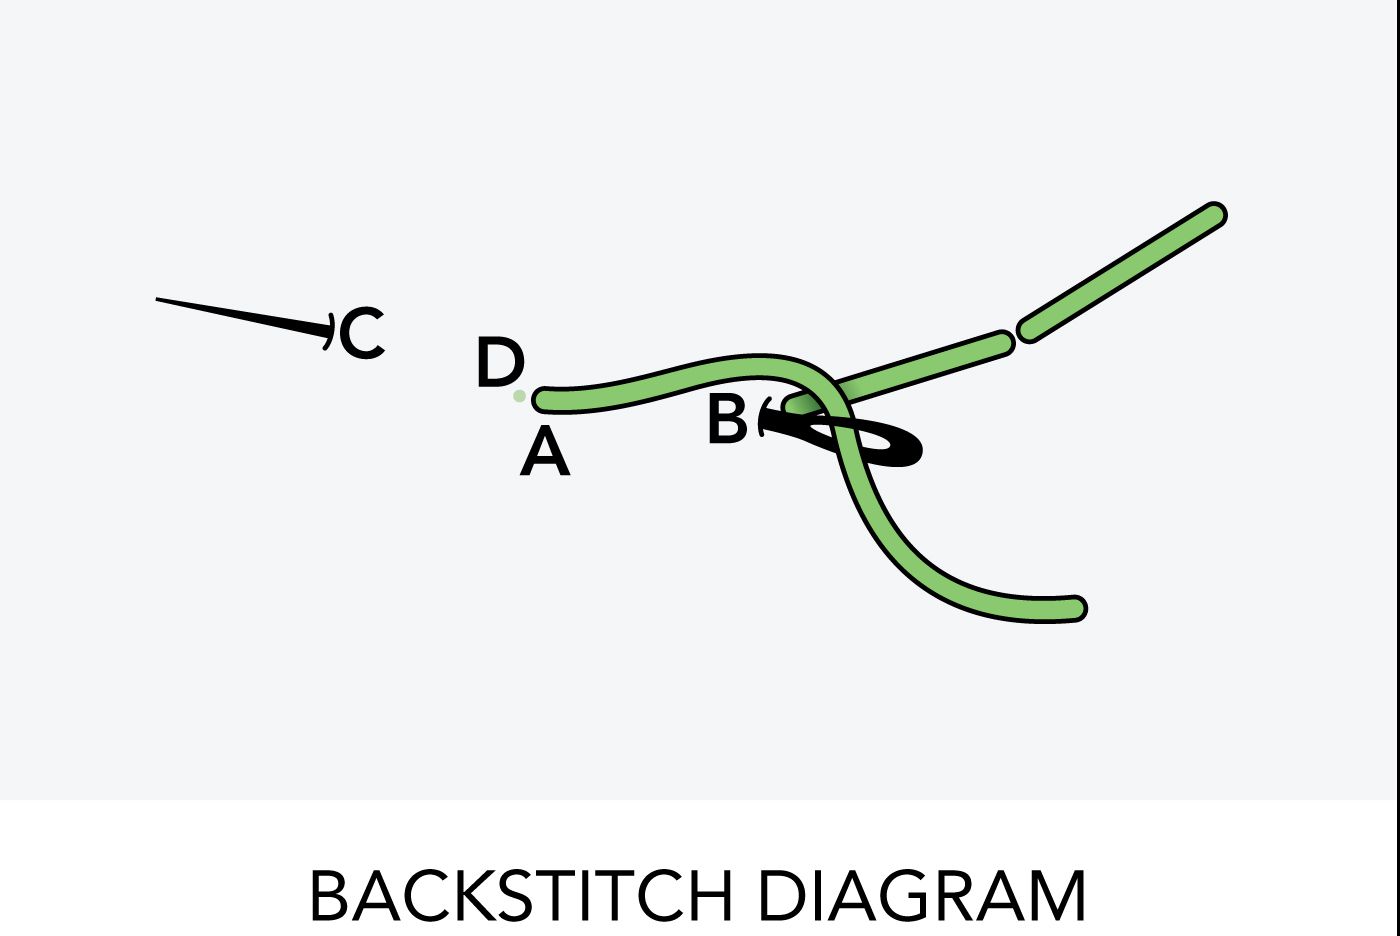
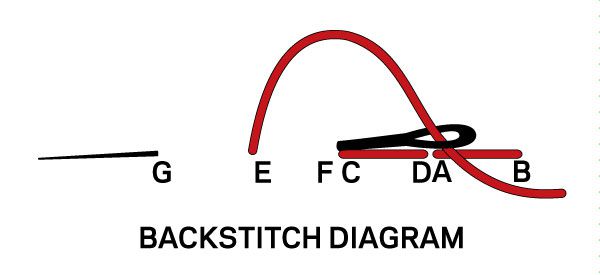
4) Using two strands of red embroidery floss, backstitch the traced words. To backstitch, pull your threaded needle up at A (Backstitch Diagram), insert it back into fabric at B, and bring it up at C. Continue in the same manner until all letters are stitched.
Finish Hoop
1) Stitch a running stitch approximately 1" from block edge (outside the hoop). Pull the thread to gather the fabric in the back; knot thread. Trim excess fabric approximately 1⁄2" beyond the gathering thread.
2) If desired, cut a felt circle that is slightly smaller than the diameter of the embroidery hoop. Whipstitch the felt circle to the gathered fabric on the back.
.................................................................................................................................................................................................................................................................
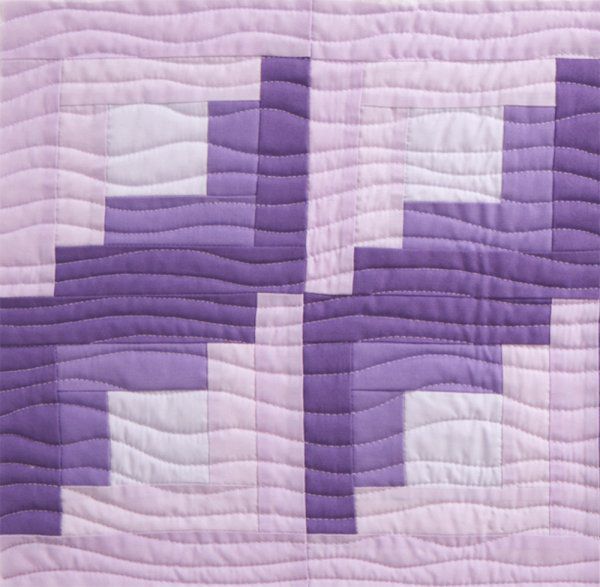
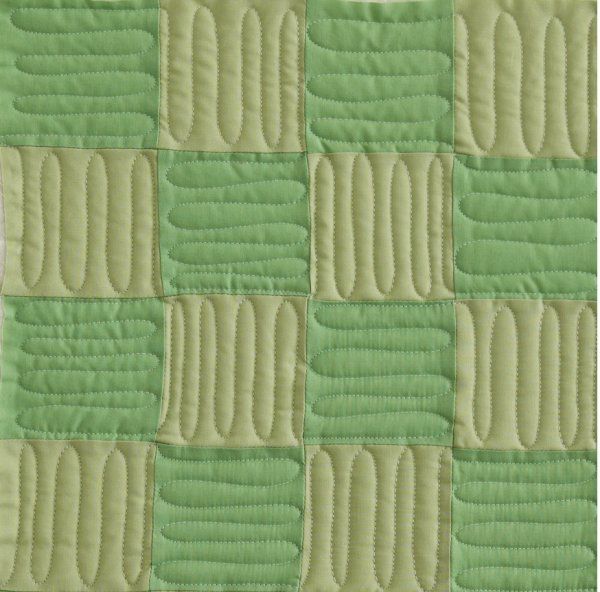
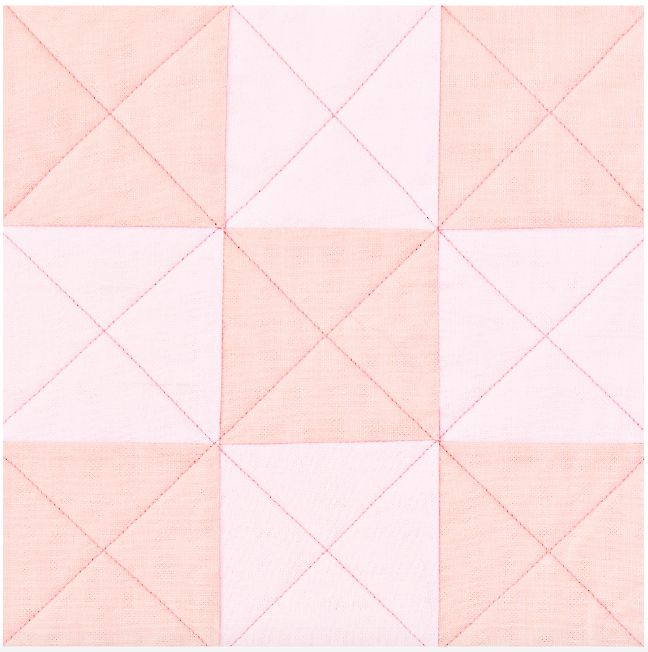
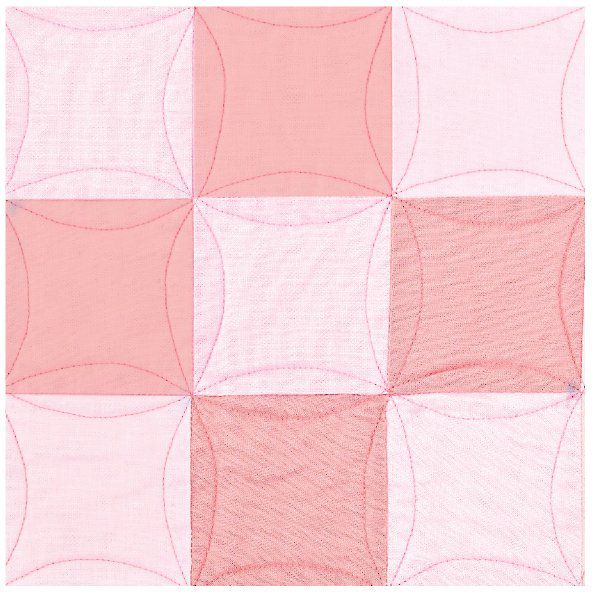
June 21, 2020
How to Machine-Quilt Seven Common Quilt Blocks
June 14, 2020
Tips for Hand Piecing Like an Expert
Need help perfecting your hand-piecing technique?
Designer Jo Morton shares some tips.
When Jo Morton was shown how to hand-piece (many years ago), she learned to repeat a pattern of three forward stitches followed by a backstitch from one end of a sewing line to the other.
Jo recommends that you use a Tulip size 10 big-eye needle. It is easier to manipulate the stitches onto the longer needle, and the big eye is easier to thread. She also recommends using Aurifil 50-weight 100% cotton thread. It is great for hand-piecing (or machine-piecing) smaller projects.
For Best Results:
For No-Knot Hand Piecing
To Inset a Piece:
For a Continuous Seam:
.............................................................................................................................................................................................................................................................
June 7, 2020
Ten Tips to Get the Perfect 1/4" Seam
1. Check Your Stitching
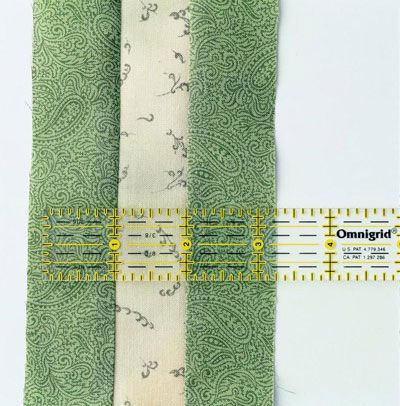
Cut three 1-1/2"-wide strips of fabric. Join two of the strips using a 1/4" seam; then add the third strip with another 1/4" seam. Press the seams away from the center strip. Turn patchwork to the right side of the fabric and measure the center strip. It should measure exactly 1" wide. Reset your seam guide as necessary.
You can also check the width of a machine's presser foot by sewing a sample seam with the raw fabric edges aligned with the right of the machine's presser foot. Measure the seam allowance using a quilting ruler. (Alternatively, sew along a piece of graph paper with a 1/4" grid or an index card with lines 1/4" apart to check if your seams are accurate.)
2. Adjust the Needle Position
Needles on many machines move right or left. Sew sample seams and check each seam size as you move the needle in small increments. Jot down the needle position for each seam size so you can quickly set it as needed. When sewing, watch the guide and not the needle.
3. Change the Throat Plate
The start of a 1/4" seam is cleaner with a single-hole throat plate; threads and fabric won't sink into the hole. Be sure to change the plate before you zigzag-stitch, or the needle will break.
4. Start and End Seams with a Fabric Scrap
To prevent a patchwork seam from puckering or having incomplete stitches at the beginning or end of a seam, use a small piece of fabric to begin and end your seam. Feed the small scrap in first, then the patchwork fabrics, followed by another small scrap. Snip off the stitched scraps.
5. Purchase a Specialty Foot
A 1/4" presser foot, whether it's generic or made just for your machine, takes much of the guesswork out of sewing 1/4" seams. Run the edge of the fabric along the right-hand edge of the foot as you sew. Measure the seam before beginning each project. Some specialty feet have an attached edge guide, above, that prevents you from stitching a too-wide seam.
6. Choose a Seam Guide
Most sewing machine companies offer an easily positioned, screw-in seam guide attachment that provides an edge for the fabric to slide along. Magnetic guides, used on noncomputerized machines, also are available. You can fashion your own guide from a strip of painter's tape, masking tape, or adhesive moleskin. To set a guide, lower the needle, place a ruler or 1/4" graph paper against the front or back of the needle, and position the guide along the 1/4" line.
7. Pinning Is the Secret
When you want the seam lines in patchwork pieces to line up perfectly, first pin the pieces together with extra-fine pins. With right sides together, pin one piece to another unit, aligning raw edges. Match seams by pushing a pin through both layers to check alignment.
8. Press For Success
In quilting, almost every seam needs to be pressed before the piece is sewn to another. Pressing the seams ensures accurate piecing. The direction you press is important in piecing and usually will be specified in the instructions. When in doubt, press seam allowances toward the darker fabric. You'll usually press the entire seam allowance to one side rather than open.
When two seams will be joined, press the seam allowances in opposite directions; this helps line up seams perfectly and reduces bulk. Press seam allowances in each row in opposite directions so they abut when rows are joined.
Press, don't iron: Don't know the difference? Ironing involves moving the iron while it is in contact with the fabric; this stretches and distorts seams. Pressing means lifting the iron off the surface of the fabric and putting it back down in another location.
Setting a seam: Before pressing a seam open or to one side, press the seam as it was sewn, without opening up the fabric pieces. This helps sink the stitches into the fabric, leaving you with a less bulky seam allowance.
9. Joining Pieces, Blocks, and Rows
Precise 1/4" seams allow you to join units, blocks, and rows with ease. Use exact 1/4" seam allowances throughout a quilt's construction. With the number of seams in a quilt top, little variances can quickly multiply.
It isn't necessary to backstitch at the beginning of any seam that will be intersected by another seam later in the quilt making process. Use a stitch length of 10 to 12 stitches per inch (2.0- to 2.5-mm setting) to prevent the stitches from unraveling before they're stitched over again. Secure seams that won't be sewn across again (such as those in borders) with a few backstitches.
On the sewing machine, squares and triangles in blocks should be sewn together from edge to edge. Save time and thread by chain piecing whenever possible. To chain-piece, feed the pieces under the machine needle. Don't lift the foot or clip the thread. Short lengths of thread will link the stitched patches. Cut them apart when you've finished sewing the units.
10. Sewing-Machine Troubleshooting Tips
While it's a good idea to take your machine to a dealer regularly for a tune-up, here are a few fixes for common problems.
Bad stitch quality: Before making any other adjustment, lift the machine's presser foot and rethread the machine.
Skipping or uneven stitches: Try replacing the needle with a new one. Although some quilters only change a needle when it breaks, a smarter rule of thumb is to insert a fresh needle at the start of every project (or every 8 hours of sewing).
Thread breaking: If you're using old thread, try a new spool; old thread can become brittle and lose elasticity.
Happy Quilting!!
.........................................................................................................................................................................................................................................................
March 17, 2020
Flip & Sew Carrot Table Runner
A quilt-as-you-go project like this spring dandy means that when the top is done, so is the quilting! Add binding and you're finished.
Materials
Quilt Designer: Shelley Robson of The Quilted Forest
1/2 yard of backing fabric
1/8 yard each of seven assorted orange prints for table runner top
18x22" piece (fat quarter) of mottled orange for binding
2 -- 18x22" pieces (fat quarters) of assorted green prints for stem
16x28" of thin quilt batting
Lightweight fusible web
Medium-weight cutaway stabilizer
Quilt basting spray (optional)
Finished table runner (including stem): 13x32-1/4"
Quantities are for 44/45"-wide, 100% cotton fabrics. All measurements include a 1/4" seam allowance. Sew with right sides together unless otherwise stated.
Cut the Fabrics
To make the best use of your fabrics, cut the pieces in the order that follows. Download the full-size patterns from The Quilted Forest. Patterns A and B will print out together as four pages and Pattern C will print out as two pages; after printing, tape sheets together on the dotted lines to make patterns. Be sure to transfer the center positioning line onto the A fabric piece after cutting.
From backing fabric, cut:
1 of Pattern A
From each assorted orange print, cut:
2 -- 1-1/2x42" strips
From mottled orange, cut:
Enough 2-1/2"-wide bias strips to total 75" in length for binding.
From each green print, cut:
1 -- 11x16" rectangle
From lightweight quilt batting, cut:
1 of Pattern A
From fusible web, cut:
2 -- 11x16" rectangles
From stabilizer, cut:
1 -- 11x16" rectangle
Assemble and Quilt Table Runner
1. Lay the backing fabric A piece on your work surface with the right side down. Place the thin quilt batting A piece on top. (If desired, use quilt basting spray to secure the layers together.)
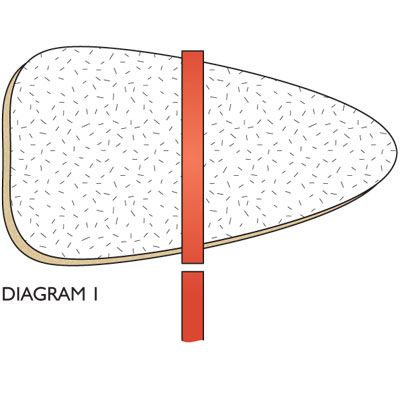
2. With the right side up, place an orange print 1-1/2x42" strip across the middle of the layered A pieces; one edge should run along the center positioning line and the end should extend just beyond the top of the layered A pieces. Trim the excess orange print strip just beyond the bottom edge of the layered A pieces (Diagram 1).
3. With the right side down, place a second orange print 1-1/2x42" strip atop the first strip; trim the excess strip as before. Sew together through all layers (Diagram 2). Finger-press the top strip open. (Designer Shelley Robson recommends using a walking foot attachment on your machine during the construction to avoid puckers on the quilt back.)
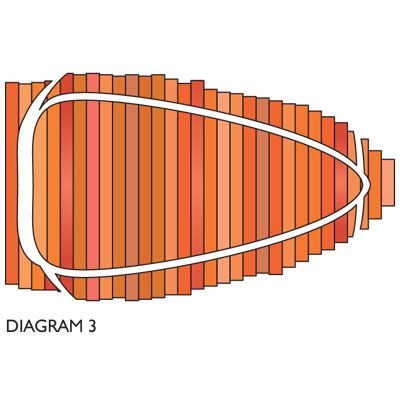
4. Continue adding assorted orange print strips in both directions until the layered A pieces are covered; press. Center the B template on the strip-covered A piece; trace around and cut out to make the table runner (Diagram 3).
Complete the Table Runner
1. Using diagonal seams, sew together the mottled orange 2-1/2"-wide bias strips to make a 75"-long strip. Bind table runner with 75"-long strip.
2. Following the manufacturer's instructions, press the fusible-web 11x16" rectangles onto the backs of the green print 11x16" rectangles; let cool. Peel off the paper backings.
3. Lay one Step 2 green print rectangle on your work surface with the right side down. Place the stabilizer 11x16" rectangle on top. With the right side up, place the remaining Step 2 green print rectangle on top of the layered rectangles. Following the manufacturer's instructions, fuse all of the pieces together.
4. Trace Pattern C onto the fused Step 3 rectangle, tracing the stitching line and six pleat lines. Cut out on the outer drawn lines to make the stem. Using a short, wide zigzag stitch, sew around all edges of the stem.
5. Fold the stem so a set of two pleat lines match up; pin through both pleat lines. Then press lightly to form a pleat. Repeat to fold and press a total of three pleats in the stem. Machine-baste on the marked stitching line to hold the pleats in place (Diagram 4).
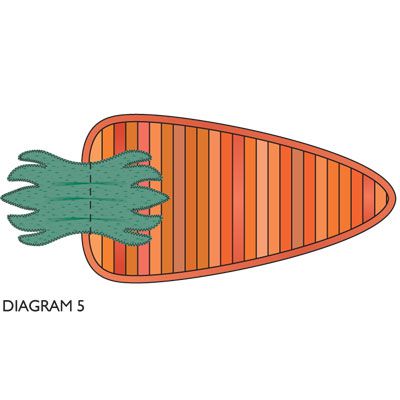
6. Place the pleated stem on the wide end of the table runner so the short stem end is on the table runner and the stitching line is 1/2" from the bound edge (Diagram 5). Topstitch over the basting stitches to secure the stem to the table runner. Fold the stem in half so both portions extend above the top of the carrot shape; press lightly to complete the project.
February 14, 2020
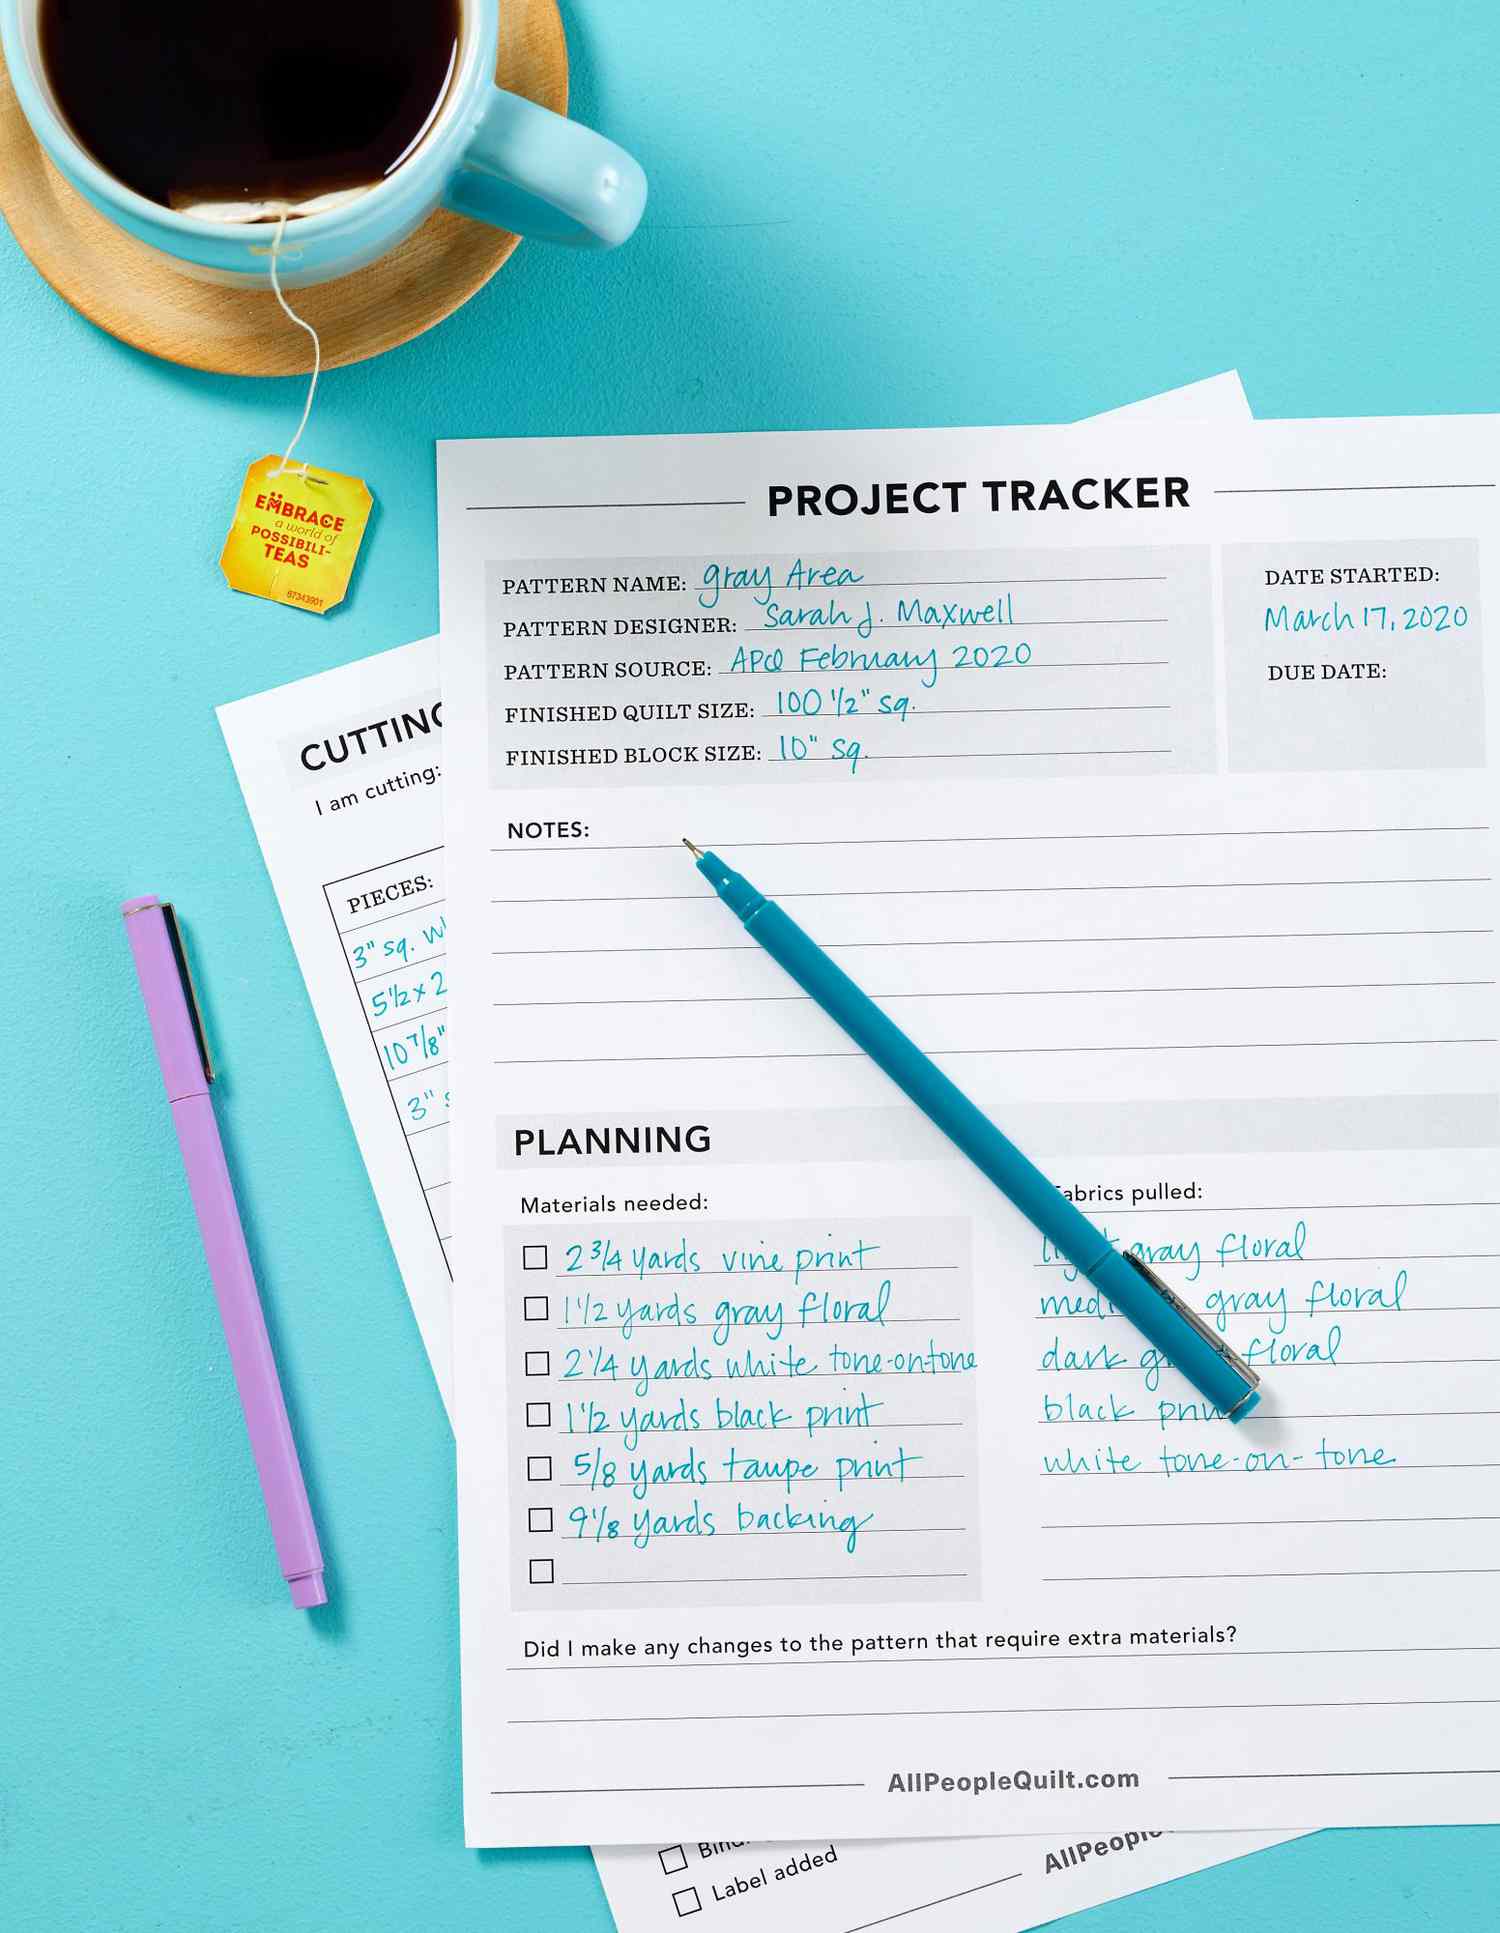
Quilt Project Tracker
This project tracker will help you keep your current projects and UFOs (unfinished objects) organized.
Fill it out as you go and store it with your project. This project tracker is great for keeping important deadlines in mind and making progress on projects, while also guaranteeing that you'll be able to pick up an older project without missing a beat.
I need this!! I really, really need this!!
..............................................................................................................................................................................................................................................................
February 13, 2020
Should You Keep That Fabric?
Is it possible to have too much fabric? If you feel like you have more fabric than you can ever use and your stash is overflowing, you may want to part with some precious fabric. This flowchart can help make some hard decisions.
As quilters, we love to say “Of course you can never have too much fabric.” But the reality for some is that some of us may need to do some purging. So many emotions are tied to our fabrics. We remember past projects the scraps came from, the people we made quilts for, and the friends with whom we quilted. Use this flowchart to cut through some of those emotional responses if you feel the need to make some tough decisions with your fabric stash. Remember, this is a good problem to have!Good luck and happy quilting!
...............................................................................................................................................................................................................................................................
February 10, 2020
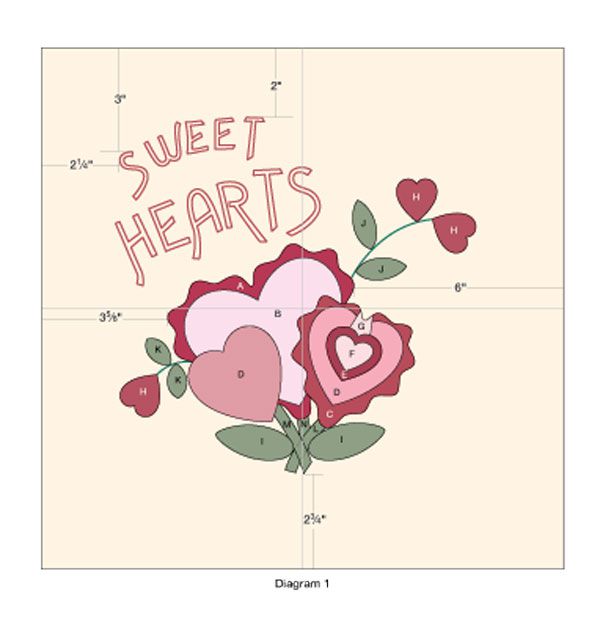
Sweet Hearts
A Valentine pillow will make its recipient feel especially loved. Fused, machine appliquéd heart flowers and embroidered letters embellish this token of affection.
............................................................................................................................................................................................................................................................February 2, 2020
Practical Tips for a Sewing Room Clutter Cleanse
Kick clutter to the curb in minutes a day! This no-fail plan shows you how to confront quilting room mess-and keep it clean. Follow these tips to making and keeping your clutter-free work space a success!
Schedule your cleanse. You make better decisions when you work uninterrupted, so block out 15 to 45 minute blocks of time on your schedule.
Aim for consistency. Schedule your cleanse session for the same time for a few consecutive days, perhaps every morning before your family wakes or immediately after dinner.
Minimize disruptions. Let your family know ahead of time when you'll be busy. A consistent daily decluttering time helps.
Be prepared: Dress in comfy clothes. Put on some music. Have a favorite beverage or snack (like chocolate!!) close by.
Gather your supplies. You'll need the following items close at hand for each cleanse session:
- Permanent markers and index cards or heavy stock paper to make labels for piles as you sort or boxes headed to donation centers
- Boxes and bags to hold sorted items
- Scissors or utility knife
Touch once, decide once. Decluttering involves deciding to keep or let go, so the main activity throughout the cleanse is picking up or touching an item and asking, "Should I keep this?" If you instantly know something needs to stay or go (and you have space to store it), go with your gut. No need to analyze. However, if you're not quite sure, see "Four Tough Questions," below, to help you reach your decision.
Work like a machine. Go through any space you're decluttering in a methodical fashion-left to right, high to low, front to back-whatever makes sense for your project. Don't jump around the space. Trying to be creative or clever can sometimes slow you down from your goal.
Keep moving. When you don't quickly know whether to keep or get rid of an item, place it in a pile and keep moving through the room. Save the last 5 to 10 minutes of the session to deal with your pile of questionable items.
Know what's next. Don't fret about what to do with stuff you're not keeping. You have only four options: Sell it, give it away, donate it, or recycle/dispose of it. Label four boxes accordingly and keep moving.
Keep testing simple. Operate tools and machines to see whether they work. Verify that you have all the pieces of kits. Then move immediately to deciding whether the item is a keeper.
Skip touching when it bogs you down. If you're decluttering items with emotional connections, have a neutral person hold up the item and ask whether you want to keep it. Without a physical connection to the item, you'll be in a better state of mind to make quick, clear-headed decisions.
Four Tough Questions
- Do I love it? Keep anything you truly love. You'll always remember (and probably regret) giving away something you love. But be aware that keeping a beloved item may mean you must get rid of something else in order to make room.
- Do I use it? And if so, how often? Keep anything you use-and start storing the stuff you use more frequently in the easiest places to access.
- Do I have more than one? If so, edit down to the best one. Of course, having more than one rotary cutter may make sense, but having two of the same triangle template is tough to justify.
- Can I get another? If you suddenly need the item or it miraculously comes back into style, remind yourself that you can usually buy or borrow another one.
Cleanse Your Work Space
Ask yourself:
- Am I surrounded by only working, functional items? When you sit or stand at your desk, every item within reach must work. Test every tool, supply, and machine. Toss (never donate) dull scissors or broken tools.
- Do I need more than one? Sewing supplies are sometimes sold in multiples or include refills. Multiples can go into a drawer or cabinet elsewhere in the room -- you don't need them clogging up your work space.
- What's my go-to choice? Embrace your preference for rulers, cutting and marking tools, and other supplies-and stock only these in your work zone. Let go of all the nice-enough-but-not-for-you options now.
- What do I actually use? Keep only items you use frequently on your work space. Place items you use less regularly nearby shelves, drawers, or cabinets.
- Short-term or long-term? The quickest way to cut through piled papers is to sort short-term (patterns you're working on, articles you're reading) and long-term (machine instructions). Organize short-term papers with vertical solutions (a bulletin board above your desk, wall pockets) and long-term papers with horizontal solutions (sorting trays, a file box, or a file cabinet with hanging folders).
January 19, 2020
Making Quilt Labels
Follow these tips for labeling your quilt, then choose from two block ideas to make your own quilt label.
Quilt Label Tips
Preserve the heritage of your quilts for future generations while expressing your creativity with labels.
Here are some ideas for what to include on your label:
--who made the quilt
--the quilt pattern name
--date and place where it was completed
--whom the quilt was given to
--the occasion, such as a graduation, retirement, or anniversary, that prompted the making of the quilt
--care instructions
Here are some ideas for making a quilt label your own:
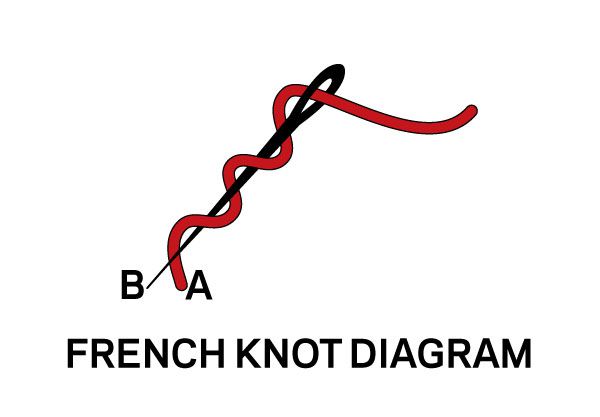
--Draw or embroider the words and add embellishments, such as vines, flowers, or French knots.
--Incorporate one or more extra blocks from the quilt top into the label.
--For a framed finish, bind the label edges like a mini quilt. Sew leftover binding from the quilt around the label edges, then turn the binding over the edge to the wrong side. Hand-stitch the bound label to the backing, taking care not to stitch through to the top.
--To ensure a label can't easily be removed from the quilt, stitch the label to the backing fabric and quilt through it.
Printing by Computer
To print a quilt label directly onto fabric using your computer, look for printer fabric sheets, which feed into an ink-jet printer, in fabric and quilt stores. Or prepare your own fabric using a fixative to ensure the printing will be permanent.
First print the label on paper to ensure the design and words appear as desired and there is room for seam allowances. Follow the manufacturer's instructions for printing, peeling off the paper backing, and setting; then trim the label to the desired size.
To create a custom label design, use word-processing, desktop-publishing, scrapbooking, or label-making software to combine text, photos, and clip art.
Tracing by Hand
Make sure the design you want to trace is dark enough to show through your fabric, or locate a light box or bright window on which to work.
Lay a piece of fabric over a paper printout of the label. With masking tape, anchor the fabric and the paper to your writing surface so it won't shift.
Using a fabric marking pen, trace slowly, drawing a steady line. Darken the lines by tracing over them again, or add color with permanent-ink pens or brushes.
Here are 8 tips for writing on fabric:
2. Select fabric in a color that allows the ink to show. Avoid white-on-white prints because the pattern is painted on the fabric rather than dyed into it.
3. Prewash your fabric (cotton fabrics usually contain sizing, which acts as a barrier to ink penetration).
4. Purchase pens that have permanent ink and are made for use on fabric. A fine point (size 01, .25 millimeter) writes delicately and is less likely to bleed as it writes. Lines can be made thicker by going over them more than once. For larger letters or numbers, a size 05 (.45 millimeter) pen works well.
5. Test the pen on a fabric sample, then follow the manufacturer's directions for setting the ink. Wait 24 hours for the ink to set, then wash the sample as you would the quilt. The extra time it takes to run such a test will pay off in years of durability.
6. If you don't care to use your handwriting or just want to ensure nicely spaced letters, type your words using computer software. Adjust the size and spacing to fit your label size; space out letters a little more than normal to allow for the width of the marker tip. Print out the words onto paper and trace.
7. Practice on fabric scraps first. Write slowly and with a lighter touch than you would normally use when writing on paper. This allows time for the ink to flow into the fabric and lets you control the letters.
8. Stabilize the fabric and create guidelines for words with freezer paper. To do so, cut a piece of freezer paper bigger than the label. Use a ruler and a thick black marker to draw evenly spaced lines on the freezer paper's dull side. Press the shiny side of the freezer paper to the fabric's wrong side with a hot dry iron. After marking on the fabric, peel off the freezer-paper guide.
Make A Signature Quilt Label
This 6" block is a great way to incorporate favorite fabrics from your quilt top into a customized quilt label.
Cut Fabrics
From solid white, cream or tan, cut:
1--2x4-3/4" rectangle
From print No. 1, cut:
1--3-7/8" squares, cutting it in half diagonally for 2 triangles total
From a print No. 2, cut:
2--1-7/8x4-3/4" rectangles
1--3-7/8" square, cutting it in half diagonally for 2 triangles total
From freezer paper cut:
1--2x4-3/4" rectangle
Create Signature Strip
1. Center shiny side of a freezer paper 1-1/2x4-1/4" rectangle on wrong side of a white, cream or tan 2x4-3/4" rectangle.
2. Use a black fine-point permanent marking pen to sign and date fabric side of prepared strip, making sure you don't write in the seam allowances, to make a signature strip. Remove freezer paper.
Assemble and Finish Signature Block
1. Sew print No. 2 rectangles to opposite edges of signature strip (Diagram 1) to make a block center. Press seams toward print. The block center should be 4-3/4" square including seam allowances.
2. Referring to Diagram 2, sew print No. 2 triangles to side edges of block center. Press seams toward triangles.
3. Sew print No. 1 triangles to top and bottom edges of block center to make a label block (Diagram 3). Press seams toward print No. 1 triangles. The block should be 6-1/2" square including seam allowances.
4. Turn under 1/4" seam allowance on each edge. Hand stitch label block to quilt back.
Make A Foundation-Pieced Quilt Label
Even if you only have bits and pieces of fabric left from the quilt top, you can make this 4" square label block to personalize your quilt.
Cut Fabrics
From solid cream, cut:
1--3x5" rectangle
From assorted prints, cut:
6--3" squares
From downloadable pdf (above), cut:
1--Foundation Pattern from paper
Assemble Foundation-Piece Block
1. For one block you'll need one solid cream 3x5" rectangle (signed, if desired); six assorted print 3" squares; and a foundation paper.
2. With wrong sides together, center area No. 1 of a foundation paper over a 3" square (Diagram 1). Remember, this and all subsequent pieces should cover the area within the lines plus 1/4" beyond them. Hold fabric piece No. 1 in place with your fingers, a pin, or a dab from a glue stick.
3. With right sides together, place a second 3" square under first square, aligning raw edges (Diagram 2). With right side of foundation paper up, stitch on line between areas 1 and 2, beginning and ending a few stitches beyond ends of line (Diagram 3). Trim seam allowance to a scant 1/4". Press second square open, pressing seam toward area No. 2. Trim pieces to about 1/4" beyond lines around areas 1 and 2 (Diagram 4).
4. With raw edges aligned and right sides together, position a solid cream 3x5" rectangle under first two pieces. (Signature on solid cream rectangle should be upside down and facing right side of first two prints.) Stitch on line between areas 1, 2, and 3 (Diagram 5). Trim seam allowance and press solid cream piece open. Trim solid cream piece to about 1/4" beyond lines around area No. 3. Add remaining assorted 3" squares in numerical order, trimming and pressing as before, to make a block (Diagram 6).
.................................................................................................................................................................................................................................................................
January 18, 2020
Make More Time to Sew, Even When You are Busy!
We know, we know. You're so busy! When your to-list is a mile long, it's hard to fit in time to sew. We hope these tips will help you fit in more time in your sewing room!
1. Keep your sewing machine, supplies and work in progress out where you can easily get to it. That way, you can sneak in even just five minutes of sewing between other activities.
2. Pack an on-the-go bag of hand projects like EPP, hand-piecing or hand-applique to keep in your car. Squeeze in sewing time in waiting rooms, in line, while riding in the car or public transportation, or while watching your children's /grandchildren's sports events. You can even do this while catching up on your favorite TV shows.
3. Get together with your friends for coffee and sewing! This way you can still catch up with friends, but also both make some progress on a project.
4. Put your phone away. The average American spends more than 3 hours on a smartphone per day. It's easy to get sucked into scrolling through Facebook and Instagram or watching videos online. But if you stepped away from your phone and ignored the notifications, could you fit in more time to sew?
5. Wake up earlier or stay up later. Try setting an alarm 20 minutes earlier each day and getting some sewing time in or do a little bit of sewing right before bed. Sacrificing a little bit of sleep for some "me time" in your sewing room will make you feel refreshed.
If all else fails, skip some of your chores. No one will know that your dishwasher needs unloading, but will always remember the beautiful quilt you made!!
.................................................................................................................................................................................................................................................................................................................................
Welcome to 2020!
|
|
|
|
|
|
|
|
|
|
|
|
|
|
|
|
|
...…...…………......…...………...……….........………………………...…...…………..
December 2, 2019
Stash It
ry Werner
Materials
• 3-1⁄8-yard pieces green florals (exterior)
• 1⁄8 yard green check (exterior)
• 3⁄8 yard green print (exterior and lining)
• 9-1⁄2×30-1⁄2" piece heavyweight fusible interfacing
• 9-1⁄2×30-1⁄2" batting
• Basting spray
Finished container: 5×10×6"
Quantities are for 44⁄45"-wide, 100% cotton fabrics.
Measurements include 1⁄4" seam allowances unless otherwise stated. Sew with right sides together unless otherwise stated.
Cut Fabrics
To make the best use of your fabrics, cut pieces in the following order.
From each green floral, cut:
• 1-1-1⁄2×35" strip
• 1-1-1⁄2×30-1⁄2" strip
From green check, cut:
• 1-1-1⁄2×35" strip
• 1-1-1⁄2×30-1⁄2" strip
From green print, cut:
• 1-9-1⁄2×30-1⁄2" lining rectangle
• 1-1-1⁄2×35" strip
Assemble Container
1. Aligning long edges, sew five 1-1⁄2×35" strips together to make a strip set (Diagram 1). Press seams in one direction. Cut strip set into six 5-1⁄2"-wide segments (Diagram 2).
3. Aligning long edges, sew together one green check and three green floral 1-1⁄2×30-1⁄2" strips, repeating order of fabrics in Step 1 to make container top (Diagram 4). Container top should be 4-1⁄2×30-1⁄2" including seam allowances.
5. Following manufacturer's instructions, press fusible interfacing onto wrong side of green print lining rectangle; let cool.
6. With right sides together, stitch lining rectangle to container exterior along container top. Press seam toward lining.
7. Using basting spray, adhere batting to wrong side of exterior (Diagram 6).
9. With wrong sides together, fold exterior with batting over lining to make a 9"-high tube. Press folded edge and smooth the tube with your hands.
10. Quilt as desired. Designer Meredith McCambridge chose a machine-stippled design.
11. With the lining on the outside, join bottom raw edges with a 1⁄2" seam allowance. Trim seam to 1⁄4" and serge or machine-zigzag-stitch to finish seam.
13. Turn container right side out. Using fabric glue or a hot-glue gun, glue fabric triangles to bottom. For a crisp finish, iron a fold into each of the four vertical corners and along each long side of the bottom.
................................................................................................................................
November 24, 2019
Sweet Tweets
Designer: Wenche Wolff Hatling of Northern Quilts
Materials for One Bird
• 6×12" piece red or white print
• Red or white embroidery floss or 12-weight thread
• 6×12" fusible stabilizer (such as Pellon Ultra Weft)
• Polyester fiberfill
• 10" length of silk ribbon in different colors and widths
• Assorted beads and glass pearls in matching colors
• Water-soluble marker or heat-disappearing pen
Finished ornament: approximate size 3"×4"
Sew with right sides together unless otherwise stated.
Embroider and Assemble Bird
1. Iron fusible stabilizer 6×12" rectangle to wrong side of red or white print 6×12" rectangle.
2. Make a bird pattern and tape to light box or sunny window. Place half of fused rectangle, right side up and centered, on bird pattern; tape in place. Using water-soluble marker or heat-disappearing pen, trace bird outline and embroidery stitches on fused rectangle. Remove fused rectangle. Turn pattern over; trace again on remaining half of fused rectangle to make reversed shape.
4. Cut out each bird shape, adding a 1⁄4" seam allowance all around. Layer birds with right sides together; pin. Sew on drawn line, leaving a 2" opening for turning.
5. Make small cuts in seam allowance for easier turning. Trim seam allowance on beak to 1⁄8", being careful not to cut into seam. Turn bird shape inside out. Use a pencil tip to press out tail and beak.
7. Thread a hand-sewing needle with a doubled strand of sewing thread. At bottom center of bird, take a few backstitches. Thread beads and pearls as desired onto needle. When you reach bead length you want, skip last bead and thread needle up through remaining beads until you reach the fabric. Secure thread with a few knots, then trim.
8. Make a ribbon loop and hand-stitch loop to top center of bird.
Embroidery Stitches
Backstitch
Pull threaded needle up at A. Insert it back into fabric at B, and bring it up at C. Push needle down again at D, and bring it up at E. Continue in same manner to make as many backstitches as needed.
Cross-stitch
Pull threaded needle up at A. Insert it back into fabric at B, bring it up at C, and push it down at D. Repeat to make as many cross-stitches as desired.
French Knot
Pull needle and floss through at point where knot is desired (A). Wrap floss around needle twice without twisting floss. Insert needle tip into fabric at B, 1⁄16" away from A. Gently push wraps down needle to meet fabric. Pull needle and trailing floss through fabric slowly and smoothly. Repeat to make as many French knots as desired.
Lazy Daisy Stitch
Pull needle and floss up at A, and form loop of floss on fabric surface. Holding loop in place, insert needle back into fabric at B, about 1⁄16" away from A. Bring needle tip out at C and cross it over trailing floss, keeping floss as flat as possible. Gently pull needle and trailing floss until loop lies flat against fabric. Push needle through to back at D to secure loop. Repeat to make as many lazy daisy stitches as desired.
Satin Stitch
Pull threaded needle up at A; insert it back into fabric at B. Holding thread out of the way, bring needle back up at C; insert it back into fabric at D. The CD stitch should lie against AB stitch. Continue in same manner, adjusting stitch lengths as needed to cover the desired area from edge to edge.
Star Stitch
Pull threaded needle up at A; insert it back into fabric at B. Bring needle up at C and, crossing over center of AB stitch, push it down D. Pull needle up at E; insert it back into fabric at F. Repeat to make as many star stitches as desired.

